- Joined
- Feb 5, 2015
- Messages
- 662
One of the most common complaints regarding horizontal milling machines is acquiring a good arbor for the cutters. These machines are always old ones and the existing arbors are always bent, even if only .005 or so. I was fortunate in acquiring a beautiful relatively new (1954) German horizontal mill with 1 inch and 7/8 arbors that are straight as an arrow.
But it does take some time changing over tooling with a normal arbor so I devised something a little different. I bought a ER-40 collet chuck with a CAT 40 shank to fit my mill. I envisioned using one inch shafting or drill rod to make an arbor that could be secured in the ER-40 collet and supported at the free end with the normal over arm. There’s nothing particularly unique about this except that I eliminated the large nut that normally clamps the cutter(s) and various spacers.
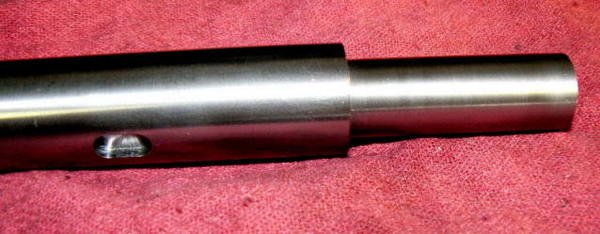
I decided to use a thrust washer against the over arm bearing, and applying pressure using the over arm crank. This system elimates expensive CAT 40 arbors. The new arbor couldn’t be simpler: a length of 1 inch shafting or drill rod, cut to length and slotted for a key (to prevent the cutter from rotating during the cut) and one end turned to fit the over arm bearing..
It took a while before I actually made the arbor but I finally got around to making a short arbor from one inch drill rod to be driven from the previously mentioned CAT 40/ER-40 one inch collet chuck and secured with the end support. The original plan was to use opposing keyways to minimize distortion in the arbor but I decided to try one very short one first. I have less than thirty minutes total into this and it can't get much simpler

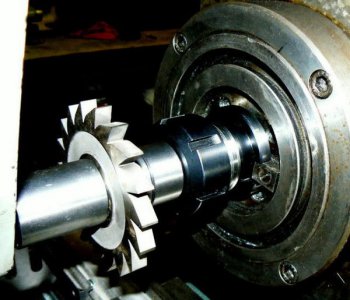
Here's a slotter on the arbor, set up for a test cut.

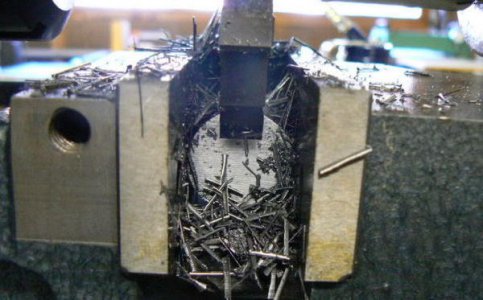
As described earlier, there is no retaining nut, the assembly is held in position by the end-support with slight preload against a thrust bearing (no helical cutters = no appreciable side loading). Here's the test cut.

The idea is to end up with a half-dozen short arbors permanently loaded with common slotters (and a couple of slitting saws) for light work. … so far, so good … takes about one minute to change cutters. Before making any more arbors, I'll use this one for a while, checking runout occasionally to see if the arbor distorts with age and use.
A cautionary note: the ER-40 collet requires a LOT of clamping pressure to transmit the torque required by larger cutters. I welded a one foot length of 1/8 black pipe to the handle of the spanner wrench normally used to tighten the collet holder. Placing the mill in back gear and applying some grunt, the cutters can be held securely.
Even so, for safety sake, I usually traverse the table manually, rather than using the power feed, so that I can feel if something is amiss. Of course with the conventional CAT 40 arbors, power feed is not a problem.
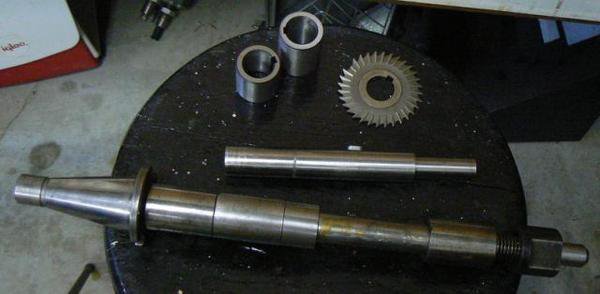
Here is a photo depicting a normal CAT 40 arbor at the bottom of the picture, with a couple of spacers loaded on it. In the upper part of the photo, the new short arbor is shown. I made it short for stiffness but there's no reason why it can't be as long as a standard arbor.

Loading and unloading tooling on this arbor takes less than 1/4 the time required for a conventional arbor.
But it does take some time changing over tooling with a normal arbor so I devised something a little different. I bought a ER-40 collet chuck with a CAT 40 shank to fit my mill. I envisioned using one inch shafting or drill rod to make an arbor that could be secured in the ER-40 collet and supported at the free end with the normal over arm. There’s nothing particularly unique about this except that I eliminated the large nut that normally clamps the cutter(s) and various spacers.
I decided to use a thrust washer against the over arm bearing, and applying pressure using the over arm crank. This system elimates expensive CAT 40 arbors. The new arbor couldn’t be simpler: a length of 1 inch shafting or drill rod, cut to length and slotted for a key (to prevent the cutter from rotating during the cut) and one end turned to fit the over arm bearing..
It took a while before I actually made the arbor but I finally got around to making a short arbor from one inch drill rod to be driven from the previously mentioned CAT 40/ER-40 one inch collet chuck and secured with the end support. The original plan was to use opposing keyways to minimize distortion in the arbor but I decided to try one very short one first. I have less than thirty minutes total into this and it can't get much simpler

Here's a slotter on the arbor, set up for a test cut.

As described earlier, there is no retaining nut, the assembly is held in position by the end-support with slight preload against a thrust bearing (no helical cutters = no appreciable side loading). Here's the test cut.

The idea is to end up with a half-dozen short arbors permanently loaded with common slotters (and a couple of slitting saws) for light work. … so far, so good … takes about one minute to change cutters. Before making any more arbors, I'll use this one for a while, checking runout occasionally to see if the arbor distorts with age and use.
A cautionary note: the ER-40 collet requires a LOT of clamping pressure to transmit the torque required by larger cutters. I welded a one foot length of 1/8 black pipe to the handle of the spanner wrench normally used to tighten the collet holder. Placing the mill in back gear and applying some grunt, the cutters can be held securely.
Even so, for safety sake, I usually traverse the table manually, rather than using the power feed, so that I can feel if something is amiss. Of course with the conventional CAT 40 arbors, power feed is not a problem.
Here is a photo depicting a normal CAT 40 arbor at the bottom of the picture, with a couple of spacers loaded on it. In the upper part of the photo, the new short arbor is shown. I made it short for stiffness but there's no reason why it can't be as long as a standard arbor.

Loading and unloading tooling on this arbor takes less than 1/4 the time required for a conventional arbor.
Last edited:

