- Joined
- Sep 22, 2010
- Messages
- 7,223
The first step in removing the spindle is to unplug the machine and remove the chuck. Next remove the gear cover by loosening the grub screw and lifting it off.
Then remove any gears on the banjo and the lead screw. Tip the banjo up so you can access the two screws holding on the circular guard, remove it and set it aside. Tip the banjo back and out of the way.
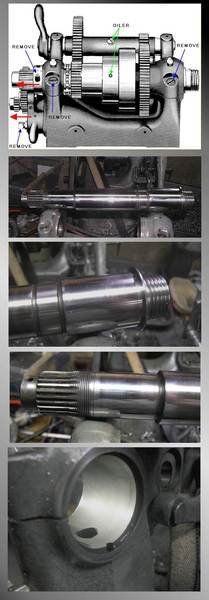
Refer to the next image and remove the indicated screws. The reverse gear toggle assembly pulls out of its socket in the head stock after the square head grub screw is removed. Remove the locking screw on the threaded spindle collar and unscrew it from the left of the spindle.
Place a board on the ways to prevent any chance of dropping the spindle on the ways. Using a block of wood, tap on the left end of the spindle to disengage it from the keyed bull gear and slide it out of the head stock. You may have to give it a good whack to get it started but there is no possibility of damage when driving it in this direction.
Inspect for wear, damage etc. Notice below that only the very finest scratches and some burnishing are present. No remediation is required and the cast iron bores on the head stock are just as good.

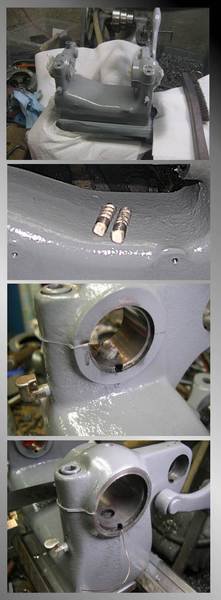
Since it was all apart you can freshen up the paint using some very fast drying Krylon medium gray. I thoroughly cleaned it with, what else, trichloretheylene before painting.
Next was to make up some new felts for the oiler reservoirs. The old ones were in surprisingly good condition but since it is all apart new ones were provided. I used machinery felt obtained from a machinery manufacturer.
Installing the felts requires that they be held out of the way of the spindle as it is replaced. The cast iron bores have oil return passages on both sides. Soak the felts in spindle oil until saturated and drop into place. A stiff wire, in this case mig wire, may be used to hold the felts down and out of the way. Depress the felt with a hex wrench and slide the wire into the felt. Put the wire on the outside on each end where it can be removed easily when the spindle is part way installed.
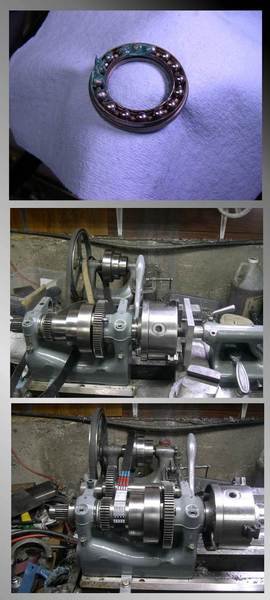
Clean and relube the thrust bearing with some wheel bearing grease. Then assemble the stack of the bull gearand the step pulley and install the spindle placing the thrust bearing when possible. Push the spindle into place until the key contacts the bull gear. Then pull out the wires holding the felts.
Turn the bull gear until you feel the key catch the key slot. No hammering is allowed in this direction because it will damage the thrust bearing. Instead, bring up the tail stock, mount the chuck to close up the distance and with a board or plate use the tailstock to press the spindle in place. Then replace the threaded collar, not forgetting the bearing shim. Tighten it very tight and then back it off until just slightly loose. You may need to use a punch to loosen after tightening. Punch against the excess threads on the side of the hole away from the securing screw head. This is a slightly fiddly adjustment because it tightens slightly when the screw is tightened. It should not produce any additional friction but it also shouldn't be loose.
Now is the time to replace the shims if necessary. There should be no perceptible looseness to the spindle at either end when a bar is installed in the chuck and used to lever it in every direction with the shims clamped down tight. However, the spindle should also turn freely at least a full turn when spun by hand.

Don't forget to put the belt in place before installing the spindle. If you are also changing the belt you will need to remove the back gear assembly too. It has a holding/engagement adjusting screw under the left end casting that must be removed. There is also a grub screw under the right end casting that must be loosened. You may run into some difficulty in the next part. There is a tapered pin on the right end that holds an eccentric cam in place on the back gear shaft. If you can't drive it out, drill it and replace it with a roll pin. It isn't hardened and drills very easily.
All said and done except for replacing the left end parts. This is an easy job if the spindle is in good shape.

If the spindle has some slight damage then the cast iron bores will too. They can be cleaned up with a brake cylinder hone and the spindle polished with some emery if the damage isn't great. It isn't the optimum solution but it will prevent further damage and the lathe will be very usable as long as the shims are properly adjusted.
Then remove any gears on the banjo and the lead screw. Tip the banjo up so you can access the two screws holding on the circular guard, remove it and set it aside. Tip the banjo back and out of the way.
Refer to the next image and remove the indicated screws. The reverse gear toggle assembly pulls out of its socket in the head stock after the square head grub screw is removed. Remove the locking screw on the threaded spindle collar and unscrew it from the left of the spindle.
Place a board on the ways to prevent any chance of dropping the spindle on the ways. Using a block of wood, tap on the left end of the spindle to disengage it from the keyed bull gear and slide it out of the head stock. You may have to give it a good whack to get it started but there is no possibility of damage when driving it in this direction.
Inspect for wear, damage etc. Notice below that only the very finest scratches and some burnishing are present. No remediation is required and the cast iron bores on the head stock are just as good.

Since it was all apart you can freshen up the paint using some very fast drying Krylon medium gray. I thoroughly cleaned it with, what else, trichloretheylene before painting.
Next was to make up some new felts for the oiler reservoirs. The old ones were in surprisingly good condition but since it is all apart new ones were provided. I used machinery felt obtained from a machinery manufacturer.
Installing the felts requires that they be held out of the way of the spindle as it is replaced. The cast iron bores have oil return passages on both sides. Soak the felts in spindle oil until saturated and drop into place. A stiff wire, in this case mig wire, may be used to hold the felts down and out of the way. Depress the felt with a hex wrench and slide the wire into the felt. Put the wire on the outside on each end where it can be removed easily when the spindle is part way installed.
Clean and relube the thrust bearing with some wheel bearing grease. Then assemble the stack of the bull gearand the step pulley and install the spindle placing the thrust bearing when possible. Push the spindle into place until the key contacts the bull gear. Then pull out the wires holding the felts.
Turn the bull gear until you feel the key catch the key slot. No hammering is allowed in this direction because it will damage the thrust bearing. Instead, bring up the tail stock, mount the chuck to close up the distance and with a board or plate use the tailstock to press the spindle in place. Then replace the threaded collar, not forgetting the bearing shim. Tighten it very tight and then back it off until just slightly loose. You may need to use a punch to loosen after tightening. Punch against the excess threads on the side of the hole away from the securing screw head. This is a slightly fiddly adjustment because it tightens slightly when the screw is tightened. It should not produce any additional friction but it also shouldn't be loose.
Now is the time to replace the shims if necessary. There should be no perceptible looseness to the spindle at either end when a bar is installed in the chuck and used to lever it in every direction with the shims clamped down tight. However, the spindle should also turn freely at least a full turn when spun by hand.

Don't forget to put the belt in place before installing the spindle. If you are also changing the belt you will need to remove the back gear assembly too. It has a holding/engagement adjusting screw under the left end casting that must be removed. There is also a grub screw under the right end casting that must be loosened. You may run into some difficulty in the next part. There is a tapered pin on the right end that holds an eccentric cam in place on the back gear shaft. If you can't drive it out, drill it and replace it with a roll pin. It isn't hardened and drills very easily.
All said and done except for replacing the left end parts. This is an easy job if the spindle is in good shape.

If the spindle has some slight damage then the cast iron bores will too. They can be cleaned up with a brake cylinder hone and the spindle polished with some emery if the damage isn't great. It isn't the optimum solution but it will prevent further damage and the lathe will be very usable as long as the shims are properly adjusted.
Last edited by a moderator:

