100 year old South Bend 34 Rustoration

Not a lot done today, but I did get the chuck off the end of the spindle, and the missing back gear lock nut has been recovered from inside the pulley and restored to its correct location.
 
If your pocketbook starts to get a bit thin from paying enormous prices for Evaporust, try some white vinegar. Works the same and costs about 5 times less. :)
 
so tonight was finishing the engraving on the dial, punching on the numbers (once i had found the small number punches that werent reversed, and then using a paint pen to highlight the lines and numbersIMG_3638.JPG

IMG_3639.JPG
 
so how much per division I asked myself, 100 divisions on the wheel, and the cross slide measured out at 10TPI, so each division is 1 thou, thetop slide came out at 12 TPI and the lead screw at 8TPI (notes for my later self)
1 thou per division is about what I expected, but whether I use these or not, its nice to know and easy to work with (unlike my mill at 0.02mm per division and 80 divisons per turn, with 0.025mm and 36 divisions on the quill)
 
so yesterday it was tackling the cleanup of the apron, it was carefully disassembled as far as possible (since I could not release most of the clutch gearing as i waited until i had removed everything else and couldnt get a grip on it, anyway parts will be cleaned up and reassembled todayIMG_3640.JPGIMG_3642.JPGIMG_3644.JPGIMG_3650.JPGIMG_3651.JPGIMG_3652.JPGIMG_3653.JPG
I will insert a note here that to remove one of the gears the oiler tube has to be rotated slightly out of the way
IMG_3654.JPGIMG_3655.JPG

one thing i am finding as i work through this lathe is that just about every oiling hole is bunged full of black paint, however despite this the machine seems to have been kept well oiled for the most part.
 

Attachments

  • IMG_3649.JPG
    IMG_3649.JPG
    3.4 MB · Views: 6
today was quite productive, the apron parts were cleaned up and it was reassembled, then it was the turn of the headstock to be cleaned up.IMG_3657.JPG
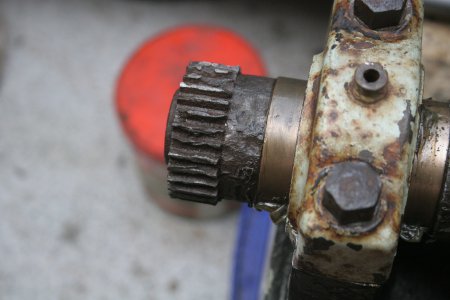
This is the gear that the handwheel drives, it still functions although there is a fair amount of damage to the teeth, to be honest I cant think how that might have happened.IMG_3658.JPGIMG_3659.JPG
The two half nuts, now I dont know how much engagement there should be , but these look a bit worn - well I suppose it could have been well used in 100 years.
IMG_3662.JPGIMG_3663.JPG
The rerassembled Apron, nicely cleaned up and greased on reassembly.
IMG_3664.JPG
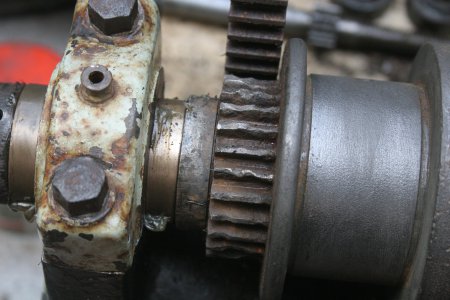
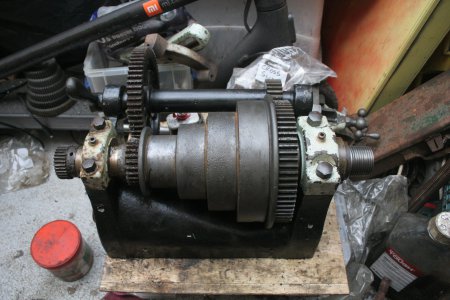
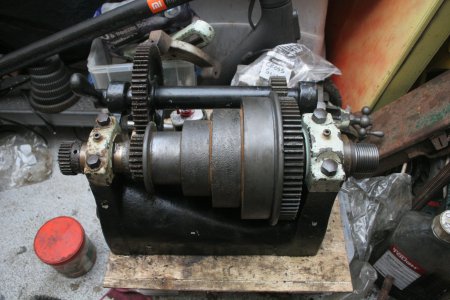
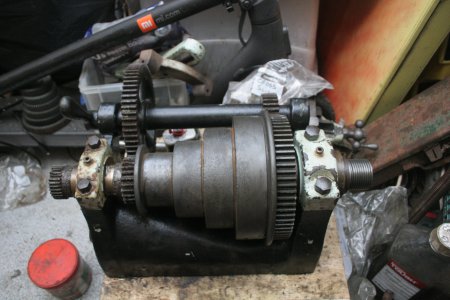
the backgear driven gear on the left end of the spindle is not in the best of shape, it does however work smoothly.IMG_3665.JPG
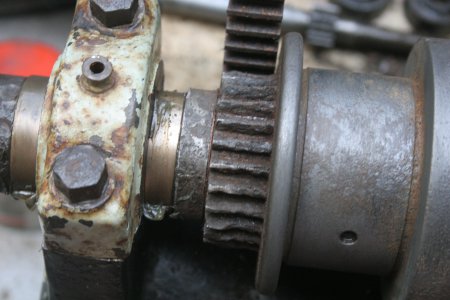
the gear on the end of the spindle is worse if that was possible, yet after cleaning the dirt out of the spaces between the teeth, it still meshes and runs smoothly to my amazement.IMG_3669.JPG
the reassembled headstock.IMG_3673.JPG
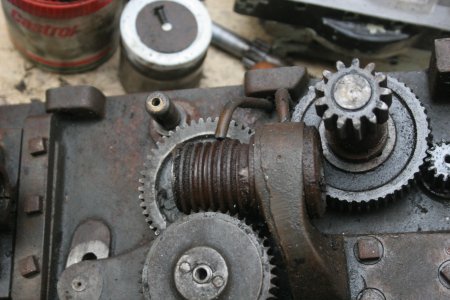
I also reassembled the reverse gear, all except the nut, this was the thread that i managed to split in half down the centre, and then flatten out with the copper hammer, this thread will need to be reformed or the part remade.
I do have an option, and that is to repair it the same as the lead screw end thread has been repaired, at some point in its history the threaded section of the lead screw was broken, as someone has drilled in from the end, and tapped the new thread in for a length and pinned it in place, I think this may be a route I may investigate for replacing this thread. either by making a stepped stud with a smaller thread to fit into the part, or possible I may just end up drilling and tapping for a cap screw and washer, i have yet to decide the solution.
 

Attachments

  • IMG_3666.JPG
    IMG_3666.JPG
    3.2 MB · Views: 6
  • IMG_3667.JPG
    IMG_3667.JPG
    3.6 MB · Views: 6
  • IMG_3668.JPG
    IMG_3668.JPG
    3.3 MB · Views: 6
  • IMG_3670.JPG
    IMG_3670.JPG
    3.5 MB · Views: 5
  • IMG_3671.JPG
    IMG_3671.JPG
    3.5 MB · Views: 6
  • IMG_3672.JPG
    IMG_3672.JPG
    3.3 MB · Views: 6
IMG_3675.JPG
Here the previous repair to the lead screw, this has broken into the slot for the key
 
dang, that lathe has had a hard life! Good to see that it's getting some TLC.

The handwheel gear damage is probably from someone trying to shift from powerfeed to halfnut feed or something similar. Check to see that there's a small key between the halfnuts and the feed selector lever - I can't remember where it is exactly but it prevents the halfnuts being closed when powerfeed is selected.

Unfortunately your halfnuts are toast. Check out XRF's thread on bronze filled epoxy and other threads on delrin nuts, you should be able to repair them with a bit of care and ingenuity.
 
I was afraid that might be the case, however I have formulated a plan, I think I may try to create a 3d model for the half nuts and 3d print a set in ABS, I think part of the problem is the keyway on the lead screw, that must act as a giant single flute tap on the material of the half nut, I might make the drive pin for the half nut out od steel though as that looks to take a fair amount of lateral force, then it will just be a matter of arranging the print layer direction correctly, I have nothing to lose so it must be worth a try.
 
Back
Top