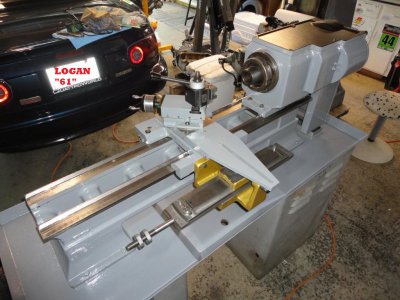
My Logan 12x24 lathe project

Now for something completely different...

No, not a man with three buttocks. (with respect to Monty Python)

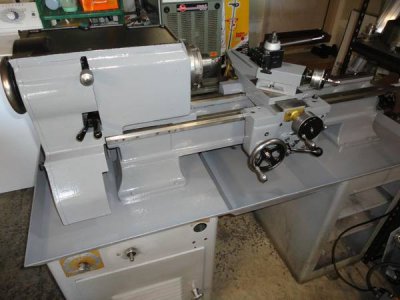
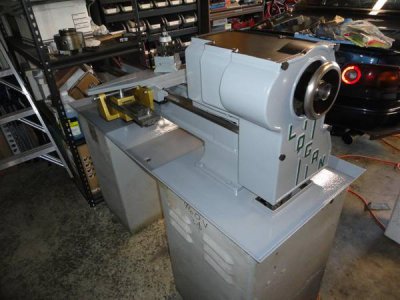
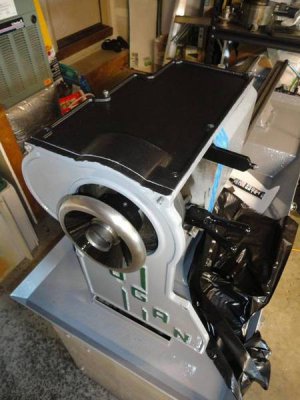
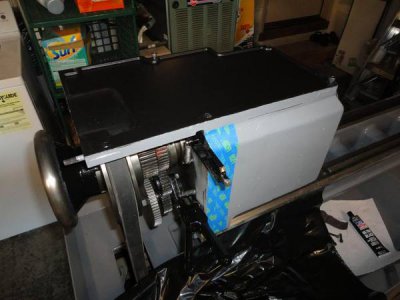
I decided I'd try something I hadn't seen done with the top cover on the lathe. I have a tendency to put tools (chuck key, wrenches, etc) on the top of the lathe so they're right at hand. After going to the trouble to paint this thing I didn't want it to immediately get all chipped, so I started thinking about how I could keep that from happening.

Plastidip to the rescue! I'd been meaning to try this on something and it seemed to fit the bill. Nice tactile rubber surface so tools won't chip, easy to clean, and even a little sound deadening. Not sure if I had an original idea or not but this is the first time I've seen this done. Also painted the back gear and feed reverse levers and the lockup handwheel on the end of the spindle. In the top pic the end cover isn't on tight hence the gray line. I may put a little satin black on the faces so there can't be a line when it's assembled.
DSC04244_zps10077ee9.jpg

DSC04239_zpseb76bc77.jpg

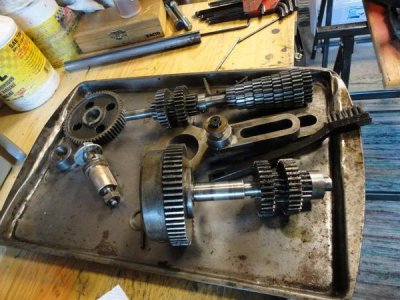
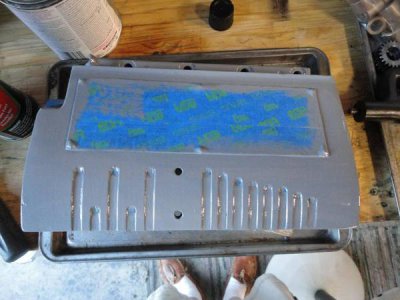
I've also gotten more done on the QC box. My parts (finally) got here from Logan, I stripped and started painting the QC casting, and did a first pass through cleaning the gearsets and such.

Casting after a couple coats...
DSC04241_zpsf5f7badf.jpg

parts semi-clean...

DSC04242_zps0e2469e0.jpg


Hopefully I can get this back together before my folks show up for a visit in a couple weeks... I want them to see the before pic then the real thing the way it looks assembled. Not sure if I have enough time :panic:
 
Looking good!

It'll be interesting to see how that PlastiDip holds up. How did you apply it?

Steve
 
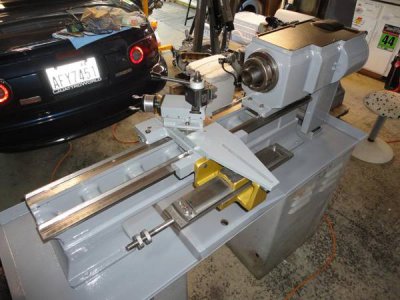
Made some more progress today... cleaned the undersides of the ways and put the rack back in place. Put all the belt covers back on, put the saddle/cross slide/tape attachment back on. The back cover was originally held on with nice thumbscrews, which of course are long gone. When I got the lathe the cover was held on with a motley collection of bolts and nuts. I went down to the local hardware store hoping to find thumbscrews but was only able to find the plastic covers that you put on an allen bolt so bought enough to put the cover on for now. Later when it's running I'll make some proper ones.

More pics...

DSC04249_zps038efddb.jpg

DSC04252_zps4f0870a0.jpg

DSC04253_zpsf543e962.jpg

Now to finish up the quickchange box so I can reinstall it, finish cleaning/painting the lower cabinet and tailstock, then wire it up.
 
Man she's looking really good! Excellent work sir. I am really enjoying watching this one come together. We appreciate you taking the time to post pics.
 
Man she's looking really good! Excellent work sir. I am really enjoying watching this one come together. We appreciate you taking the time to post pics.

I agree! These lathes seem to be somewhat rare. There are all sorts of Logan 9 and 10 inch around these parts (B'ham, AL) but I have not seen any of the larger Logans. There are a lot of South Bend 14 and up if you can pry them from the owners hands. My experience with my Logan 10 inch has been excellent, I think it performs as well as a South Bend 10 heavy, just a little different in the design.

Looking great and my thanks, too, for the posts. G Morgan
 
Thanks guys, it's been a lot of work but it will be worth it. Glad you're liking the pics, I try to document what I do... kind of a habit from doing auto restorations. The more pics you take the less time you spend putting things back together 6 months later. Next up after this... my Bridgeport clone (which needs wayyyyy more work than the lathe did).
 
WOW! You almost convince me to paint mine! Lucky the original finish still look good enough after a good cleaning.

For those interested This Logan 12" use the same bed as the 11" or 10" Logan, Only the headstock made them a totally different "animal", but the version wearing Powermatic green color is the best of the bunch...
 
One of the things that had me a bit worried on this lathe was the fact that the crossfeed dial is super hard to read. I've used a solid paint stick to renovate dials at work a bunch of times in the past with great success, but it wasn't working in this case due to the lack of depth of the lines on the dial (same thing that makes them really hard to read). A new dial from Logan is about $150 and given the the line depth looks like it was that way from new there's no saying a new dial would fix the issue.

I've run machines without a DRO in the past, but my formal training (4 year apprenticeship) and professional experience was all in an industrial environment where everything has a DRO. That said, I just couldn't justify spending over 50% of what the lathe cost on even the cheapest Chinese DRO setups (~$450). So while trying to decide what to do I ran across this... http://www.hobby-machinist.com/showthread.php/15763-DRO-s-Available . While they're sort of a pain due to them shutting off automatically, having batteries, and having to deal with multiple displays I figured they were better than nothing.

Then I found this thread... http://www.hobby-machinist.com/showthread.php/16601-Input-needed-on-my-wireless-DRO-project ... I downloaded the app to the Nook HD+ tablet I already own and played with it a bit. Super easy to read, completely flexible from a feature standpoint (Yuriy is currently adding hole layout/setup and RPM functions as a for instance) and I'm never locked into where the display is at, as long as it's in range of the Bluetooth. If it's in the way I just move it... if a new feature comes out I just update the software (and maybe hardware in the case of RPM).

I've now ordered enough scales to do both the lathe and the mill, and the parts to build the boxes (Launchpad based for mine). Total cost with scales is under $250 for both machines, would be about $400 if I bought another tablet to have one dedicated to just using for the DRO. So I'll have a 2-axis DRO on the lathe, and a 3-axis on the mill for less than the price of one of the cheapest dedicated DRO's. It also fixes the auto-shutoff, battery, and multiple display unit issues that bothered me about the base iGaging scales.

This is why I love these forums... people sharing their ideas to everyones benefit.
 
Very nice job you do awesome work . While you were gone the state sent your new license plate enjoy .

Bob

logan.jpg
 
Back
Top