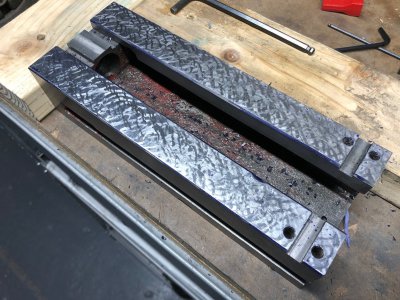
Scraping my Shars 4" Milling Vise

That's a great idea and I've been meaning to do that. Maybe tonight I can try it out at a few different extensions and get a rough idea of flatness.

Even if it is only true within 0.0005" (it better be a lot better than that) it is still a very accurate tool.
I binge-watched all the videos about measuring and surface lapping a plate. This is one of those things where you can, in principle, use self-proving methods to get to any accuracy, though when the plate is within 50 millionths, you can get to the point where you can't improve it, and the more you lap, the flatter becomes your lapping tool instead.

Way, way before that point, you have a plate that will be about 0.0002 in it's worst local measure, and maybe 0.0001 over 80% to 90% of what you would use. Making various versions of repeat-o-meters has the excellent design fro Robin Renzetti (ROBRENZ) among them, and various other projects with improvements that acknowledge his version. They are all quite make-able.

The procedures, and what you do to fix I got from Abom79 "Lapping my Granite Surface Plate to AA Grade"
I am quite sure none of us have to do all this to have a surface plate good enough to fix a vise. Most of us rarely need to make something to within 0.0002 absolute. Even if we make a lapped fit to fine limits, it usually only has to fit relative.

Back before pandemic, I scored a nice granite surface plate freebie, on a stand. I plan to use it, but like you, I would rather like to know exactly how it stands up to measurement.

I've watched all those videos too :)

I'd love to get into that, but there is a good deal of expense in making/buying the repeat-o-meter and/or an autocollimator. If I could pay $100 and sneak my plate into a batch getting lapped at a local shop I would totally do that. I've also reached out to a local calibrator to get a quote. Otherwise I've been eyeing up a Shars AA plate for $150. You get the same issue with unknown flatness, but Shars has been good to be and I trust their products pretty well.

I can also tell the quality of granite that mine is made from is inferior to the granite I have seen the plates in the metrology lab I used to work in be made out of. The crystals are quite large. But... It was <$100 and I picked it up locally so I can't complain much. Probably still better than the old Starrett plates I see at the industrial surplus places.
 
@macardoso : You and I seem to be riding the same trail here.
You can get up to tricks to duck having to do the 3-plate method, make up laps, and all that, An ordinary piece of plywood can hold three bolts stable enough to let you know even 0.0001 has touched. It can be circular, trianglar, square, or random shaped like a dog's hind leg, so long as it has 3 pointed bolts set into nuts on the ply, and all about the same length. Then a central fine thread bolt in a nyloc nut, and put a disc with degree markings on it, and set a pointer, Fancy is to print the protractor. Fine gel pen in a compass also works. This is a "flat" version of a spherometer.

A small type, that can span the surface plate in about 4 or 5 overlapping halves can be used along diagonals, and "Union Jack" lines for local up/down.

The neat trick is to make one that is a bit larger than half the span of the surface. Adjust it down until it only just squeaks to spin.
Leave at that setting, and move to the other end of the plate. If the plate is flat, it will still be at the spin point. With a gentle touch, less than 0.0001 can be felt. There is a 2-bolt version of this also, but the 3-bolt + centre is the "kinematic" spherometer.

I plan to play with one of these :)

[Edit: BTW - how big is the Shar's plate? ]
 
Last edited:
I thought an Englander would be quick to point out the Union Flag is only a Jack when it's flown on a ship. Or so I've been schooled at the pub.

I'm sorry your Shars vise is such a potato chip. My Shars 5" is so straight that I refused to sell it with my "little" mill. I'm keeping that vise! I bought my granite surface from KBC (because the shipping was way cheaper and I had a holiday %-off coupon) but I think their surfaces all come from the same supplier. I also think the import granite is softer than the pink Starrett surfaces or the hard, slate-colored surfaces you'd see in a commercial shop. But I'm just one guy, so I don't expect I'll wear it out of spec in my lifetime.
I guess my failing was that I was not originally Englander with the island nautical (and somewhat isolationist) mentality. Instead, I was an ex-Colonial from far enough inland not to care. You are right, it is the Union Flag, regardless the Union is now somewhat strained. The "Jack" was on ships. Sailors were also known as "Jack Tars". When I settled in UK, I discovered one is expected to know when it is upside down as a distress signal. There is a slight asymmetry when the Scotland cross of St Andrew is overlaid with the Irish red cross of St Patrick.

There is some argument as to it being called so because it was flown from the jackstaff. Parliament has decreed that "Jack" is shortened reference to "Jacobus" of the Kings James and that the term "Union Jack" can be used on land.

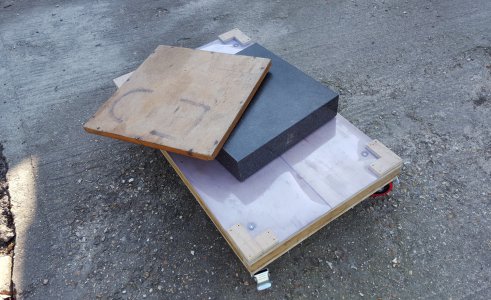
I do want to check out my freebie surface stone, acquired because it was replaced after "someone dropped something on it".

GraniteBlock3.jpg

I have found the "ding". Quite hard to spot it without a bit of searching. It hardly looks like that tiny hole will affect anything I would be using it for. It's 18" square and came with the stand. Definitely my vise will be checked out on it!
 
Last edited:
I have found the "ding". Quite hard to spot it without a bit of searching. It hardly looks like that tiny hole will affect anything I would be using it for. It's 18" square and came with the stand. Definitely my vise will be checked out on it!
granite surface plates don't raise burrs due to impact, small bits of spalling are low points and don't really affect overall accuracy
a cast iron surface plate will raise burs under the same impact
 
I’m trying to understand , so over time the vise got bowed, from use or another reason ? If the bottom isnt flat then the bed (? ) of the vise be bowed too ?
 
I hate to say it - but. Check out the bed. Even without a straight edge reference, there are things you can do, with a DTI, and a level.
 
You can get up to tricks to duck having to do the 3-plate method, make up laps, and all that, An ordinary piece of plywood can hold three bolts stable enough to let you know even 0.0001 has touched. It can be circular, trianglar, square, or random shaped like a dog's hind leg, so long as it has 3 pointed bolts set into nuts on the ply, and all about the same length. Then a central fine thread bolt in a nyloc nut, and put a disc with degree markings on it, and set a pointer, Fancy is to print the protractor. Fine gel pen in a compass also works. This is a "flat" version of a spherometer.

A small type, that can span the surface plate in about 4 or 5 overlapping halves can be used along diagonals, and "Union Jack" lines for local up/down.

The neat trick is to make one that is a bit larger than half the span of the surface. Adjust it down until it only just squeaks to spin.
Leave at that setting, and move to the other end of the plate. If the plate is flat, it will still be at the spin point. With a gentle touch, less than 0.0001 can be felt. There is a 2-bolt version of this also, but the 3-bolt + centre is the "kinematic" spherometer.

I plan to play with one of these :)

I did the poor mans repeat-o-meter last night on the half of the plate which was not covered in Dykem. I have an Interapid tenths indicator. Total reading was about 0.0002-0.0003" so not bad. my indicator base could probably use a light scrape or lapping job to get it sitting real flat too. Next time I clean off all the blue I'll check the other side.

[Edit: BTW - how big is the Shar's plate? ]

This plate was from JTS machinery in Cleveland - now out of business. It is a no-name import plate 18x24x3. At 150 lbs it was the heaviest I could carry around or lift onto the bench. I need a stand for it.

I’m trying to understand , so over time the vise got bowed, from use or another reason ? If the bottom isnt flat then the bed (? ) of the vise be bowed too ?

One word - China. The vise has likely been like this since I got it. My next post will cover it better, but the top was bowed as well but in the opposite direction so it is not bent, just bad grinding.

I hate to say it - but. Check out the bed. Even without a straight edge reference, there are things you can do, with a DTI, and a level.

Yup, I had to do that. Will write about it in my next post but I couldn't get my measurements to stabilize when scraping the bottom and it was because the bed of the vise was also very crooked.
 
Did about another hour of scraping on the bottom and I am getting pretty comfortable getting a good bluing. The hinging method helped my identify when I was getting convexity in the middle and I could preferentially scrape to resolve this issue.

In the image below, I am trying to scrape only the areas needed to resolve the side to side taper and the convexity of the bottom.
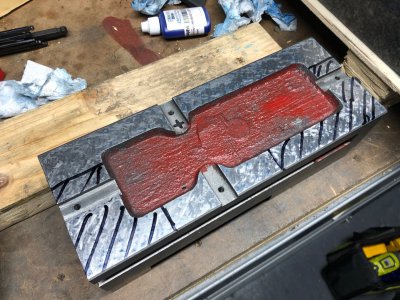
image004.jpg

I worked at this for a while but just could not get consistent measurements on the parallelism of the bed to the bottom. I figured the bed must also be twisted, so I disassembled and cleaned the vise to prepare for scraping.
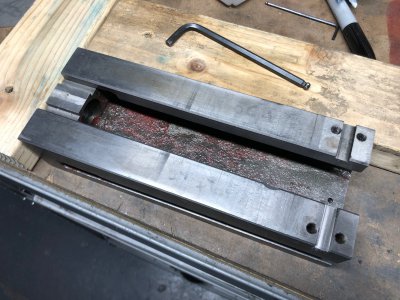
image005.jpg

Here is an initial blue up. Somewhat as expected as there was a lot of raised material around the tapped holes. I wonder if they were drilled and tapped after grinding? Anyways, I figured at this point that the blue on the left side of the picture was just a false reading due to the part being lifted at the threaded holes, but later on I realized that the left edge was significantly raised up in comparison to the rest of the bed.
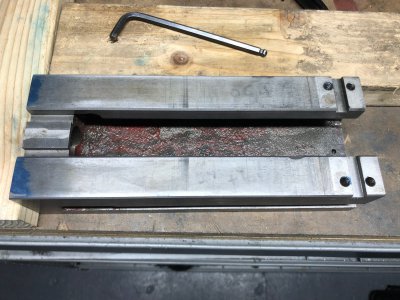
image006.jpg

Since it is hard to get a good bluing on surface ground finishes, I used layout fluid to paint the top surface. I then executed two scraping passes to texture the surface, looking for even scrape patterning and spacing (thus scraping "straight down")
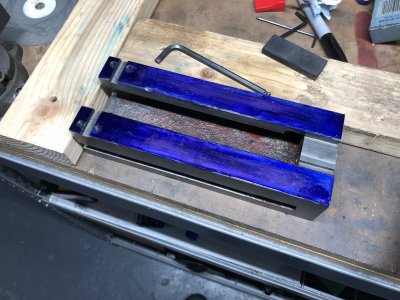
image008.jpg

Here is what that looked like.

image009.jpg

I spent another hour trying to develop this surface down to flat. Here is a summary of what I have discovered in the part geometry.

Bottom not flat: bottom was concave (banana shaped) by roughly 0.003"
Bottom not parallel to bed: after developing the bottom to be flat, a widthwise taper of ~0.0006" and a lengthwise taper of ~0.0002" were present.
Bed not flat: bed is concave by roughly 0.003"
Bed rails not flat: each rail has a concavity along the length (like a half pipe) of roughly 0.0008"

I made a lot of progress towards getting this flat. Probably would be done by now if I didn't make mistakes - more on that later. I would guess one more hour to get it flat, one hour to high point to decent bearing, and one hour to get the bottom parallel to the top.

Each cycle looks like this:
1) Examine bluing (use sharpie to mark exclusion zones if needed)
2) Scrape bluing
3) Dust off chips
4) Wipe clean with alcohol
5) Stone lightly with a fine india stone
6) wipe clean with alcohol
7) Clean off dust with light compressed air
8) Use brayer to smooth out the blue on the plate
9) Print part with blue

During the latter part of roughing in the bed I got impatient and thought to try a bench stone to hit off the high spots. I only gave it maybe a dozen swipes, but I did a lot of damage in that short action. If you can see in the image below, the outside edges of the bed rails got rolled off very quickly (they were even high before stoning). This is going to require several scraping passes to drop the surface down to the level of the edges that got stoned. Probably cost me at least an hour of work in only 15 seconds - ugh. I called it a night here.
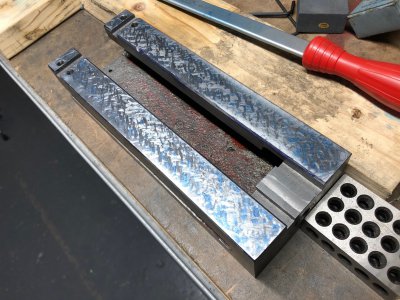
image011.jpg

What I learned on day 2 of scraping:

1) It is very easy to get dirt, dust, and grit in your blue on the plate. When you do, you typically have to remove a ton of blue and start over. I had to develop and good strategy of cleaning the part before bluing it. The scraping chips fall into the vise body during scraping and then fall onto the plate when it is inverted. The extra cleaning time is much better than constantly needing to wipe off the blue and start over.

2) A rubber brayer does a good job of picking up a bit of dust and grit from the blue on the surface plate. The dust sticks better to the rubber roller than the plate. Keeping the brayer clean and rolling it over the blue at least every few cycles helps keep the plate clean.

3) Bench stones have no place in scraping. A fine india hard arkansas stone or a precision ground flat stone (PFG) is the only option for deburring.

4) You need to rough scrape longer than you think. I keep switching to going after high points long before the surface is flat or geometrically correct.

5) Hinging is really important for determining surface flatness.

6) Carbide hand scrapers require more frequent sharpening than expected. I notice the edge does not cut as easily after 4-5 cycles. 2-3 swipes on 1500 grit diamond gets it back to sharp. I can visually see if the blade is dull by if there is any light reflected from the corner of the blade. Even the faintest sliver indicates dullness.

7) Scraping near edges and holes is very tricky. It is hard to get yourself to cut deep enough just inside from the edge, but not roll over the edge.

I do think that a few more hours will get this much better than what I started with. On my next scraping attempt, I expect to be 25% more efficient if I can avoid the same mistakes I've done here.
 
Last edited:
Back
Top