2015 POTD Thread Archive

In appreciation for taking care of our home while we were in Europe for six weeks last year, we decided to make a brass plaque for our neighbors. The plaque measures 6.5 x 8.25 x .25 and has an old Chinese proverb that describes our neighbors.

Rather than just put the English proverb on the plaque, I decided to put the Chinese characters as well. I found an on-line site that does English to Chinese translations and got the nine Chinese characters that loosely translate to the English.

The characters were copied into an MS Word document. Word seemed to think that they were a font, in fact Times New Roman. "OK", I thought, "this is going to be easy". I then tried pasting them into a SolidWorks sketch. However SolidWorks didn't know how to configure them so just gave question marks instead of the characters. After a number of unsucessful attempts at placing the "text" into SolidWorks, I found an on-line software package called "Inkscape" that could convert a raster image to a vector image that SolidWorks could understand. Each character was individually blown up to full page size in Word and save as a png file. That file was imported into Inkscape and converted to a dxf file. The dxf images were then dropped into a SolidWorks sketch. The conversion is usually imperfect with overlapping lines and breaks. These were manually cleaned up to create a sketch that could be used to make a 3D model.

Chinese characters are drawn with a brush and the strokes have varying widths often ending in a sharp point. Milling with a conventional endmill will leave a rounded feature instead of a sharp. To get around this problem, a 45o angle carbide engraving tool was used. Unfortunately, SolidWorks (or at least I) could not create the 22.5o feature. The SprutCam software that I use to create the G code does have a proviso for certain operations of not to cut into the actual part. That is, it will machine as much as it can of the stock material, leaving the finished part with unmachined stock where it can't physically cut. When cutting a vee shaped profile, the final depth will decrease as the cutter approaches the apex of the vee with the wall angle of the profile equal to 22.5o.

The actual process used cuts everything available at a given depth of cut and then increments to the next depth and repeats. The increment used was .001" to minimize scalloping. The total depth of cut was modeled as .070" although no character required more than .063" The G code generated consisted of 230K lines. Machining time was about 70 minutes.

The English characters were a little more straightforward. A Century Gothic font was chosen for clean lines. A .050 depth of cut was modeled. A 1mm carbide end mill was used to cut the characters. The font characters vary somewhat in width and a trial run in Plexiglas had some breaks in some of the characters. This was solved by assigning a .043" diameter to the 1mm tool. The character width increased by 6.5 thousandths which was actually a desirable side effect. To reduce the chance of breakage of the rather fragile tool, the depth of cut was set at .0025". The G code for this portion of the machining was 190K lines. Machining time was about 60 minutes.

The combined machining G code files were too large for the SprutCam memory to handle so the machining was broken into two separate operations. The outline was cut in a third operation.

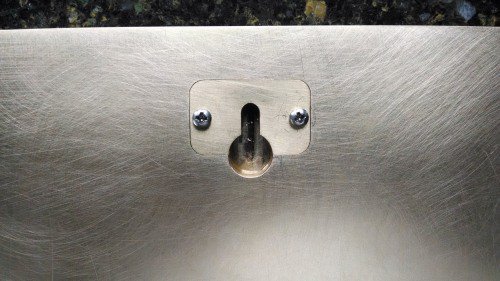
A recess was cut on the back side of the plaque to provide for hanging. A capture plate was machined and inlaid, being held in place with two 2-56 screws. The plaque was hand finished to remove blemishes and machining marks on the front surface. Sheets of SiC wet or dry paper were used on a flat surface. Straight line sanding with a horizontal grain was used. The grit size started with 150 and progressed through 240 and 360. Finishing was halted there to give a brushed look to the piece. No protective coating was applied as I wanted to leave that option open to the recipients. If they wish, a coat of automotive clear coat will be used. Otherwise, it will be left to develop a natural patina over time.
Brass Plaque 1 .JPG Brass Plaque 3 .JPGBrass Plaque 2 .JPG
 
Very nice, I bet the neighbor loves it. Just one example of the advantages of cnc over manual. I may get there some day, but it will be a while. Mike
 
Mike, nice job on the trailer, and seeing your rotary table setup got me psyched as I have a 10" table, 3-jaw chuck, and backing plate arriving Monday. Looks like a very nice space you have there. Mike
 
Mike , I can only drool and buy a lottery ticket because of your engineering shop machinery , plus with my age & dodgy health I dare not even buy green bananas unless they are guaranteed to ripen to dark brown within 24 hours let alone order some decent machinery :grin:.

Thanks for posting and putting up the pictures .

Mike, nice job on the trailer, and seeing your rotary table setup got me psyched as I have a 10" table, 3-jaw chuck, and backing plate arriving Monday. Looks like a very nice space you have there. Mike

Thanks guys. I appreciate the feedback.

Mike.
 
In appreciation for taking care of our home while we were in Europe for six weeks last year, we decided to make a brass plaque for our neighbors. The plaque measures 6.5 x 8.25 x .25 and has an old Chinese proverb that describes our neighbors.

Rather than just put the English proverb on the plaque, I decided to put the Chinese characters as well. I found an on-line site that does English to Chinese translations and got the nine Chinese characters that loosely translate to the English.

The characters were copied into an MS Word document. Word seemed to think that they were a font, in fact Times New Roman. "OK", I thought, "this is going to be easy". I then tried pasting them into a SolidWorks sketch. However SolidWorks didn't know how to configure them so just gave question marks instead of the characters. After a number of unsucessful attempts at placing the "text" into SolidWorks, I found an on-line software package called "Inkscape" that could convert a raster image to a vector image that SolidWorks could understand. Each character was individually blown up to full page size in Word and save as a png file. That file was imported into Inkscape and converted to a dxf file. The dxf images were then dropped into a SolidWorks sketch. The conversion is usually imperfect with overlapping lines and breaks. These were manually cleaned up to create a sketch that could be used to make a 3D model.

Chinese characters are drawn with a brush and the strokes have varying widths often ending in a sharp point. Milling with a conventional endmill will leave a rounded feature instead of a sharp. To get around this problem, a 45o angle carbide engraving tool was used. Unfortunately, SolidWorks (or at least I) could not create the 22.5o feature. The SprutCam software that I use to create the G code does have a proviso for certain operations of not to cut into the actual part. That is, it will machine as much as it can of the stock material, leaving the finished part with unmachined stock where it can't physically cut. When cutting a vee shaped profile, the final depth will decrease as the cutter approaches the apex of the vee with the wall angle of the profile equal to 22.5o.

The actual process used cuts everything available at a given depth of cut and then increments to the next depth and repeats. The increment used was .001" to minimize scalloping. The total depth of cut was modeled as .070" although no character required more than .063" The G code generated consisted of 230K lines. Machining time was about 70 minutes.

The English characters were a little more straightforward. A Century Gothic font was chosen for clean lines. A .050 depth of cut was modeled. A 1mm carbide end mill was used to cut the characters. The font characters vary somewhat in width and a trial run in Plexiglas had some breaks in some of the characters. This was solved by assigning a .043" diameter to the 1mm tool. The character width increased by 6.5 thousandths which was actually a desirable side effect. To reduce the chance of breakage of the rather fragile tool, the depth of cut was set at .0025". The G code for this portion of the machining was 190K lines. Machining time was about 60 minutes.

The combined machining G code files were too large for the SprutCam memory to handle so the machining was broken into two separate operations. The outline was cut in a third operation.

A recess was cut on the back side of the plaque to provide for hanging. A capture plate was machined and inlaid, being held in place with two 2-56 screws. The plaque was hand finished to remove blemishes and machining marks on the front surface. Sheets of SiC wet or dry paper were used on a flat surface. Straight line sanding with a horizontal grain was used. The grit size started with 150 and progressed through 240 and 360. Finishing was halted there to give a brushed look to the piece. No protective coating was applied as I wanted to leave that option open to the recipients. If they wish, a coat of automotive clear coat will be used. Otherwise, it will be left to develop a natural patina over time.
View attachment 100875 View attachment 100877View attachment 100876

That is AWESOME!!! I love it.

I just wish I had neighbors that took well enough care of their own properties, let alone mine.:beguiled:

Mike.
 
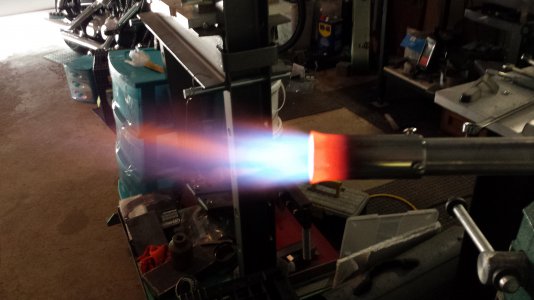
Who wants Flames? Here are some pics of the burner fired up. the first one is the burner before a little adjustment to the air fuel mixture.20150506_133257.jpg

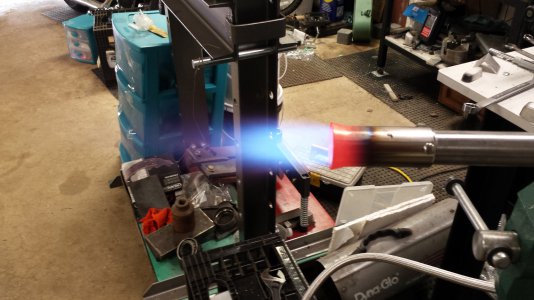
The Next one is after I removed a shim from between the burner pipe and the flare. That allowed more air to be drawn in from between the two. I was thinking I may have to choke the air when I built it not let in more.

20150506_135731.jpg

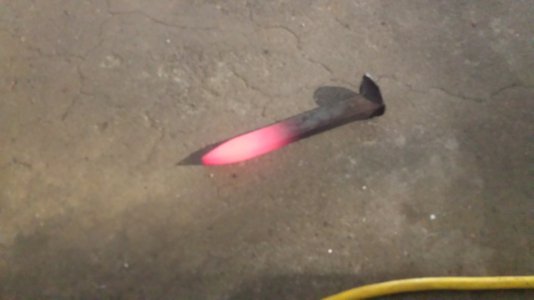
Notice the almost pure blue flame. Took a rail road spike from room temp. to red hot in about 5 min. in open air at about 10psi.

20150506_134100.jpg

Pretty happy so far. Now I just need to get the forge built.
Thanks again to Dave Hammer for his fine You tube video on how to build this burner.
Mark
 
In appreciation for taking care of our home while we were in Europe for six weeks last year, we decided to make a brass plaque for our neighbors. The plaque measures 6.5 x 8.25 x .25 and has an old Chinese proverb that describes our neighbors.

Rather than just put the English proverb on the plaque, I decided to put the Chinese characters as well. I found an on-line site that does English to Chinese translations and got the nine Chinese characters that loosely translate to the English.

The characters were copied into an MS Word document. Word seemed to think that they were a font, in fact Times New Roman. "OK", I thought, "this is going to be easy". I then tried pasting them into a SolidWorks sketch. However SolidWorks didn't know how to configure them so just gave question marks instead of the characters. After a number of unsucessful attempts at placing the "text" into SolidWorks, I found an on-line software package called "Inkscape" that could convert a raster image to a vector image that SolidWorks could understand. Each character was individually blown up to full page size in Word and save as a png file. That file was imported into Inkscape and converted to a dxf file. The dxf images were then dropped into a SolidWorks sketch. The conversion is usually imperfect with overlapping lines and breaks. These were manually cleaned up to create a sketch that could be used to make a 3D model.

Chinese characters are drawn with a brush and the strokes have varying widths often ending in a sharp point. Milling with a conventional endmill will leave a rounded feature instead of a sharp. To get around this problem, a 45o angle carbide engraving tool was used. Unfortunately, SolidWorks (or at least I) could not create the 22.5o feature. The SprutCam software that I use to create the G code does have a proviso for certain operations of not to cut into the actual part. That is, it will machine as much as it can of the stock material, leaving the finished part with unmachined stock where it can't physically cut. When cutting a vee shaped profile, the final depth will decrease as the cutter approaches the apex of the vee with the wall angle of the profile equal to 22.5o.

The actual process used cuts everything available at a given depth of cut and then increments to the next depth and repeats. The increment used was .001" to minimize scalloping. The total depth of cut was modeled as .070" although no character required more than .063" The G code generated consisted of 230K lines. Machining time was about 70 minutes.

The English characters were a little more straightforward. A Century Gothic font was chosen for clean lines. A .050 depth of cut was modeled. A 1mm carbide end mill was used to cut the characters. The font characters vary somewhat in width and a trial run in Plexiglas had some breaks in some of the characters. This was solved by assigning a .043" diameter to the 1mm tool. The character width increased by 6.5 thousandths which was actually a desirable side effect. To reduce the chance of breakage of the rather fragile tool, the depth of cut was set at .0025". The G code for this portion of the machining was 190K lines. Machining time was about 60 minutes.

The combined machining G code files were too large for the SprutCam memory to handle so the machining was broken into two separate operations. The outline was cut in a third operation.

A recess was cut on the back side of the plaque to provide for hanging. A capture plate was machined and inlaid, being held in place with two 2-56 screws. The plaque was hand finished to remove blemishes and machining marks on the front surface. Sheets of SiC wet or dry paper were used on a flat surface. Straight line sanding with a horizontal grain was used. The grit size started with 150 and progressed through 240 and 360. Finishing was halted there to give a brushed look to the piece. No protective coating was applied as I wanted to leave that option open to the recipients. If they wish, a coat of automotive clear coat will be used. Otherwise, it will be left to develop a natural patina over time.
View attachment 100875 View attachment 100877View attachment 100876
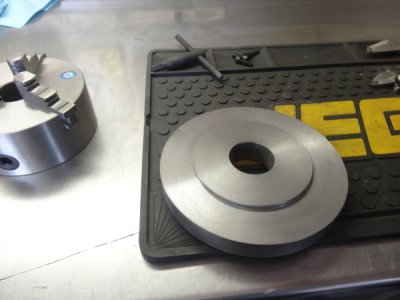
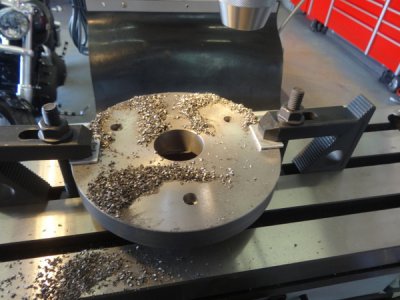
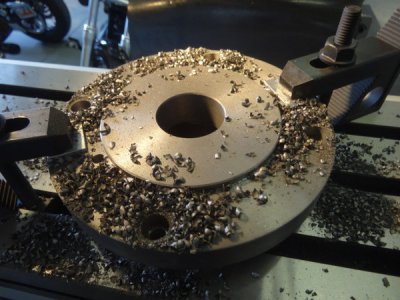
Have I mentioned just how much I dislike machining cast iron? What a mess, but I figured I may as well hurry and get this project completed rather than clean it up just to make the same mess again. Last night I quite work on customer work so I could complete the rotary table adapter plate and clean up my mess.

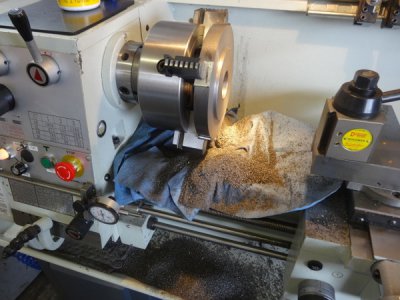
Here is the mess after the lathe work is completed and just prior to removing the backing plate from the 4-jaw chuck.
25yu9h3.jpg

Turning and facing processes completed and ready to drill the mounting holes. The step is .001" smaller than the backside of the chuck so it will self center onto the plate.
292oi7o.jpg

Chuck test fit onto the plate to ensure self-centering. I got a little cocky here but I should have test fit it prior to removing it from the lathe. Had my measurements been off I could have been chucking it back up in the lathe to make a skim cut. Luckily everything fell together perfectly. Another reason I probably shouldn't work this late at night.
2150epc.jpg

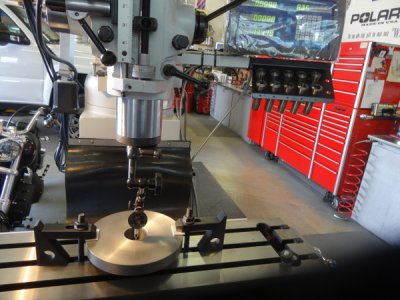
Vise removed from mill table and the backing plate clamped down locating the center. I have it spaced off the table so I can drill through without hitting the table. Using my handy, dandy modified Noga/IndiCol DTI holder. Works awesome. You can also see the DRO that I have zero'd after locating center.
30iuk5c.jpg

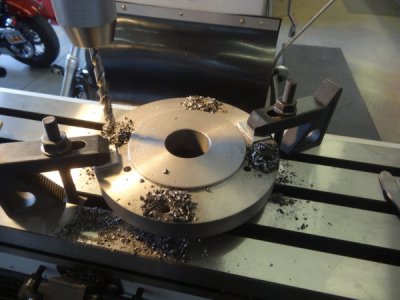
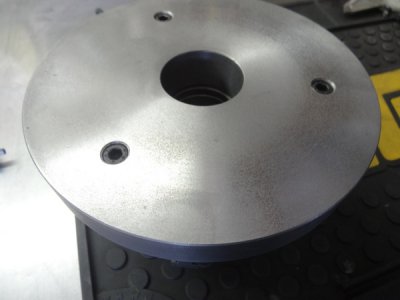
Three chuck mounting holes drilled. The bolt hole circle function in the DRO flat ROCKS!!!
28wkklk.jpg

I used a .375" end mill and countersunk for the socket head capscrews to sit just below flush.
v3q9so.jpg

Next I flipped the adapter over and plugged the dimensions into the DRO for the four bolt hole pattern to match the slots in the rotary table.
dvouug.jpg

Four bolt pattern drilled and countersunk with a .625" end mill.
if4vox.jpg

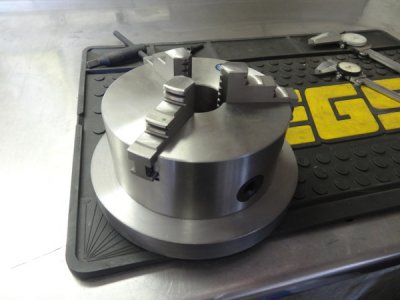
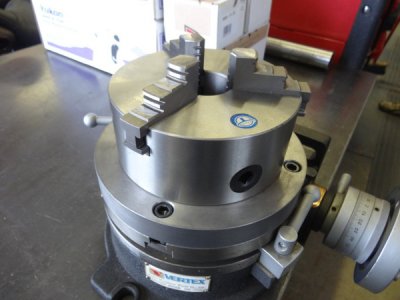
Completed sitting on the rotary table.
b6zn5s.jpg

Now that my 3-jaw chuck is mounted on my rotary table I can move on to the actual paying job that I needed this for. Oh well, at least it is off my bench and crossed off my list of things to do and is readily available when I have the next job come in requiring the chuck and rotary table.

Mike.

25yu9h3.jpg

292oi7o.jpg

2150epc.jpg

30iuk5c.jpg

28wkklk.jpg

v3q9so.jpg

dvouug.jpg

if4vox.jpg

b6zn5s.jpg
 
Sorry about that, What I was gonna say to mike is that "yes the bolt circle function is great" But I personally very rarely use it. The first readouts I used did not have that function. I got so used to doing the sine and cosine that I think its firmly implanted in my brain. LOL 3 4 6 8 and 12 hole circles are so easy, I find it easier to just dial them off using the trig functions. I do use the bolt hole function on something odd like a 7. I actually laid off a circle with dividers the other day for a guy that didnt know how. How crazy is that? You have a fantastic looking shop BTW !
 
Mark ,
Did you try to heat the spike from room temp using both methods ie with & without the shim ?
If you didn't and now do it will you tell us the best timed heating result please?
 
Nothing fancy, no flames, trailers, backplates, or similar fine work to show, actually no pics. But, did pull the apron off the Logan lathe and put some liquid gasket material along the bottom between the clamshells. been meaning to do it for a while now, as otherwise all the oil leaks out of the apron in short order. Messy and a waste of oil. I'll fill it back up tomorrow and see how well it sealed.
 
Back
Top