Postmortem of a power feed adapter

chris.trotter

Registered
Registered
Joined
May 14, 2013
Messages
104
Choo choo! All aboard the fail train! Alternate thread title: How NOT to make a power feed for your mini-mill.

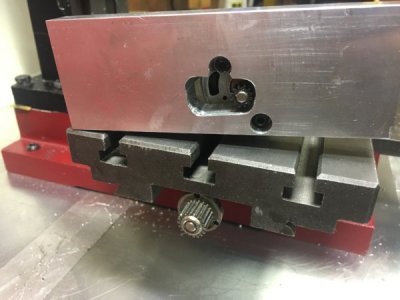
After lovingly flycutting that aluminum blank nice and square and smooth, I applied my poorly thought out power feed adapter design to it and have learned much.

What did not go well, what I need to learn
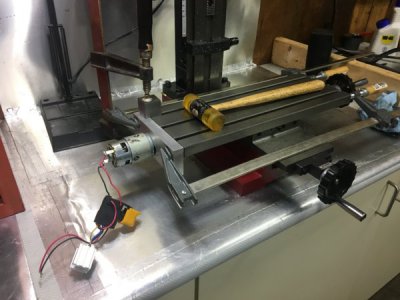
  1. I have little practical understanding of gears and how they work, how you apply gearing concepts to design, etc
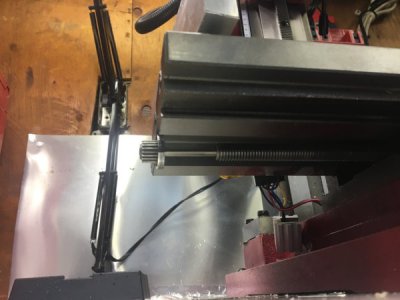
  2. I did not take into consideration the torque an electric motor produces, and the flex of materials involved (need to make an end piece for the feed screw, right now it is free floating - pretty sure I'll need a boring bar for this)
  3. I did not take into consideration the function of the planetary gear set in a drill - the motor spins at 20k rpm, this is unsuitable entirely for directly coupling to a feed screw. :) Apparently. :D
  4. As mentioned in that other thread, my vises and technique do not lend themselves to retaining surface finish
  5. Completely botched (horrors) milling out the inner open area where the gears mesh - should have taken more time and aligned the vise correctly.
  6. Discovered that the z-axis has developed (or I've just noticed) a 'skip' near the top of the travel. I was flycutting the top of the blank, slowly getting the zero, when it grabbed and jumped down 1/8", slamming the cutter into the side of the work. Whups. Ended up physically touching the cutter to the top, wiggling by hand, then moving fine feed down and locking. i.e. not under power
  7. Still need to learn how to use the parting tool on the lathe. I learned flycutting, I can learn this, too. :)
  8. Measuring pre-existing holes (i.e. the threaded mount hole on an electric motor housing) precisely is something I need to learn how to do properly
  9. Drawing something out beforehand is a must
  10. I completely underestimated the power draw of that motor - blew two (old) computer power supplies up. Ended up using the car battery charger.
What did go well, what I learned
  1. Flycutting went really well, for the most part, surface finish and speed of cutting in aluminum was great
  2. Drilling out the feed screw in the 4-jaw also went well
  3. Using Loctite 609, while cold, requires at least 24h. 1hr 'fixturing' time won't cut it. Possibly due to too large a gap.
  4. My filing technique is improving!
  5. The importance of sawing something as close as possible - much care taken during sawing can save a lot of machining time
  6. Adding that swivel light has been amazing
My next steps are
  • Figure out gear ratios, make/find a large gear (or just get an appropriately geared motor)
  • Do a legit cad drawing and print it out
  • Do a reset of the gibs after those crashes
2018-04-23 21.02.36.jpg2018-04-23 21.03.33.jpg2018-04-23 21.03.40.jpg

Onwards and upwards. :)
 
The "correct" way I suppose (which I imagine few of us would do) would be to measure the amount of turning force required to turn the
leadscrew with a spring scale then multiply that by some amount, then go motor shopping. But I think most folks aren't that inclined and
just experiment till they get something that works. So you're not alone. Keep on going :D
Mark
 
Regarding your experience with the Z axis suddenly dropping down while you were milling, that is a known problem with this class of milling machines. It is due to the _very_ sloppy Z axis drive. Owners have come up with a number of mods to address various aspects of the problem. They include: 1. Replacing the torsion spring head lift with an air spring. This provides more positive lift to the head. 2. Shimming the Z axis rack to get better engagement with the pinion. 3. Modifying the castle nuts that couple the fine z axis drive to the coarse direct drive (these are a MAJOR source of backlash). 4. Tightening up the worm screw portion of the fine z axis drive, IF you find a lot of slop there (I didn't on my mill).

However, none of these are a guarantee -- the manufacturing tolerances and machine design are such that backlash is a fact of life. I only have done #1 and observed some improvement. But the best solution IMO is to ALWAYS lock the Z axis while milling. In general, on these mills it is good practice to lock all axes that are NOT going to move during each milling pass. Sort of a pain to move/lock/mill/unlock/move... ad infinitum but that produces the best results.

Also, something I learned the hard way is that you can unknowingly perform a climb milling step, even if you are moving the work in the correct direction relative to tool rotation. This can happen when you are widening a slot or milling the side of your work. For example, you finish one pass in Y, move back to the start, step over on X for your next pass and move into the work. Due to the way backlash works, you actually have some additional potential displacement on the X axis: so when the end mill encounters the work, the cutting force pulls the work further over. So your DOC suddenly increases. When this happened to me, the mill stopped spinning so quickly that it unscrewed the collet nut! Yet another good reason to lock all undriven axes while milling....

Also, FYI, locking the head or table axes can produce a small change in the head or table position. This can be minimized by properly adjusting the gibs.
 
Ha, I've actually had that jump happen once or twice, usually when I'm doing something with the Y axis.

Good notes on the Z axis. I discovered pretty early on that locking the Z is huge (lol, once I knew about the lock itself even existing). I have yet locked X or Y axes, mostly because my screws are stripped (came like that, haven't gotten around to replacing - also seems like a terrible system, that you have to use a tiny allen, i.e. no lever). The missing gib screw in the X axis probably also not helping things. :D

@markba633csi Thanks for the encouragement. I read enough posts of people jury-rigging electric drills that I figured, how hard could it be? Haha, well apparently really hard if you ignore stuff like 'what planetary gear sets do'.
 
Hey we were all beginners once
Indeed! To paraphrase an old sage- " The machinist that does not make mistakes ain't doing MUCH!" The simple fact that you have seen your results in an objective light speaks volumes about your ability to improve. There are entire generations of people that could benefit from that approach. You will be fine. (I start nearly every project, regardless of it's complexity, with pencil and paper and an unwavering conviction that there is room for version 2, or 3, or 7....)
 
Haha, it's a process used in the software industry as a part of continuous improvement (and has obvious origins outside software, probably used elsewhere, too). I've just found it really handy for anything - celebrate the wins, talk about the losses, what did we learn and how will we apply it for the next iteration.

My coworker who donated the drill has a second one lying around that he's bringing in. v2 on the way...
 
Ha, I've actually had that jump happen once or twice, usually when I'm doing something with the Y axis.

Good notes on the Z axis. I discovered pretty early on that locking the Z is huge (lol, once I knew about the lock itself even existing). I have yet locked X or Y axes, mostly because my screws are stripped (came like that, haven't gotten around to replacing - also seems like a terrible system, that you have to use a tiny allen, i.e. no lever). The missing gib screw in the X axis probably also not helping things. :D

@markba633csi Thanks for the encouragement. I read enough posts of people jury-rigging electric drills that I figured, how hard could it be? Haha, well apparently really hard if you ignore stuff like 'what planetary gear sets do'.

The OEM locking levers are much nicer than plain old allen or hex head screws. I got these at LMS. I am not affiliated in any way with this supplier, just a satisfied customer. But it sounds like you have a bit of work to do before you can use them.
 
As a follow-up to this, I did end up making the anti-flex piece that holds the end of the lead screw in place, that works great! What I did not do, which is in hindsight just silly, is say "right, now gear ratios...". I directly coupled the motor to that gear on the end of the lead screw. It only moves under a lot of power, like 2/3 of the knob range and up. However, it does move very smoothly at that point. :)

At some point someone casually remarked, "you're going to want to gear that thing down".

What they should have said was, "that will in no way, shape or form, work at all period zero ever, you absolutely 100% must gear it down". :D

Learning...right?
 
[QUOTE="chris.trotter, post: 602223,
At some point someone casually remarked, "you're going to want to gear that thing down".

What they should have said was, "that will in no way, shape or form, work at all period zero ever, you absolutely 100% must gear it down". [/QUOTE]

I am a very direct person, sometime to the point of being harsh, and I prefer when people are direct with me. In other words, I can't read between the lines for **** !! Hind sight is 20/20 and I'm sure you will have this working like a top in no time.
 
Back
Top