

- Joined
- Oct 29, 2012
- Messages
- 1,328
I'm needing a way to sharpen twist drills (lots of them) quickly and consistently. I won't be doing the work myself; I have an unskilled helper doing the chore. I've tried to teach him how to do it by hand but I suck at it myself so I can't hold it against him, but his results are less than stellar. I've looked into purchasing a jig/machine but there seems to be only two kinds: 1. Cheap crap that doesn't work, and 2. Really expensive production-oriented fixtures that have more axes than a CNC robot and more adjustments than two lathes together. They also mostly use a collet system so I would need a drawer of doodads, one for each size of bit I would conceivably want to sharpen. I don't like my options. I want something of acceptable quality (or at least acceptable results) and simple enough that a Liberal Arts major can use it. Necessity is the mother of hairbrained ideas and ultimate folly. Here's what I'm thinking...
(By the way, I'm posting this for peer review. Any and all criticism is welcome. Shoot holes in it, don't hold back. I can't find examples of anything close to what I'm about to describe so that means it's either a horrible idea or revolutionary. Most likely horrible. But at the same time, the pictures are just conceptual; only enough detail convey the point. the end result wouldn't look anything like this.)
I drew inspiration for this from knife sharpening jigs such as this:
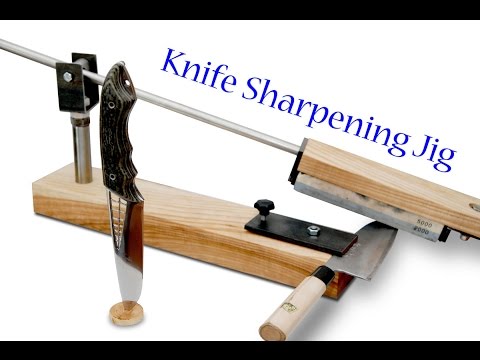
The stone is held at the end of a long rod which pivots about (and slides through) a fulcrum of adjustable height. The long distance between the knife's edge and the fulcrum point allows the setting of precise angles with relatively crude hardware.
My jig is the same concept but in reverse. The "stone" (grinding belt) is held stationary and "knife" (drill bit) is mounted on a mobile rod. The slot plates are interchangeable and with the plates shown, should produce general purpose 118deg 4-facet bits.

The image above depicts the jig fitted with a 1/2" 4-facet drill bit, grinding the relief edge.
The image below depicts the jig fitted with the same bit, but grinding the cutting edge.

Below is a top-down view from above the grinding belt. The drill bit is held in a cordless drill chuck which is mounted on the end of the paddle pole.
The belt is mounted to the plate behind, at an angle of 118 deg. This angle is adjustable. The belt assembly is mounted to its backing plate with linear slides, so it can be moved side-to-side for even belt wear.

The sequence of operations would be as follows:
[with belt off]
1. Loosen the locking collar and place paddle pole into slot plates A and B (cutting edge grinding position)
2. Insert bit to be sharpened in paddle pole chuck, with cutting edge 90deg to belt.
3. Slide paddle pole forward until bit touches grinding belt, slide locking collar forward until it touches slot plate A.
4. Back locking collar off [some small distance*] from slot plate A and tighten.
* this small distance sets the amount of material to be removed. it will depend on the size of the drill and condition. If only a touch-up resharpening is desired, then maybe use a few thousandths of shim stock to set the depth.
5. Back paddle pole away from belt, energize belt.
6. Slide paddle pole gently in towards belt, and continue to apply gentle pressure until locking ring bottoms out against slot plate A and the belt stops cutting.
7. withdraw paddle pole away from belt, carefully remove paddle pole from slots, and without adjusting the chuck or locking ring, flip it over and put it back in the slots.
8. Feed paddle pole forward, gently grind 2nd cutting edge until locking ring bottoms out and belt stops cutting.
9. Withdraw from cut, remove paddle pole, place in slot plates A and C (Relief grinding position). loosen locking collar.
10. Paying close attention to cutting edge thickness, feed paddle pole into grinding belt until desired cutting edge thickness is achieved.
11. Set locking collar up against Slot plate A and tighten.
12. withdraw paddle pole away from belt, carefully remove paddle pole from slots, and without adjusting the chuck or locking ring, flip it over and put it back in the relief grinding slots.
13. Feed paddle pole forward, gently grind 2nd relief edge until locking ring bottoms out and belt stops cutting.
So, by utilizing the locking collar to feed forward to precisely the same distance on both sides, this should ensure precisely the same length of cutting edge on both sides, if my logic is correct. A perfectly symmetrical grind at precise angles. And with taking most of the "art" out of the task, maybe it now makes sense to sharpen smaller drills rather than replace.
The slot plates B and C are drawn appropriately for a 1/2" drill bit, but would be made to extend in both directions (up & down) with multiple stops within the slots, to achieve a variety of cutting edge & relief angles for different sized bits (and those stops could be marked in drill bit sizes for simplicity, ex: "use this position for 5/32 & 4mm bits")
Ok, take your shots. Why won't this work?
(By the way, I'm posting this for peer review. Any and all criticism is welcome. Shoot holes in it, don't hold back. I can't find examples of anything close to what I'm about to describe so that means it's either a horrible idea or revolutionary. Most likely horrible. But at the same time, the pictures are just conceptual; only enough detail convey the point. the end result wouldn't look anything like this.)
I drew inspiration for this from knife sharpening jigs such as this:
The stone is held at the end of a long rod which pivots about (and slides through) a fulcrum of adjustable height. The long distance between the knife's edge and the fulcrum point allows the setting of precise angles with relatively crude hardware.
My jig is the same concept but in reverse. The "stone" (grinding belt) is held stationary and "knife" (drill bit) is mounted on a mobile rod. The slot plates are interchangeable and with the plates shown, should produce general purpose 118deg 4-facet bits.
The image above depicts the jig fitted with a 1/2" 4-facet drill bit, grinding the relief edge.
The image below depicts the jig fitted with the same bit, but grinding the cutting edge.
Below is a top-down view from above the grinding belt. The drill bit is held in a cordless drill chuck which is mounted on the end of the paddle pole.
The belt is mounted to the plate behind, at an angle of 118 deg. This angle is adjustable. The belt assembly is mounted to its backing plate with linear slides, so it can be moved side-to-side for even belt wear.
The sequence of operations would be as follows:
[with belt off]
1. Loosen the locking collar and place paddle pole into slot plates A and B (cutting edge grinding position)
2. Insert bit to be sharpened in paddle pole chuck, with cutting edge 90deg to belt.
3. Slide paddle pole forward until bit touches grinding belt, slide locking collar forward until it touches slot plate A.
4. Back locking collar off [some small distance*] from slot plate A and tighten.
* this small distance sets the amount of material to be removed. it will depend on the size of the drill and condition. If only a touch-up resharpening is desired, then maybe use a few thousandths of shim stock to set the depth.
5. Back paddle pole away from belt, energize belt.
6. Slide paddle pole gently in towards belt, and continue to apply gentle pressure until locking ring bottoms out against slot plate A and the belt stops cutting.
7. withdraw paddle pole away from belt, carefully remove paddle pole from slots, and without adjusting the chuck or locking ring, flip it over and put it back in the slots.
8. Feed paddle pole forward, gently grind 2nd cutting edge until locking ring bottoms out and belt stops cutting.
9. Withdraw from cut, remove paddle pole, place in slot plates A and C (Relief grinding position). loosen locking collar.
10. Paying close attention to cutting edge thickness, feed paddle pole into grinding belt until desired cutting edge thickness is achieved.
11. Set locking collar up against Slot plate A and tighten.
12. withdraw paddle pole away from belt, carefully remove paddle pole from slots, and without adjusting the chuck or locking ring, flip it over and put it back in the relief grinding slots.
13. Feed paddle pole forward, gently grind 2nd relief edge until locking ring bottoms out and belt stops cutting.
So, by utilizing the locking collar to feed forward to precisely the same distance on both sides, this should ensure precisely the same length of cutting edge on both sides, if my logic is correct. A perfectly symmetrical grind at precise angles. And with taking most of the "art" out of the task, maybe it now makes sense to sharpen smaller drills rather than replace.
The slot plates B and C are drawn appropriately for a 1/2" drill bit, but would be made to extend in both directions (up & down) with multiple stops within the slots, to achieve a variety of cutting edge & relief angles for different sized bits (and those stops could be marked in drill bit sizes for simplicity, ex: "use this position for 5/32 & 4mm bits")
Ok, take your shots. Why won't this work?
Last edited:
