- Joined
- Oct 11, 2019
- Messages
- 139
A friend of mine, Gary Bower a long time enthusiast of several lathes milling machines and what not. told me how to repair a gear that I have never heard of before
... although brazing up the busted tooth area of a gear is not new, his method for re cutting the tooth area was....
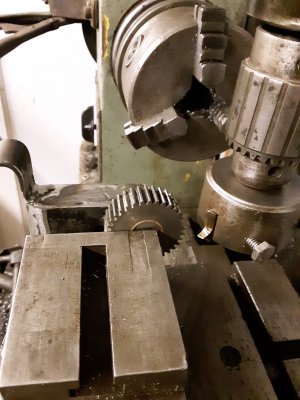
what I knew already was that it takes an indexer to turn the gear so the next slot is in line with the cutter in the milling machine
and rotary indexers like that cost a fortune ....when you can find them and it's hard to justify one for a single gear repair Right?
well Gary told me that he came up with the idea to help his friend about 30 years ago when he had a gear that had busted teeth on his lathe
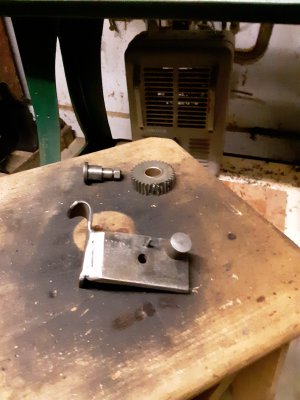
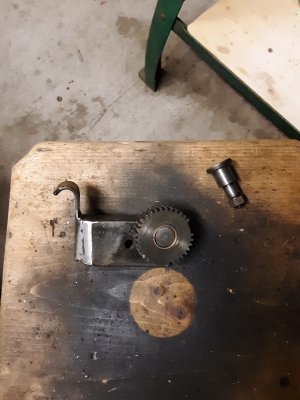
if you take a stout piece of flat bar , I used 1.5"x 1/4"x 3" steel scrap I had laying around. used my Logan lathe to make the pin that the gear will sit on
and afixed that to the top right corner of the piece of bar stock when it was laying horizontally in the milling vice.
and I welded the pin in from the back side .... then ground it flush again.
next i put the gear on the pin and with my awl scribed a arc using the good teeth on the back side of the gear to guide the awl
I guessed at the horizontal line from where the bad teeth would be re cut to the back side of the gear and scribed a mark then used a center punch and frilled a small hole
( this hole needs to be between the teeth of the gear) then I found a small nail that fit the hole and cut it off about 1/8" from the top of the gear ....
i welded the nail in place then hand filed the nail to shape ( like a "V" ) and then put the gear back on.... after several tries at fitting it like this I had a very good strong fit
.... I thin found a scrap piece of steel suitable for a flat bar across the top edge of the bar stock so it would not twist in the vice when putting this thing in and out of the milling vice... and it was done....
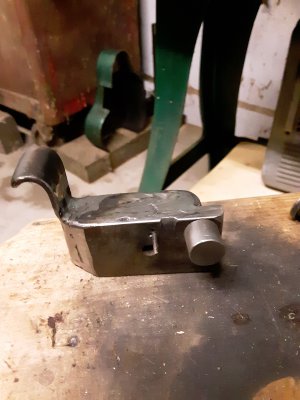
the idea here is that you have one side that you can squeeze in the vice on the gear and lock it down for the milling....
after you set it up and take your first cut and lock the quill down you should be able to take it out and return it to the exact same spot,
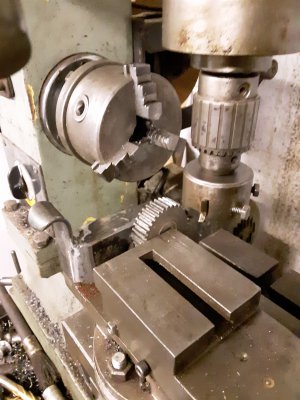
once the first tooth is cut you remove the device with the gear intact and ease the gear off and turn it one tooth (to align it up with the cutter on the other side) and put it back in the milling vice and do the next tooth. and repeat till all the teeth are cut anew !
Gary's Idea had a peg that had a tooth on the top to align the teeth to the next step, my version used a nail instead. the disadvantage to the nail is that you must take it out of the vice in order to move it one tooth... with Gary's version you simply loosen the vice, use the peg to align the next tooth and then tighten the clamp again.
there is no doubt in my mind that Gary is one sharp cookie !
I call this the "Gear self indexing device" no need for a rotary indexer.... it took me about an hour to make up is all and I did a dry run to make sure I would not run into any limitations when actually doing it..... I saw no problems at all !
.... my only problem is getting the gear brazed up !.... my O/A torch burned up in the ranch fire about 5 years ago and it hasn't been replaced yet !
so I'm on the hunt for a welding shop that can braze that gear now !
.....
Koodos to Gary ! he saved my bacon on that one ! ..... index the gear with the gear itself ! who'd have thunk it !!!!!!
hahahhah
.....
I think I will add a piece of metal on the end of the thing to make it set in the mill vice the same way each time.... right now it can slide horizontally.... just welding a scrap piece of steel over the corner will stop that from happening ...it'll be ...put it in the jaws, push down on the top to make sure it's level and push it in till it stops... and tighten it down...... cut the tooth,pull it out advance it a tooth and put it back in...
....
now I can take my time with my lathe indexer and not have to find a 34 tooth saw blade !
his method is far easier !
....
Thanks Gary !
Bob.........
... although brazing up the busted tooth area of a gear is not new, his method for re cutting the tooth area was....
what I knew already was that it takes an indexer to turn the gear so the next slot is in line with the cutter in the milling machine
and rotary indexers like that cost a fortune ....when you can find them and it's hard to justify one for a single gear repair Right?
well Gary told me that he came up with the idea to help his friend about 30 years ago when he had a gear that had busted teeth on his lathe
if you take a stout piece of flat bar , I used 1.5"x 1/4"x 3" steel scrap I had laying around. used my Logan lathe to make the pin that the gear will sit on
and afixed that to the top right corner of the piece of bar stock when it was laying horizontally in the milling vice.
and I welded the pin in from the back side .... then ground it flush again.
next i put the gear on the pin and with my awl scribed a arc using the good teeth on the back side of the gear to guide the awl
I guessed at the horizontal line from where the bad teeth would be re cut to the back side of the gear and scribed a mark then used a center punch and frilled a small hole
( this hole needs to be between the teeth of the gear) then I found a small nail that fit the hole and cut it off about 1/8" from the top of the gear ....
i welded the nail in place then hand filed the nail to shape ( like a "V" ) and then put the gear back on.... after several tries at fitting it like this I had a very good strong fit
.... I thin found a scrap piece of steel suitable for a flat bar across the top edge of the bar stock so it would not twist in the vice when putting this thing in and out of the milling vice... and it was done....
the idea here is that you have one side that you can squeeze in the vice on the gear and lock it down for the milling....
after you set it up and take your first cut and lock the quill down you should be able to take it out and return it to the exact same spot,
once the first tooth is cut you remove the device with the gear intact and ease the gear off and turn it one tooth (to align it up with the cutter on the other side) and put it back in the milling vice and do the next tooth. and repeat till all the teeth are cut anew !
Gary's Idea had a peg that had a tooth on the top to align the teeth to the next step, my version used a nail instead. the disadvantage to the nail is that you must take it out of the vice in order to move it one tooth... with Gary's version you simply loosen the vice, use the peg to align the next tooth and then tighten the clamp again.
there is no doubt in my mind that Gary is one sharp cookie !
I call this the "Gear self indexing device" no need for a rotary indexer.... it took me about an hour to make up is all and I did a dry run to make sure I would not run into any limitations when actually doing it..... I saw no problems at all !
.... my only problem is getting the gear brazed up !.... my O/A torch burned up in the ranch fire about 5 years ago and it hasn't been replaced yet !
so I'm on the hunt for a welding shop that can braze that gear now !
.....
Koodos to Gary ! he saved my bacon on that one ! ..... index the gear with the gear itself ! who'd have thunk it !!!!!!
hahahhah
.....
I think I will add a piece of metal on the end of the thing to make it set in the mill vice the same way each time.... right now it can slide horizontally.... just welding a scrap piece of steel over the corner will stop that from happening ...it'll be ...put it in the jaws, push down on the top to make sure it's level and push it in till it stops... and tighten it down...... cut the tooth,pull it out advance it a tooth and put it back in...
....
now I can take my time with my lathe indexer and not have to find a 34 tooth saw blade !
his method is far easier !
....
Thanks Gary !
Bob.........