Now that you have the quill out you can Kroil the inside ends of the locks. You can use a 3/8" or 1/2" drive socket that is just large enough for the lock to fit in and use it as a puller base. Thread the bolt with a washer under its head through the socket into the tapped lock and tighten to pull. If the lock didn't rotate when you were tapping it, it may be quite stubborn coming out.
-
Welcome back Guest! Did you know you can mentor other members here at H-M? If not, please check out our Relaunch of Hobby Machinist Mentoring Program!
You are using an out of date browser. It may not display this or other websites correctly.
You should upgrade or use an alternative browser.
You should upgrade or use an alternative browser.
12" Atlas Reverse Tumbler Gear Stud
- Thread starter paul s
- Start date
Good idea - better and easier than the slide hammer. I'll try some Kroil, but I'm betting that I'm dealing with swollen Zamac. And no, it didn't try to rotate while being tapped.Now that you have the quill out you can Kroil the inside ends of the locks. You can use a 3/8" or 1/2" drive socket that is just large enough for the lock to fit in and use it as a puller base. Thread the bolt with a washer under its head through the socket into the tapped lock and tighten to pull. If the lock didn't rotate when you were tapping it, it may be quite stubborn coming out.
- Joined
- Dec 25, 2011
- Messages
- 10,508
That is probably the best way to break the upper lock/lock sleeve/sleeve loose from the tailstock. But after 2 or 3 turns of the wrench, it will probably begin turning in the hole instead of the bolt threads continuing to extract it. When that happens, shift to the slide hammer puller. Then use the slide hammer puller and the original bolt that is still in the hole to remove the lower lock.
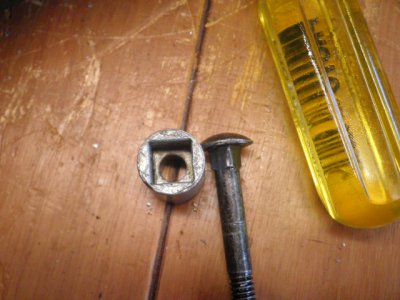
Found an inconsistency - I don't believe the bolt for the tailstock quill lock is correct. The picture below shows that the square on the carriage bolt is much too small to engage the square in the lower lock. The drawing I have shows 1/4-20, 1 5/8" long, square head. It seems that either would work - I'm not really sure why the square would need to engage the lower lock.


That should be a square head bolt, not a carriage bolt. The bevel on the lock against the quill prevents it from turning and the square head in the recess prevents the bolt from turning. Being keyed to a fixed position also allows the lock lever to always lock in the same orientation. You can use one of 4 positions. If you are right handed, having the lever to the right when tight is most convenient.
I ended up grinding down a 1/4-20 square nut to fit the recess, then fixtured it to a 1/4-20 bolt with the head cut off, using loctite.
I've got the tailstock and the headstock back together. I replaced some of the backgears; regarding the pins that hold the eccentrics to the backgear shaft - they're set flush with the shaft, removing them entails tapping them out from the recessed side towards the flush side.
I've got the countershaft apart now and noticed something odd; I don't see any provision to get the oil from the gits oilers to the bronze bushings - no holes, slots, nothing. Were these resleeved at some point?
On edit - these are oilite bearings and the oil will actually seep through?
On edit - these are oilite bearings and the oil will actually seep through?
Yes. the oil will seep into the oilite.
- Joined
- Dec 25, 2011
- Messages
- 10,508
Although it doesn't ruin anything to match drill a hole through the bushings after they are installed, it isn't necessary. Oil the shaft itself during assembly and fill the cups immediately after assembly. Then top up the oil in the cups when necessary. The consequences of drilling a hole through the bushings is that you must thereafter re-fill the cups before every use, and the countershaft will tend to sling oil for the first few minutes after start up.
For those of you who don't recognize what;s being discussed, note that some countershafts have straight roller bearings and use grease, some have only sintered bronze bushings and use oil, and some have a combination of bushings and sealed ball bearings.
For those of you who don't recognize what;s being discussed, note that some countershafts have straight roller bearings and use grease, some have only sintered bronze bushings and use oil, and some have a combination of bushings and sealed ball bearings.

