- Joined
- Feb 2, 2013
- Messages
- 3,622
I have been grinding and testing simple lathe tool geometry on different sized machines.
i have found 2 tool designs to have been exceptional, regardless of the lathe size. (from Unimat to 20x40 lathe)
the 8° and 10° designs i'm grinding have taken a beating in the name of progress, and have performed flawlessly.
i figured i would destroy a machine or 2 in the process, but this didn't come to pass.
Grinding smaller tools is no problem on my KMX10. (Deckel SOE clone)
But as the tools get larger, i move over to the Boyer Schultz surface grinder to make quicker work of it.
i have 10°,12° and 15° fixtures, that i use in my day job, so that's already taken care of.
i didn't have an 8° fixture, until recently.......
i have some 7/8" square 1214 that was dying to be useful, so it got the shoulder tap!
i portoband sawed off a 65mm length
i put the chunk in the Bridgeport and milled a 3/8"x .200" deep channel.
the rest of the work was performed in my home shop...
i'm a little more limited in my home shop, smaller machines (and lack of an appropriate milling machine)
but, no shortage of tooling or ways of doing things.
of that, i can assure.
I chose the Ammco 7" shaper as the go to machine.
its not fast, but is sure is cool to watch, and even funner to run!
My first hurdle was to find a way to hold the partially machined part in my shaper vise.
my first inclination was to pocket mill a hunk of aluminum to match the 8° pitch i'll need to surface the 1214 steel with.
then split the aluminum to have a clam shell type of fixture easily grabbed by the vise.
i pondered the idea for about 5 minutes, thinking about set up, tooling, time, & etc.
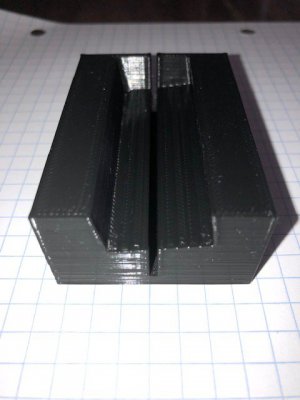
Then, it occurred to me, that i was under-utilizing a wonderful development tool at my disposal- the Ender5 3D Printer!!!!
my cad-Fu is very weak, but i managed to create a fixture, that i had outlined above, but instead in PLA plastic.
i used Tinkercad to make the template, then imported the .stl file to Cura 4.6.1
i used 35% plastic , cubic subdivision, 85/mm print speed and printed in the low quality mode.
it took less than 2 hours to design and print the holder i needed!
Technology is AWESOME !!! the bounds are truly endless!
The shaper made short work of the 8° angle in the 1214
i ground a tool i call the eagle beak.
as the name implies, the tool is formidable against steels.
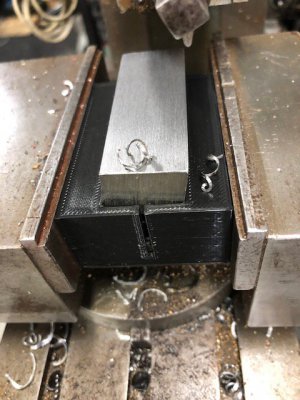
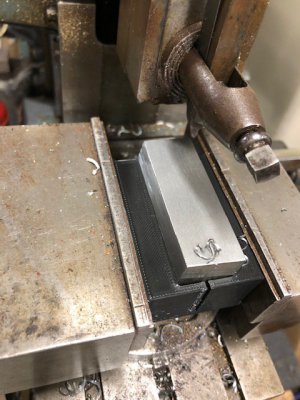
there were doubts as to if the whole chunk of PLA was going to fail.
to my amazement i could not differentiate the cuts in this material,from being clamped directly in a vise.
i cleaned up the newly formed fixture and took some pictures.
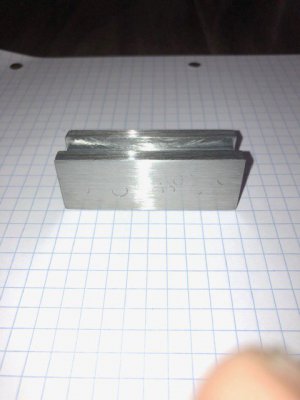
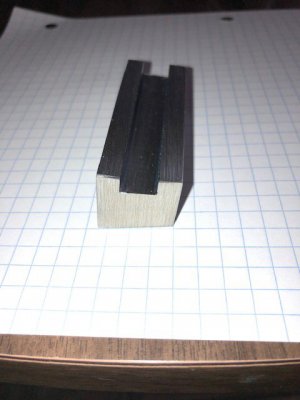
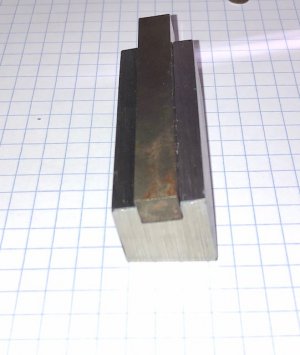
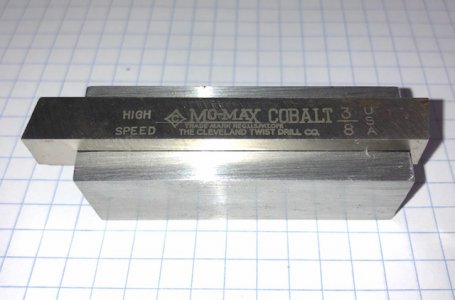
the fixture is ready for the surface grinder!
i have found 2 tool designs to have been exceptional, regardless of the lathe size. (from Unimat to 20x40 lathe)
the 8° and 10° designs i'm grinding have taken a beating in the name of progress, and have performed flawlessly.
i figured i would destroy a machine or 2 in the process, but this didn't come to pass.
Grinding smaller tools is no problem on my KMX10. (Deckel SOE clone)
But as the tools get larger, i move over to the Boyer Schultz surface grinder to make quicker work of it.
i have 10°,12° and 15° fixtures, that i use in my day job, so that's already taken care of.
i didn't have an 8° fixture, until recently.......
i have some 7/8" square 1214 that was dying to be useful, so it got the shoulder tap!
i portoband sawed off a 65mm length
i put the chunk in the Bridgeport and milled a 3/8"x .200" deep channel.
the rest of the work was performed in my home shop...
i'm a little more limited in my home shop, smaller machines (and lack of an appropriate milling machine)
but, no shortage of tooling or ways of doing things.
of that, i can assure.
I chose the Ammco 7" shaper as the go to machine.
its not fast, but is sure is cool to watch, and even funner to run!
My first hurdle was to find a way to hold the partially machined part in my shaper vise.
my first inclination was to pocket mill a hunk of aluminum to match the 8° pitch i'll need to surface the 1214 steel with.
then split the aluminum to have a clam shell type of fixture easily grabbed by the vise.
i pondered the idea for about 5 minutes, thinking about set up, tooling, time, & etc.
Then, it occurred to me, that i was under-utilizing a wonderful development tool at my disposal- the Ender5 3D Printer!!!!
my cad-Fu is very weak, but i managed to create a fixture, that i had outlined above, but instead in PLA plastic.
i used Tinkercad to make the template, then imported the .stl file to Cura 4.6.1
i used 35% plastic , cubic subdivision, 85/mm print speed and printed in the low quality mode.
it took less than 2 hours to design and print the holder i needed!
Technology is AWESOME !!! the bounds are truly endless!

The shaper made short work of the 8° angle in the 1214
i ground a tool i call the eagle beak.
as the name implies, the tool is formidable against steels.


there were doubts as to if the whole chunk of PLA was going to fail.
to my amazement i could not differentiate the cuts in this material,from being clamped directly in a vise.
i cleaned up the newly formed fixture and took some pictures.


the fixture is ready for the surface grinder!


