820 countershaft repair

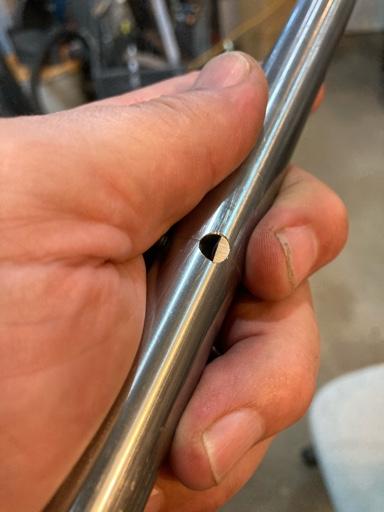
Tip to keep the drill bit from following the center of an egged hole. Don't use a drill bit, use an end mill. Preferably 4-flute and oreferably sindle ended. Start with the smallest size end mill that will cut, and progressively go to a larger end mill. You can probably expect some chatter. Probably need to use the lowest spindle RPM. When the hole is round again, switch back to drill bit. Don't make the steel bushing until you finish with the hole.

As far as clearance or interference between the new steel bushing and hole, look on the Loctite web site. It has been so long since I did one that I forget. But I think that it should still be a slight interference fit. The name of the product used to be Bearing and Bushing Seat I think. And the color was I think green.

On the fit for the Oilite bushings, again go with what they say. And do NOT use the Loctite on them. Because of the oil in the bushing it won't help any and it will plug up the pores and keep fresh oil from getting from the oil cup into the bushing. If the iron casting has no oil cups, I would add them and not expect to have to top them up but once or twice a year.
 
Smoke up the shaft with a candle and pour some lead in there?

Getting those two hole co-linear is not trivial by any stretch. Line boring it on your other lathe would be the way to go in my opinion, then press in appropriately sized bushings. A piloted reamer would be ideal or you risk reaming one of the holes (usually the first one) off axis. That's what happened when I rebushed my Atlast countershaft, took alot of farting around to get the shaft in.
 
My 820 has the older style countershaft with the 2 separate holders for bronze bearings. When I got the lathe the bronze bushings and shaft were trashed. I find it a bit ironic that this seems to be such a common problem on these old Logans considering that the very first thing in the list of places to lubricate is "Two oil cups on top of the countershaft bearings".

LoganOil.JPG
 
My 820 has the older style countershaft with the 2 separate holders for bronze bearings. When I got the lathe the bronze bushings and shaft were trashed. I find it a bit ironic that this seems to be such a common problem on these old Logans considering that the very first thing in the list of places to lubricate is "Two oil cups on top of the countershaft bearings".

That's a spot where the extra cost of a couple of ball bearings would have been worth it.
 
That's a spot where the extra cost of a couple of ball bearings would have been worth it.

Which I believe may have been done in later V-belt models. (This image is in a 200 series manual I downloaded from somewhere) It shows pillow block bearings.

LoganLA1083.JPG
 
Yes, that is a much better design. Unfortunately, it is also more expensive.
 
You have all given me great tips and I’m always amazed at how much I learn from the various posts. Thank you all.

I think I’m going to attempt setting up a line bore on my mill in the horizontal position. Bore to 1” and insert custom 932 bronze bushings. The larger bronze bushings allow me the ability to remake them if I screw up the first attempt or need a reamer to correct alignment.

Crossing my fingers this works. I can’t get to this for a week or so but will get back with pics if it works...or looking for sympathy if it doesn’t work.

John from Minnesota


Sent from my iPhone using Tapatalk
 
Logan Line boring update

Finally got around to my first attempt at line boring with my friend Rick. Needed to repair a Logan 820 counter shaft that had wobbled out more than 1/8 inch causing the shaft to squeal badly.
Although it ultimately went ok and we learned a ton, out nuub skills certainly showed up a few times.

On my old VanNornan #12 mill I set up the line boring as in the picture below. I figured I had just enough Y axis travel if the boring bar had two cutters. So first made the boring bar. See pic below. Had the idea of using the shank of 1/4 inch drills as the “tool steel” for the cutting bits. Picked up a pack of 4 HF Drills, cut and ground to fit in 3/4 inch bar.

First lesson, don’t use HF drills for tool steel, shanks not hard enough!

Had to touch up cutting edge after each adjustment or just rubbed. Once the boring bar was, time for boring.

Lesson two, don’t have both cutters on same side of boring bar.

Yep, 3/4 inch bar flexed like a bugger. Took several “skim” cuts to get the bar to stop flexing and cut a mostly round hole.

Finally done with boring but holes are not exactly the same size because adjusting the two cutters alike was close to impossible, or so it seamed to us.

Time to make the bronze bushings. Finish not great but came out ok. see pic below. Drilling and boring went ok but lesson three. Tried to make a 1 thou interference fit.

Lesson 3. Learn how to use and read telescopic gauges.

Not sure I ever got the same reading twice. Luckily we could “fit” the bore to the shaft with many “test fits”.

Time to press in the bushings. We allowed a 1/4 inch portion of the bushings a smaller of to start the bushings, then pressed them in with a hydraulic press using a “pusher” bar with a diameter of just under 3/4” to keep the internal bushings round. It worked great.

With the bushings pressed in time to test the shaft. Shaft went through first hole great and aligned perfectly with second shaft but...

Lesson 4. Bushings shrink a bit when pressed in.

When pushing shaft through second bore, it hung up about 1/2 way through. Ended up making the end of the shaft a crude reamer by sawing teeth and grinding relief to cut the bore just a smidge larger. It worked.

Completed counter shaft below. I still have to drill oil access holes and make a small channel for oil disbursement.

So thank you all for suggestions and advice in previous threads. All is well that ends well and we have big smiles that this turned out ok.
a97fbad3d6b22d580b247e66feb611d2.jpg

7c315e986cb5cbf081deb2ff0b265f93.jpg

7f2db7dcd10f8e37e626d42df5fe3ab5.jpg

41e784c6bf1b897551a870307d33f65a.jpg

ac5388f606ace9e8f83f2cb859f4aaaa.jpg


John from Minnesota

Moderator, I meant to post this in “820 countershaft repair”. If you could move this to that thread it would be appreciated. John

I did not move the next post in the other thread because it also referred to something to do with the back gears which was discussed in the original thread. WA5CAB

Thanks moderators, you folks are awesome. John
Sent from my iPhone using Tapatalk
 
Last edited:
Back
Top