Accusize quill DRO for Bridgeport style mill

dunno about the need for rigidity - quill measurements are notoriously inaccurate anyway. Getting to .002 is pretty good for drilling, even under power feed...

BTW have you used your power downfeed yet? comments on it?
 
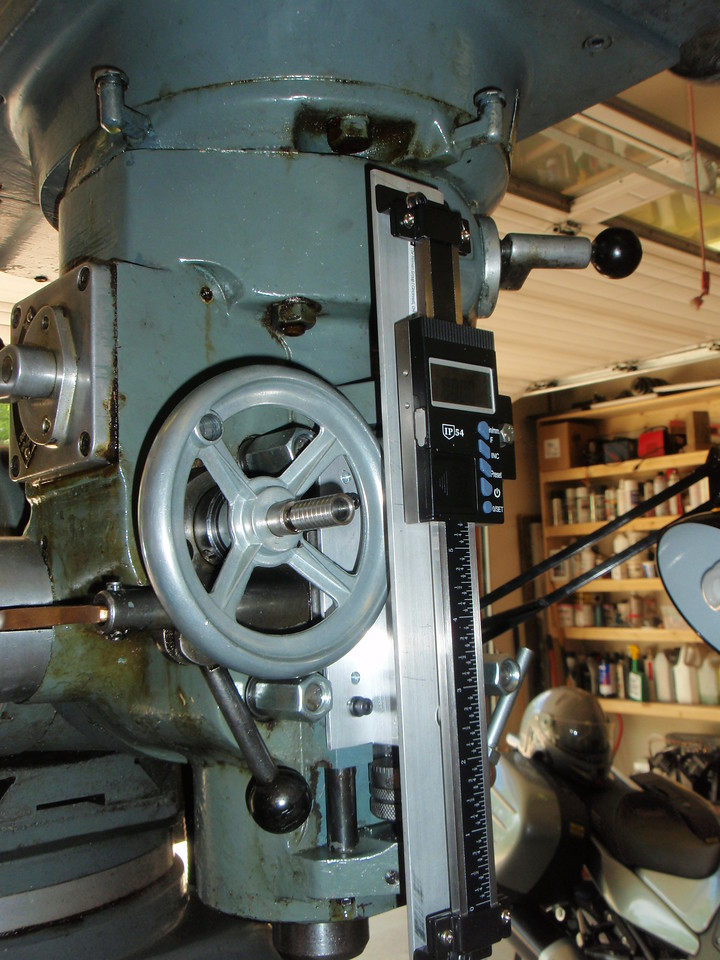
I have this DRO on my Bridgeport clone. It works fine, have not noticed any issue with batteries. I have only these complaints:
1) it turns itself off in a fairly short time, just about when I want to read it again.
2) when it turns off, it does not forget where it is. That’s a good thing, except for...
3) pressing the power button restores the reading. That’s a good thing too, except for...
4) the location of the zero key, at the bottom of the stack, is what I hit by reflex action. It works, and zeros the reading. That’s a bad thing.

Otherwise, it is good, and useful. I had to make all new brackets, seems like what is included were designed by someone who had never actually seen a DRO or a mill. My opinion.
 
Dabbler, my personal view is the frame for any DRO should be stable & accurate so the scale orientation never sees any bending or twist or bow when its initially mounted. The stamped steel is 'ok' but I think i could improve it. Also needs to accurately aligned coincident to the motion of the reader head, which in turn is mounted to some other independent moving part of the mill. You'd be surprised to know how easy this is to say but can be harder to do LOL. Most regular DRO's can be quite picky about how many thou out along the length of the entire scale. It may actually function but misalignment can shorten life, at least that's what I was told. On a small 6" scale like this a couple thou is probably good. I'm actually wondering now if mine drifted because of the rather goofy, teeny screw engagements.

I think conventional quill scales & stop nuts are likely less inaccurate & repeatable over DRO. But the nice thing about DRO is its measuring pure displacement. They don't care about backlash or anything else, just displacement. So the guts of this quill DRO is not really different than a high quality digital vernier. I spot checked the quill readout to an inverted dial indicator & it agreed to the thou on (limited) 1" range. If you are saying not as accurate for milling purposes, I agree there. Lifting the knee is better. I like the quill DRO for depth drilling, spot facing, counterboring... that less critical but also important for consistency stuff. You can zero quicly and easily. Also good habit maybe is zero the quill when you zero the knee & it confirms if the quill lock has slipped. The accurate knee (raising the floor) is only relevant if the 'ceiling stays put' haha.

I played with the power down feed to ensure it worked & I was comfortable with the operations. But no, haven't had much call for it yet & been somewhat sidetracked stomping out all these little fires that seem to be flaring up. Hope that is behind me & I can get on with work. The machine itself is a joy to use.
 
Last edited:
I made the bracket for mine from a piece of 2.5" square aluminum tube with 3/16" wall. Nice and square and very rigid.20180909_154249.jpg20180909_154223.jpg
 
I agree with everything about alignment and such!

Using the stop nuts can result in +/- .004 even in very large mills, but not too much of worry for counterbores, etc. I agree the quill DRO gives you way more accurate readings. I've just not ever had much luck with the quill getting the accuracy I like, so I almost always use the knee with a locked quill... That isn't to say having a quill DRO is useless, cause it tells you what happened accurately!

I've got to test out my power down feed - as soon as I can get a proper plug for the motor!
 
You mentioned the 5-40 screws, I recall reading on one of the forums that the screws are a known issue of being too long.....do some searches and you should find what others have run into. I know that David Best customized his mounting as well as a few others.
 
Yup I encountered that myself & was aware of the issue. I had some thin film tape to act as a shim. The initial setup was perfectly fine. My particular problem developed a month or so later when the screws must have come a bit loose. Its kind of finicky setup, just a smidgen of over or under tightening can affect the sliding performance. There aren't many threads engaged in the thin steel body plate to begin with so its not the best arrangement IMO. Why they didn't go with a much more common #4 (4-40) screw vs a #5 if they wanted to stay IMP is beyond me. Its not like you are ever going to gronk it down & will approach yield of the fasteners. Or 2-56 for that matter would give more thread engagement. It seems to be behaving now. The solution was just a toothpick tip of blue Loctite. Once the fasteners are in with just the right sliding tension, you want it to stay that way. Its still easily removable but at least wont drift out.
 
I bought some 5-40 screws from McMaster, bag full. If you need some LMK.
 
Very generous offer thanks. I had some 5-40 spares that were just a bit long but I made a jig to accurately belt sand the end. I don't anticipate them falling out with the Loctite, but ya never know. Sometimes when I sweep under the bench I find the circlip of 2015, the set screw of 2012...
Why is it you lose the part you don't have any more spares of? LOL
 
I have one made by Accuremote. It does not eat batteries like my cheap Chinese digital calipers and has been working perfectly for 4 years now.


I have the same one on my mill. It has been working fine for years now also. Not too much of a battery hog.
 
Back
Top