Align Power Feed Question

HBilly1022

Registered
Registered
Joined
Dec 22, 2015
Messages
561
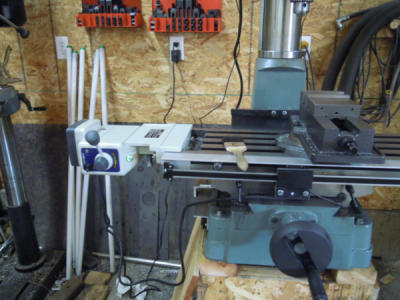
I just got this new Align 500D power feed and installed it on my mill drill. It took quite a bit of alterations to the mounting for the power feed auto shut off switch and for the DRO but I got it done.
upload_2017-2-25_9-21-14.png

I have a concern about the operation though. When I control the power feed by hand and stop it with the direction lever, it stops immediately. However when I use the stop limit switch to control the movement limits, the table coasts to a stop, it does not stop immediately. The coast distance varies with the travel speed and can be quite a bit. This doesn't make sense to me. If this is normal how would the limit switch be used when cutting a slot? Is this normal or is there something wrong with this machine? It seems silly to me that it would not stop immediately.
 
I have a much older Align on my round column mill. Had to refurbish it, so I've had a look inside and traced the circuitry. Assuming yours is like mine ... The directional lever operates a pair of internal switches to select direction. Switching it to the center shorts the motor winding, stopping it quickly. The limit switches just remove power from the motor, which allows it to coast.

A power feed is NOT the same as a CNC control! I wouldn't try to use it to stop at a critical point. Shucks ... don't know about you, but I can't even get a predictable stop position when setting the limit stops. The good news is that you can crank a bit (maybe 1/10") after the limit stop activates. There's some overtravel (at least in mine). So if you really feel the need to use power feed and a fixed position, just set the stop "early" and work manually from there. Best to do a couple of "dry runs" without engaging the cutter, to be sure you stop where you need to. The DRO makes this pretty easy.

PS - I like your installation! Getting both DRO and power feed stops to play nice with each other, on the same side of the table, is a chore. I had the power feed first, then used a slightly different approach when mounting the DRO.
 
Last edited:
Thanks hman. Glad to know the power feed is operating properly and it's just the operator that has the problem. :D I played around with it this morning and the auto stops repeat quite well, as long as the feed speed is not changed. I think I will stick with the method you described for slotting. Better safe than to cause some damage to something.

I really like having the power feed. It sure beats standing around cranking the handle by hand. I was using a battery drill attached to an adapter I made for one of the hand wheels but even that got to be a pain to get the speed right and then hold that position with my finger. Finger would start to cramp.

Glad you like the install. Like you said it was not easy trying to get everything to work without conflicts and there is very little wiggle room. This morning I ended up removing the factory x axis table lock handles because the would conflict with the RDO slide end brackets. Now I just use some shorter cap bolts and an allan key. I may just change the DRO slide end brackets if I find I don't like this system. I was going to mount the DRO on the back of the table but figured I would loose too much travel so I wrestled with the front mount. Have any pics of how you mounted yours.
 
Yes the stop on a power feed is a safety stop not a precision stop.
 
I really like having the power feed. It sure beats standing around cranking the handle by hand. I was using a battery drill attached to an adapter I made for one of the hand wheels but even that got to be a pain to get the speed right and then hold that position with my finger. Finger would start to cramp.
I really got to appreciate the power feed when I was working up my "quick vise tram." For a description of the idea, see
http://www.hobby-machinist.com/threads/tool-for-quickly-setting-up-your-vice-on-the-mill.28527/
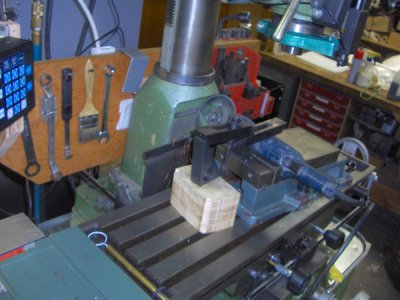
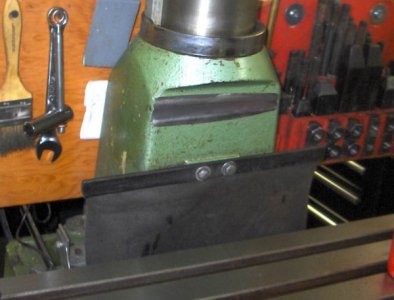
Unfortunately the column base on a round column mill is neither smooth nor square with the world. So I kludge mounted an angle grinder in the mill vise and ground two shallow grooves, one above the other, into the base. The ridge between the grooves (shown in the second photo) is perfectly parallel with table motion.

Cutting the grooves was a long process, as I was taking very light cuts with the grinder. Lots and lots of passes. Couldn't have imagined doing it with the cranks!
[and yes, if I ever take the column off, I'll probably have to re-cut the grooves!]
k2HPIM3664.jpg
kHPIM3665.jpg
Have any pics of how you mounted yours.
I'd gone through what I thought were all my photos when I posted previously, looking for one that had the DRO scale. But no joy. And I'm in Arizona, my mill in Oregon, so I can't just go out and snap one. Then I realized that the first of the photos above kinda shows the DRO scale in its final position, though with prototype mounts.

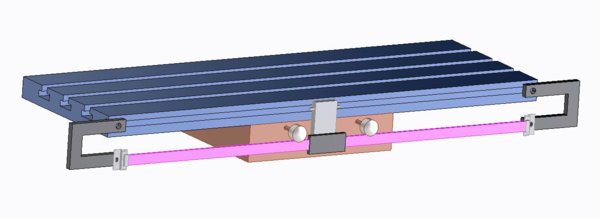
The "final" mounts are wide C shaped brackets milled from ⅜" aluminum, as (approximately) shown in the drawing below. The brackets (black) mount to the stop groove on the table with 8mm bolts (custom heads to fit inside the groove). The height of the brackets puts the scale (pink) safely below the table lock knobs (silver). I extended these, as you can see in the photo. The wide C shape is there to clear the table locks when the table is all the way at either end of its travel. The read head for the scale (black) is attached to the Y slide (orange) with a thin sheet metal bracket (not shown) that allows it some movement toward and away from the Y slide, to help prevent binding. The stop switch box (gray) is above and behind the read head. The stop posts are not shown on the drawing, but they're positioned and used normally.
DRO mounting.JPG
 
I can see your DRO setup in the first pic and the 3D rendering really shows the setup clearly. Nice job. I also like your vice tram setup. Great idea.

I bet the weather in AZ is a lot better than it is here. Overcast with flurries and -10C. Can't wait for winter to be over. Only good thing about this weather is it gives me more time in the shop.
 
Back
Top