

-
Welcome back Guest! Did you know you can mentor other members here at H-M? If not, please check out our Relaunch of Hobby Machinist Mentoring Program!
You are using an out of date browser. It may not display this or other websites correctly.
You should upgrade or use an alternative browser.
You should upgrade or use an alternative browser.
Aluminum Meat Mallet
- Thread starter tredding
- Start date
- Joined
- Sep 28, 2013
- Messages
- 4,305
I'd turn the taper between centers and offset your tailstock. It's a 1:28 taper, so relatively shallow and you'll be able to do it in one go using the carriage. Leave a bit of straight shaft at the fat end so you can hold on to that to turn off the center, either flat or with a ball turner. I'd turn the threads for the head at the other end first, then cut the taper.
I made one in high school, about 1965. My sisters and daughters have used it and would like one for Christmas. So, as a first project, I plan to make ten of them. I have a 7X14 lathe which should manage the handle, though the taper may be tedious to make. I have a verticle mill that can easily handle the shape, and drilling and tapping for the handle. But I don't recall, now, how I made the strike pattern for the ends of the hammer. Is there a "V" milling bit?
Recapturing high school machining skills is fun, at least I think it will be.
All guidance will be greatly appreciated.
 I am slowly making progress with a 7X14 lathe. This is my progress so far. Following a suggestion here, I was able to make a handle with a taper. Thank you, guys, for all your suggestions. Next, I will drill the hole for the handle and tap it for an M10 bolt on the end of the handle. Then I will cut the two faces of the mallet. Wish me luck.
I used the compound rest for this effort. It limited me to about 2 1/2 inches. I may follow your suggestion next. My small cheap lathe does not have a calibrated way to offset the tailstock. I am about ready to spend a bit more money for a better lathe. I think I want a crossfeed and the ability to align the tailstock properly.I'd turn the taper between centers and offset your tailstock. It's a 1:28 taper, so relatively shallow and you'll be able to do it in one go using the carriage. Leave a bit of straight shaft at the fat end so you can hold on to that to turn off the center, either flat or with a ball turner. I'd turn the threads for the head at the other end first, then cut the taper.
- Joined
- Sep 28, 2013
- Messages
- 4,305
I've done that before too, it's just a pain if you have a taper longer than your compound travel. If you want a specific offset to turn a taper, you first work out the angle you want, then do some trig to figure out how much you need to offset your tailstock. Then use a dial indicator on a mag base to move the tailstock that distance. If you leave the dial indicator in place, you can set it back to your original zero which will get you most of the way there. Bigger and better does make some things easier for sure, but that handle looks fantastic so you're clearly doing good work with what you have!
- Joined
- Apr 23, 2018
- Messages
- 6,518
The photo may be helping, but those knurls look fantastic for a 7x14 lathe. Nice job!
I am in the process of making seven of these meat mallets. Five daughters, granddaughter, and daughter-in-law. During the first attempt to make the pyramids I broke a 1/4 60° carbide chamfering bit. Maybe I was turning it too fast and not keeping it cool enough. I got another bit and took it slow. It took nearly four hours to carefully cut the waffle on one end, and two hours to cut the curves on the other. I have a PM-728VT mill. What settings should I be using? Speed and depth of cut. I have been taking .01 cuts but would like to go deeper and make fewer passes. All recommendations and discussions would be appreciated.
Attachments
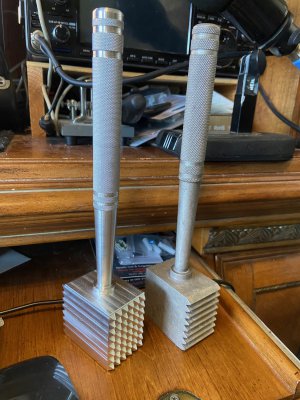
Erich, thank you for your suggestion. I did not know enough to appreciate the genius of your comment/suggestion. Now that I have done one mallet head with the chamfering bit, involving many slight passes, maybe I should try the 60° fly cutter? It might make making the face considerably less time-consuming. I have the DRO on the PM-728VT so the mill should be easy to accurately control. Again, thanks for the suggestion. Terry - W6LMJSo based on the new photo, it looks like those are 60 degree teeth. At that point, a ground single point tool in a shaper/fly cutter, or a 60 degree double-angle cutter would work:
Double Angle Chamfer Milling Cutter 5/16 dia X 60 degree MariTool
www.maritool.com
My final approach was to cut a 2 1/2" taper. The wife and other ladies actually prefer the shorter taper and longer grip on the handle.I think your best bet with the taper is to machine it in two parts using your compound. Cut one part as far as travel allows, then re-set the carriage and tool and cut the second part. If you have 4" of compound travel, then you can do a 8" taper in two steps (more or less). If you botch the join between steps, you can cut a little decorative ring where they touch in the middle of the taper. I mean to say it's not a precision taper, it's just a draft between two diameters, so you don't have much to lose by trying, and if it works, you win.