An Electronic Lead Screw controller using a Teensy 4.1

Is that a mining town poor rock stone basement? Looks just like the one I used to have a shop in!
No. It's a basement that was dug (by hand) ca. 1875. Most of the stones are granite, from local quarries.

Just an observation - mechanical things don't do much in a microsecond, or even 10 microseconds, unless they are riding on a meteor. Don't think 100ns is a big deal at all. For what it is worth, with a little cooling, Teensys have been overclocked at 1.008 GHz, as compared to their normal 600MHz. Overclocking Teensy4.1 is an option in the Arduino IDE (V1.8.19). Apparently one can OC to 816MHz without cooling.

I tested the SW encoder at 400kHz without loosing counts. (10M count tests, multiple times) This 400kHz rate is equivalent to a spindle RPM of 5859 RPM, if I recall correctly. My chuck is rated to 2000 RPM and honestly, I'm not going to run it that fast.

Say I ran at 1200RPM, then my interrupt frequency would be 81.92kHz, or 12.21usec. Lets say the feed was on and it was 0.010"/rev, which is on the faster side. Then 1200 RPM = 20 rev/second. The Z DRO would move 20*0.010"/sec = 0.2"/sec. If the DRO resolution was 0.0002"/count then we would get 0.2"/ sec / ( 0.0002"/count) = 1000 counts per second. (1kHz) That doesn't sound to me that using the feed DRO simultaneously with the spindle encoder, both in software, will be an issue. It looks quite comfortable to me. The other DRO is typically not moving, so it has an even smaller contribution, at least in a simple ELS.

The only time the NEMA24 stepper seems to make a small whine is at 4 TPI threading. Other threads don't seem to make noise at all. The only noise I hear now is the two plastic gears that are meshing. Believe me, the metal gear noise was quite a bit louder.

Still waiting on PCBs and connectors. Then I can cable things up. So the rats nest stays. It bugs me, and it is a hazard, but need to tough it out a while. Despite that, it still cuts and feeds.
 
No. It's a basement that was dug (by hand) ca. 1875. Most of the stones are granite, from local quarries.
Our basement was 1880's, amygdaloidal basalt. Hand dug, etc. Probably identical construction. I'm sure the techniques were similar in that timeframe.


Just an observation - mechanical things don't do much in a microsecond, or even 10 microseconds, unless they are riding on a meteor. Don't think 100ns is a big deal at all.
I certainly agree. Mechanical events happen glacially slow compared to electronics, especially this processor! But it was still surprising how long it takes the interrupt handler to actually run the interrupt. In other platforms that can be around 3 clocks. 60 clocks or more (even though they are much faster) was a surprise, is all.

That prompted a quick test as a worst case scenario. Jumper 6 different pins together and assigned them eacn interrupts, and each interrupt toggles an different output pin. All 6 inputs are hit with the same signal. The 6 outputs toggle at different times. The first is interrupt fires at 140nS, with each successive one being 40nS later.

Given a worst case of four encoders with a z pulse where a phase and z triggered all at the same time (very unlikely), that would be ~460nS to service them all. About a 2MHz pulse rate could easily be supported. So, yeah, not a problem for this processor. This assumes no other interrupts were going on at the same time, and the ISR routines were all relatively fast.
Anyway, the above is nothing more than back-of-napkin thinking-out-loud.


Ratsnest or not, it's working! It will be neat to see the boards and box all wired up. What's there certainly proves the concept out, and I'm sure many of us here can appreciate the amount of work done to get where you are now!

BTW, What's the gear ratio from the spindle to the encoder?
 
Our basement was 1880's, amygdaloidal basalt. Hand dug, etc. Probably identical construction. I'm sure the techniques were similar in that timeframe.


I certainly agree. Mechanical events happen glacially slow compared to electronics, especially this processor! But it was still surprising how long it takes the interrupt handler to actually run the interrupt. In other platforms that can be around 3 clocks. 60 clocks or more (even though they are much faster) was a surprise, is all.

That prompted a quick test as a worst case scenario. Jumper 6 different pins together and assigned them eacn interrupts, and each interrupt toggles an different output pin. All 6 inputs are hit with the same signal. The 6 outputs toggle at different times. The first is interrupt fires at 140nS, with each successive one being 40nS later.

Given a worst case of four encoders with a z pulse where a phase and z triggered all at the same time (very unlikely), that would be ~460nS to service them all. About a 2MHz pulse rate could easily be supported. So, yeah, not a problem for this processor. This assumes no other interrupts were going on at the same time, and the ISR routines were all relatively fast.
Anyway, the above is nothing more than back-of-napkin thinking-out-loud.


Ratsnest or not, it's working! It will be neat to see the boards and box all wired up. What's there certainly proves the concept out, and I'm sure many of us here can appreciate the amount of work done to get where you are now!

BTW, What's the gear ratio from the spindle to the encoder?
Made it 1:1, so I didn't have to think too hard. :p Spindle has a 40T M1.5 gear. Gear shaft has 60T M1.5 gear. I used a 60T timing pulley on that same shaft, and a 40T timing pulley on the encoder, so it's back to 1:1. I looked at M1.5 at first, then other module gears and couldn't get things to physically fit on the side of the lathe. The timing pulleys are more compact and did the job. Had to modify both the 60T pulleys, but it wasn't very hard.
 
Last edited:
Waiting for the PCB's is hard... Like waiting for grass to grow, or paint to dry on a wet cool day. Great anticipation and a little bit of dread.
The cheaper JLC PCB's are in country now, but the PCBWay PCB's are still in China, trying to get on a plane.

Made a little headway trying to clean up the shambles of a work area. Tied up some cords with zip ties so they are less intrusive. While puttering about, and putting things away, made a little chip tray that attaches to the saddle, so that most of the chips don't get on the ways. Just a piece of 1/8" 6061 plate the length of the saddle and about 5" wide. The aluminum was some scrap 6061 I found in a scrap yard long ago, thinking they would be nice to have. The scrap was marked as 6061 which was a bonus. Bought two or three pieces that were 1/8 x 6" x 48". Had it sitting in the corner in my garage for a decade, and remembered it recently. This chip tray was been a round tuit, nice but not totally required. I'll have to modify it to allow access to the ball oiler, but I'll have to locate that position. Maybe if I mark it the marker will transfer to the plate. Then I can drill out the hole.
 
I've been using OSHPark for circuit boards A LOT lately. The worst part is waiting the week or two for the boards to arrive.
With the low cost of boards from them, I usually design a board before prototyping a circuit anymore. It's really changed how I build things now. Really nice for little adapters, or break out board.

Made a little headway trying to clean up the shambles of a work area. Tied up some cords with zip ties so they are less intrusive. While puttering about, and putting things away, made a little chip tray that attaches to the saddle, so that most of the chips don't get on the ways. Just a piece of 1/8" 6061 plate the length of the saddle and about 5" wide. The aluminum was some scrap 6061 I found in a scrap yard long ago, thinking they would be nice to have. The scrap was marked as 6061 which was a bonus. Bought two or three pieces that were 1/8 x 6" x 48". Had it sitting in the corner in my garage for a decade, and remembered it recently. This chip tray was been a round tuit, nice but not totally required. I'll have to modify it to allow access to the ball oiler, but I'll have to locate that position. Maybe if I mark it the marker will transfer to the plate. Then I can drill out the hole.
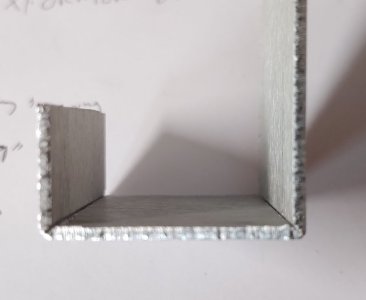
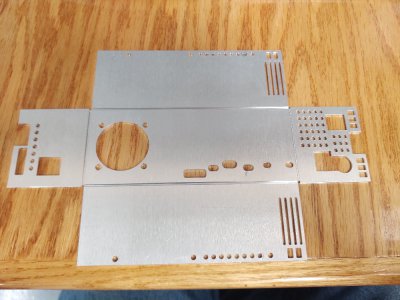
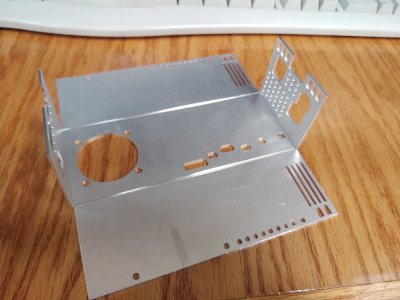
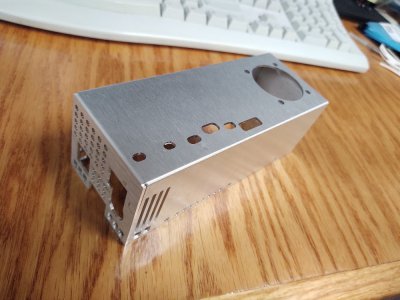
Thinking of aluminum parts. Have you ever V grooved aluminum for easy bending? It allows easy bending of aluminum or similar without a brake. Not as strong as bent solid, but but still sufficient for a lot of things. See images. In this case, for 1/16" alu, I think I milled .040" deep.

For little housings and cases it can work out really well. Takes a little time to get right, but isn't difficult. The easiest way to start is to mill two V grooves at a known distance, and bend the sheet up, and measure the final width. Then use that to lay out the position of the grooves for the final box in cad.

Alu1.jpg

This one is a little more complex than a 'little' case, but you get the idea how it can work out.

Alu2.jpgAlu3.jpgAlu4.jpg
 
Well, that's showing off. :encourage: Wow, that came out extremely nice. Thanks for showing me that. How do you vee groove the aluminum?
 
How do you vee groove the aluminum?
90 degree v groove cutter in the mill. The one I used is actually a mill/drill/ 90 degree chamfer all-in-one tool. MELIN Tool AMG-404-DP
In a small home shop with a little CNC machine they're nice because you can do so much with one tool. But, honestly I think just about any 90 degree Vee groove cutter would do the trick. This one is nice because it makes just a bit of a flat on the bottom of the Vee, so things fold up a little easier.
Thanks for the link. No CNC in my shop. My ELS is as automated as I get for now. I do have some 90 degree cutters, but they seem to come to a sharp point. Not sure how the points would like to be dragged through material, probably have to take it slow.
 
Those cutters work on manual mills too. ;) They're pretty handy, and not horribly expensive.

Thinking about the 4 TPI Thread. Does your lathe have a backgear? If not, that probably makes threads like 4 TPI a challenge.
 
Those cutters work on manual mills too. ;) They're pretty handy, and not horribly expensive.

Thinking about the 4 TPI Thread. Does your lathe have a backgear? If not, that probably makes threads like 4 TPI a challenge.
No back gear. Smallest pulley and lowest VFD frequency settings are needed to cut 4 TPI. The low frequency gives minimum torque at the spindle. I might make some pulleys to get more mechanical advantage. Don't think that I'd be cutting that pitch very often, so might not bother with it at all.

One has to recognize the limits of one's machines and not ask them to perform at levels far beyond their design points. Otherwise one finds other more expensive limits, like breakage. So probably won't ask my 10 x 22 lathe to cut 2 TPI threads on a 10" diameter piece of 304, or more difficult material.
 
Back
Top