Another Lathe Hand Crank Thread? (FINISHED!)

jblancuzzi

Registered
Registered
Joined
May 31, 2020
Messages
5
I am pretty new to machining, although my father was a hobbyist and my stepfather was a machinist, and feel like I am learning quickly. That said, I decided I wanted to really get myself setup for success. I inherited all of my father's tools after he passed away and he had a Smithy CB-300 3-in1 that I have learned to "love". I have cleaned it up, leveled it, made sure the surfaces were burr free and smooth, and that everything runs "true-ish". I have installed a Accusize AXA quick-change toolpost, which makes me love it even more, and am now making a hand crank for the chuck so I can better control it for threading. All in all this has been an easy and fun project. Making accessories for my tools is actually more fun than projects that aren't really useful. For example, candlestick holders, etc.

Since a picture is worth a thousand words I will post photos of what I did and try to keep any words to a minimum. I am new to this so I am trying to use the best terminology to describe what I am doing. Please feel free to correct me.

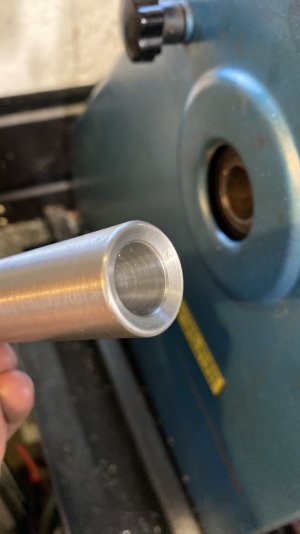
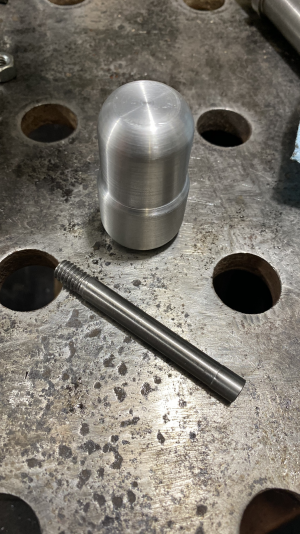
  • The crank shaft is turned from stainless steel rod I had laying around.
    1591276274318.png

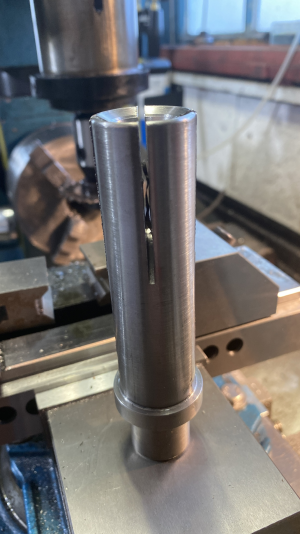
  • The collet expander is aluminum and will be tightened with a drawbar. Will likely change this to a harder metal like brass or stainless as suggested by another group member, SLK001, to avoid getting stuck in the grooves. So far during testing it hasn't shown any signs of being soft enough but I would hate for it to fail down the road.
    1591213819328.png

  • Shaft slit to allow expansion to lock it in.
    1591214010740.png
    1591213917874.png

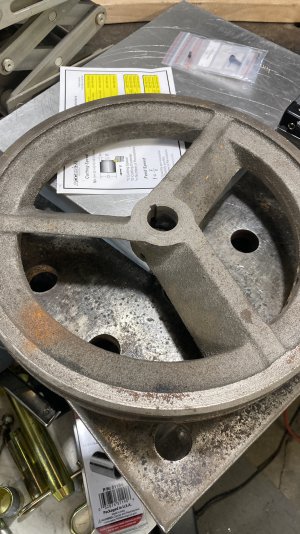
  • The flywheel crank is an old cast iron pulley I had from an old air compressor.
    1591214101637.png1591275186100.png

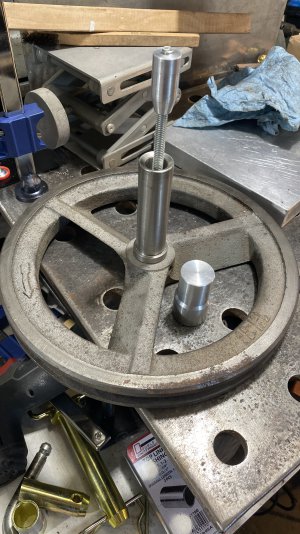
  • I milled a flat area on the shaft to allow the flywheel crank to be tightened and not turn on the shaft. Obviously.
    1591214219081.png

  • I made a stubby handle out of aluminum that will just push onto a stainless steel steel shaft. I will add a snap ring to the end of the shaft to hold the handle on.
    1591214388684.png1591275086708.png
    1591275244682.png1591275271165.png1591275508096.png

  • I did a trial run for crank fit and threading function and so far it performs as expected. I will make a different expander at some point but right now it is working fine.
    1591275901586.png
    1591214767833.png
    1591214894426.png

IMG_2689.JPEGIMG_2695.JPEGIMG_2698.JPEGIMG_2699.JPEGIMG_2700.JPEGIMG_2707.JPEGIMG_2714.JPEGIMG_2710.JPEG
 

Attachments

  • IMG_2693.JPEG
    IMG_2693.JPEG
    2 MB · Views: 245
  • 61265840705__D177012D-9AC0-433C-B0D4-F354483255CB.fullsizerender.JPG
    61265840705__D177012D-9AC0-433C-B0D4-F354483255CB.fullsizerender.JPG
    3.1 MB · Views: 244
  • IMG_2716.JPEG
    IMG_2716.JPEG
    2.9 MB · Views: 246
  • IMG_2715.MP4
    4 MB
  • IMG_2715.MP4
    4 MB
  • 1591213730225.png
    1591213730225.png
    5.4 MB · Views: 4
  • 1591275045918.png
    1591275045918.png
    6 MB · Views: 3
Last edited:
Looking at the "header", I feel you are as much saying what you have done/accomplished as asking for any input. My lathe is an Atlas/Craftsman 12X36. I do much very small work and occasional "normal" machining.

To answer your unspoken question. . . I use hand driven threading on small stuff, Nr6-32 and smaller. And power threading on "normal" sized jobs. I build models, using screws as small as 3/0, 000-120. But don't thread that small. Usually Nr0-80 is as far down as I can go. On larger work, 3/8" and above with 40 TPI, I do use hand driven threading. Mostly for the feel. . .

The Atlas has a rather large pulley outboard, 12" or so, that serves me well for pulling the spindle through. On a smaller, 9" Grizzly, I have provision for a handwheel such as you describe but seldom use it. An old "custom" steering wheel from way back when.

There are many true machinists here that will advise power threading. I'm not a machinist but will concur with them for "normal" size work. It is only because of my model building that I agree with you, to a limit. Slowing the machine down (if you can) and power threading is much quicker and easier. Only if you are trying to fit a particular class of thread would the final pass be worthwhile by hand. Since you are a noob, trying to learn power threading would be the way to go. Once you have that down, then try for a particular class of fit.

I will offer a way to slow down the machine if it already is not so fitted. I devised a planetary gear reduction for my Grizzly, http://www.hudsontelcom.com/9X20Gear.html that comes in handy for several applications. Cheap and easy to build, it isn't optimal but doable by most anyone. It is protected, but only for any commercial usage. Hobbyists have free run.

Bill Hudson​
 
Mainly I wrote the header the way I did because of how many other posts throughout the Internet there were. I am surprised there weren't so many in this forum.

I have been power threading but my machine is somewhat limited and I want some level of manual control for certain jobs. My machine does not have a dial indicator. I leave the half-nut engaged and run the lathe in reverse to keep the position on the leadscrew. When I get to the end of my threading run I have to shut off the machine. I wanted a way to manually cut the threads if needed.

I am looking for any advice I can get and am open to all opinions and criticism. Constructive preferred.

I mainly spend my hobby time building my own CNC machines, designing, welding, etc. I love to tinker so this is right where I want to be.

Thanks for the info on your setup and the link. I will check it out.
 
My advice would be to make the expander cone out of steel instead of aluminum. There is a lot of pressure on the cone and I worry about the aluminum flowing into the slits of the expander.

There is another thread discussing these for South Bend lathes here. My spindle crank is discussed there and it is a real breeze to use. It doesn't take that much tightening to make it seem like it is welded to the spindle.
 
I wanted a way to manually cut the threads if needed.

I made a hand crank for my Atlas fairly early on in my experience with the lathe, and for the same reasons as you. Mine was a bit of a construct involving an expanding masonry anchor and the crank from some kind of overpriced European kitchen gadget. It was the second attempt — my first version using a cast silicone plug as the expander device ended in disappointment — but I have to confess I don’t use it often.

But at the time it provided a certain comfort level that took the edge of some threading applications, and it’s still in my drawer of attachments in case I need it again. Maybe the best thing about building things like this though is the development process that goes through your head as you design it, especially if there’s a few salvage bits in the works. I see that in the compressor wheel! Those are the exercises that make you think of how you can do something, what tools do you have to get there, and what do you need to learn for it to succeed. To me that’s the valuable part, it just goes under the guise of a tool that you may or may not really need.

Good job on your crank, it will serve you well in more ways than you can imagine! :encourage:

-frank
 
I also leave the half nuts engaged and reverse the machine to back out. Different reasons though, my machine is very old and very loose (backlash). I could tighten things up but with threading metric it's necessary to leave the half nuts engaged anyway, So what little threading I do, I just stay the same all the way through.

As far as hand driving the spindle for small threads, I thoroughly agree. Doing a Nr 4-40 thread under power is just asking for a disaster. Much of my work is Nr 2-56, 2.0mm. . .

Be sure that the crank is clean, no snags. You'll end up leaving it in place more often than not.

.
 
Welcome to HM!

I think you did a good job on a useful accessory. As the guys have said, it will come in handy, especially when you are cutting smaller threads with a shoulder and a tiny thread relief you have to hit. It will also help when you need to cut to an accuracy class, where a half a thou is often what you need to take off to hit your pitch diameter.

Glad the lathe is being used. Sorry for your loss; that connection to your Dad is priceless.
 
My advice would be to make the expander cone out of steel instead of aluminum. There is a lot of pressure on the cone and I worry about the aluminum flowing into the slits of the expander.

There is another thread discussing these for South Bend lathes here. My spindle crank is discussed there and it is a real breeze to use. It doesn't take that much tightening to make it seem like it is welded to the spindle.

What about making the expander cone out of brass? I have a nice piece laying around I could use. I never considered the aluminum flowing into the grooves. Possible crises averted there. Appreciate it.


Sent from my iPad using Tapatalk
 
What about making the expander cone out of brass? I have a nice piece laying around I could use. I never considered the aluminum flowing into the grooves. Possible crises averted there. Appreciate it.

Brass is just too expensive to use like that (it WILL work, tho - have you priced brass lately?) Do you have problems tapping steel, is that why you are resisting it? With a sharp tap, tapping steel is fairly quick and easy.

What is the angle of your cone? It looks like you have a very shallow angle. You really want a non-locking taper, which is any included angle greater than 16º, or else you may have problems with everything releasing when you want it to.
 
I have a " lathe only" version of your 3 in 1 and this seems like a nice project for mine , thanks
 
Back
Top