My 2 cents:
I suggest doing as much of the cleaning to remove the tourmaline as soon as you uncrate before you move it in to place while it is centered in the workspace. My lathe came full of oil, BUT in the process of moving it in to place it got tilted far enough to loose a significant amount of oil. Make sure the lathe is BALANCED well because it gets dicey once it starts leaning.
You MIGHT want to install the new back control panel (the one that replaced the one in the box on the lathe) to the before moving the lathe to the stand, but I did it after. As long as you have space it is okay either way.
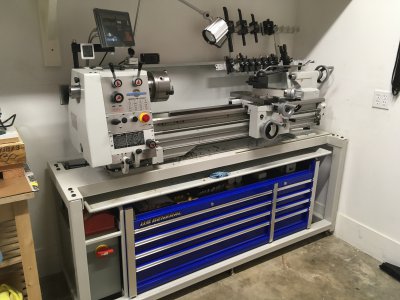
I used the stand from PM. Level the Stand as much as possible with a machinist level. Leave enough room behind the lathe to walk behind. I am a skinny person and I only left a small space (13") and was able to manage, but in hind sight a larger area would have made setting up the DRO easier. If you can get away with more space I would do so. TO give you some idea, my hips are about 15 inches wide. With the stand at 13" the splash guard is only 7" away from the wall and the control box door (closed) is about 10" from the wall. If I was doing it again I would put the stand at least 18"from the wall and more likely 24"
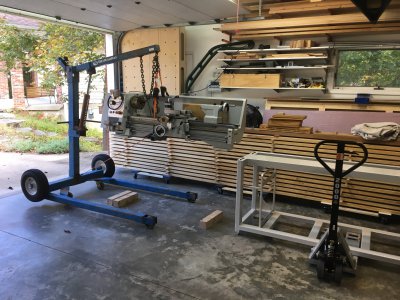
Move the lathe from the palette to the stand.
Getting the lathe off the palette was a process for me since I was using engine hoist.
Basically I had cut some of the palette to get the hoist under the machine (that worked well),
Lift the machine to remove the palette.
Lower the machine on to some block so I could reposition the hoist (since the machine was in a position that I could not get the hoist in from the correct side to begin with.
Note the Milling machine required additional step since it is on a double palette and the hoist could not be positioned close to the machine with the pallet there.
Once on the stand finish cleaning the machine and oiling.
The order of the VFD and the DRO does not really matter since you can test both independently from the other. I installed my VFD first so I could see it come to life. Following the instructions that come from Mark almost verbatim with only deviations where the machine was slightly different. After the VFD is installed and before installing the drive belts make sure you run the tuning operation (it is in the instructions too)
If you are adding an RPM monitor do it at the same time as the VFD, since you already have to have the side of the machine off. For me I repurposed the bracket that detects if that panel is installed. I made a small bracket to hold the RPM sensor that attached to the the same holes as the sensor and taped the magnet to the spindle (not sure it is necessary but I applied the electrical tape all the way around the spindle twice).
Once everything is in place you can nudge the lathe closer to the wall (though I think you should not), then start the process of leveling and checking for twist. Go slow and understand how each of the feet affects the level. It took me far longer than I expected since the machinist level is SOOO sensitive.
When putting the belts on DO NOT over tighten. This can result it wierd vibrations, If anything start with removing a little pressure from the belt from gravity. That drove me nuts. I selected the high speed pullies and am happy that I did. The VFD let's me run a very low speeds (under 80 RPM) to pretty high speed (over 3100 RPM) with only changing the frequency and gears on the front of the lathe. If I ever needed more power at the low end it would be easy to change the belt, but so far I have been able to cut stainless at slow speeds with not problem at all.


")