Another Tool & Cutter Grinder

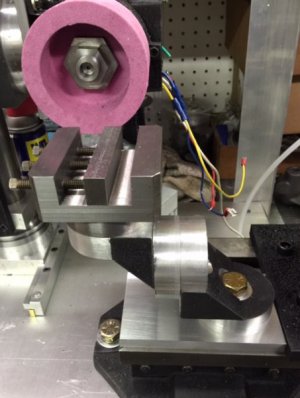
Take a good look at that fixture from Shars Mark. The beef of the base is forward under the cutter holder. This keeps the grinding wheel from forcing down on the front of the fixture. It is much more rigid this way. No flex.

"Billy G"
 
Last edited by a moderator:
I see what you mean , Bill. And you are correct. However, I did a little testing on mine. I set it up in front of my other grinder. it does well. I clamped a tool and run it hard on a 5" wheel. It did good. I got no vibration that I can tell. it seems solid. that probably is because I made it heavier cause I used aluminum. I could remake the base joint half so it reverses the rest to be over the base more and I will do that if it becomes necessary. I may even do it anyway later, but Right now it seems to work good as is. I tested it grinding much heavier than I ever will on the tool grinder. One advantage to making it that way is it will stand up on its own. Mine falls over if not bolted down :(. I got my design looking at one from an old Cincinnati grinder. It looks a lot like mine but a little smaller and it was cast iron.
 
Yes , Bill, but it is a good thing to bring these things up. So , I went back out to the shop and looked things over to make myself happy. I found I would have to make the base joint over to reverse it, so I set things up and looked over what I have and I made a couple modifications.
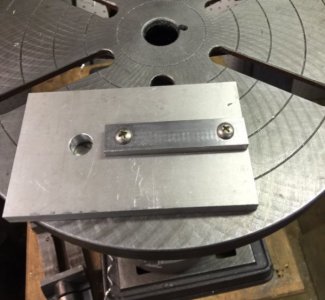
plate key.jpg I put a key on the bottom of the base. This key is a snug sliding fit in the table key ways. It locks the fixture square when mounted on the table.

finished fixture.jpg I polished the base surface for appearance and find it will stand without tipping over (this made me happy). I checked the vibration factor on my other grinder and found this assembly to be rock solid. I stalled the grinder to see how it held up. there is virtually no detectable vibration using this vise and it does not flex AT ALL. All this being said I am pleased with the outcome and will keep this setup. The vise and outboard joint will come off to put on the collet fixture I still have to build. In retrospect, I wish I would have made it a little different, but that's the way it goes. I am glad to see that some of you are observant and spot these possible flaws or problems and come up with alternatives. This kind of thinking is great to see and it pleases me to see it happen.


A friend of mine who is a cabinet maker came out today to look at the grinder. He is going to build a heavy wooden cabinet base with a 4" high drawer in it to sit under the grinder. He is going to build it from solid cherry wood. I found the basic grinder weighs over 200 pounds. I cannot lift the entire machine ,( only one side). I will have to dismantle it to move it to the bench whee it will reside. This thing is a beast and I think will be a great grinder.
 
Last edited by a moderator:
Mark
Reading all about flex and design, in my mind the amount being taken off should not be enough to cause any substantial flex in your design. It's not like we are working on a Bridgeport and hogging. When grinding we take off thousands and if it takes twenty passes that's what it takes. This is the finish end of tool sharpening.
Love how the grinder evolved and I believe it will be a very good match to those machines costing thousands of dollars.
Mark very nice
Nelson Collar

And by the way I do not think the one on Shar holds a candle to your design
 
Maybe a better word would be Vibration. The front extension might add a dampening effect. You don't need me anymore Mark. I don't know as much as the book. I only go by past experience.

"Billy G"
 
You don't need me anymore Mark. I don't know as much as the book. I only go by past experience.

"Billy G"
Don't even think that way Bill. I value your opinions more than anything else. You have more knowledge about this hobby and machining in general than anyone I have ever met. I am always honored to be the recipient of any of the wisdom you have to offer and always look forward to anything you say on what I build.
All you younger machinist or beginners out there, I been at this for well over forty years and if I am stumped or in real doubt about anything in the machining world, I will ask Bill Gruby.
 
Thank you Mark, I was probably a little put off by the "reading" comment and shouldn't have been. If there is anything that I have learned over the years it is the fact that we can read and at the same time the machines we work with can't.

"Billy G"
 
Last edited by a moderator:
Nelson Collar.... YOU GONNA LOVE THIS....

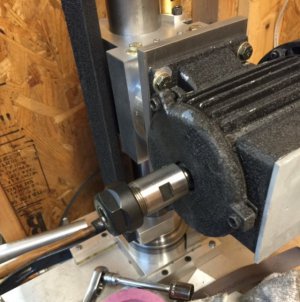
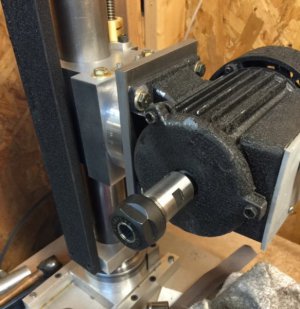
collet chuck.jpg I bought an ER 20 collet chuck for mounting on a motor shaft. It was really cheap but was for a 8 mm shaft. Mine is 12 mm. I tried to drill it but drill wouldn't touch it. BUT.... it bored ok using a carbide boring bar. I put it in my new ER 40 collet chuck I made and bored it to be a light press on the motor shaft. It has two set screws. It had about .0005" run out when in my lathe but the motor shaft itself has about a thousandth runout....So measuring behind the collet nut, there is .002" runout. I put a 1/2" end mill shank in the collet and checked out where the grinding wheel will run and there is a little over .004" runout. I believe this is as good as it gets and I am happy with this. .004" on a grinding wheel is nothing (except on a surface grinder.) If I mount each wheel on its own arbor, true it up and mark the orientation in the chuck , I can put it back and be really close, So I am happy with this setup.
collet chuck1.jpg
 
Back
Top