[How do I?] Atlas 7B Shaper Restoration - advice needed

Yep, I have the vise, it's just off for cleaning at the moment. I made a quick wrench today out of an old deep socket and a wrench that I welded together. It's kinda janky, but it works until I can finish it better, make another one, or buy a real one. It's visible laying on the table in the 2nd to last photo.
I also need to replace the top slide (what's it called really?) adjuster crank handle, as it's broken off. I have both pieces, but it appears cast, so I don't think I'd be able to weld or glue it back together.
Anyone have a source for those balanced crank handles? I assumed eBay or Amazon, but I'm not finding any in that size range, they're all much larger.

PS: So how do I do that thing like some of you have that lists my equipment and such under each post? I assumed it was a sig, but the system told me I couldn't do it that way. It said my sig was 5 lines too long, and it's only 6 lines, so.... ?
This is what I wanted to add:

Jet 1236PS 12x36 Lathe
Micro-Lux 7x16 lathe
12x20 40W CO2 Laser
Plasma Cutter
Gas Forge
tons of other junk in my way
 
I also need to replace the top slide (what's it called really?) adjuster crank handle, as it's broken off. I have both pieces, but it appears cast, so I don't think I'd be able to weld or glue it back together.

It's called the "Ram".

.
 
Hahaha c'mon Bill, I'm not quite THAT dense! :p
It's the part that allows vertical adjustment of the tool height. Looks like a top slide from a lathe, turned on its nose.
I looked it up, and the part I'm talking about is the tool post slide.
 
I believe they call it the tool post clapper box assembly in the manual.
 
The whole assembly is called that, but the part I was referring to is specifically the tool post slide. I looked it up in the manual. :)
I'm hoping to get out in the shop a little today to continue the cleanup. I've ordered new belts and a power cord. They should be here later this week.

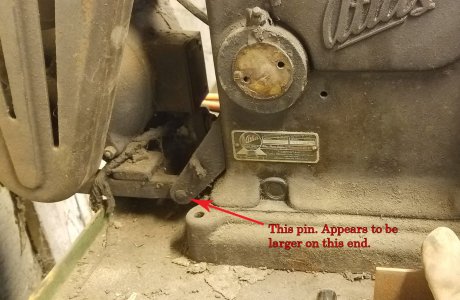
I can't seem to figure out how to remove the motor from the frame. It seems to be only one pin, but I don't see how to remove it. I tapped it a little with a hammer and punch on the smaller end, but I'm afraid to crack the (rather thin) motor mount. Is it just a big rivet that is likely stuck and may need some penetrant or something, or is there more to it that I'm missing?
 
I'm not sure what you're talking about, my motor was just the 4 bolts that hold it to the plate. This machine is full of tapered pins that kinda look like roll pins that they call "groove pins". But tapered pins will only go one way and it's not easy to see which way that is and you need exactly the right size pin punch. I had to pull the ram to get to the crank hub assembly and about shot myself in the foot because of a groove pin in the gear that adjusts the assembly in the end of the ram. They give you a little hole to work through. Crazy. Because of the crazy amount of parts and sub assembly's I only took apart what needed repair. I had bent parts in the crank hub and tool slider.
 
I'm talking about the pin marked in red on the photo. It's labeled as "pin", part #M6-122 on pg 16 of the manual/parts list. It's the pin that connects the motor mount bracket to the motor mount. If I can pull that one pin, I can remove the motor assembly to rewire it without having to unbolt it.
stuck_pin.jpg
 
It has been over two years since I did it, and of course the "manual" isn't always as detailed as it should be, but I could swear there was at least one set screw in the motor base plate to hold that hinge bolt in place. And I couldn't get to it without pulling the motor off the baseplate and hinging it downward or taking the mount to the main case off. Of course it doesn't show any set screws, but what holds it in place otherwise and it has to hinge for the belt adjustment to work.
 
1) What's the best and safest way to remove the grime from the machine without damaging the existing finish? I haven't decided if I'm going to repaint it or not, so I don't want to destroy whatever paint may exist. I'm not really planning to do a full teardown right away, so the old soap and water in a bucket method probably won't work for me. I'm looking for suggestions of cleaners or solvents that are effective, but not too harsh. I've heard good things about Castrol Super Clean. I also have used the "Totally Awesome" stuff from the dollar store with success on other projects in the past. Thoughts?

I've had good luck with paint thinner (mineral spirits) and a rag. It dries super slow so I usually go over it with a dry rag afterward.

2) The power cord (and likely other internal wiring) is totally rotted. The outer sheathing is that black woven stuff, and it's nearly gone. What would be a suitable, nice looking replacement? I believe the motor to be a 1/2HP, 120V single phase. I will confirm that once I remove enough grime to read the plate.

Home Depot carries nice looking black extension cords you can cut the end off of, they look like a modern black cord.

3) What's the best way to remove/flush the old grease and oil, and what should I be replacing it with? I know modern lubricants are far superior to what was available 40yrs ago, so if I can re-lube it with something better, I'd like to.

The bucket of paint thinner works well for this as well, although some disassembly will be required.

4) The handle that fits every major adjustment on the machine is missing. Anyone know a source for a replacement? It has a 3/8" square drive, and is about 6" long. There's one for sale on eBay (can't post the link), but they want $100 for it! o_O

You could get some square drive sockets, cut some squares on the end of a rod, bend the rod the way the factory one is and then silver solder the sockets to the end of the rod.

5) The little balanced ball crank on the top vertical adjustment is broken. I have both parts. Is there any way to fix it, or do I need to find a replacement? If it must be replaced, anyone have a source? I can't seem to find any that small on eBay or my other common sources.

For a repair on that, I would try drilling pilot holes in both sides of the break and then epoxying them back together with piece of steel rod epoxied in the holes to give it strength. I can't think of any other way to repair that zinc casting that might hold.

Good luck and enjoy.
 
If it's a Craftsman style motor, it will need to come off the mounting bracket anyway. The capacitor is on the bottom, inside the base. Once the motor is off, it should be easy to see how to dismount the bracket.

Wire type:
For internal motor wiring, I would recommend stranded MTW, machine tool wire. Altermate is THHN, again stranded. THHN is oil and waterproof, but not near as flexible as MTW.
For external wiring, recommended wire is SO, SJO, of that nature.

.
 
Back
Top