Bench rest

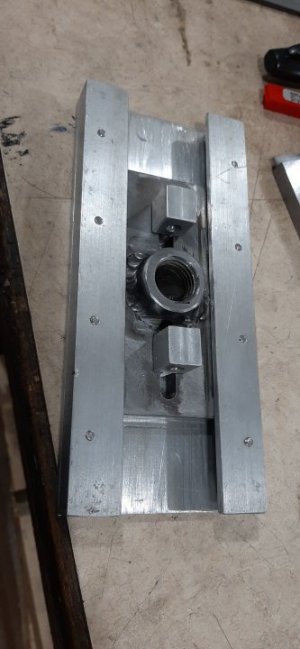
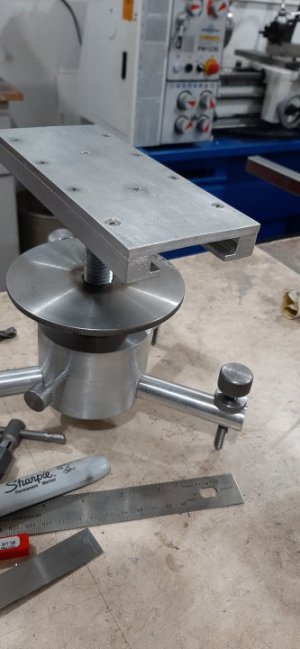
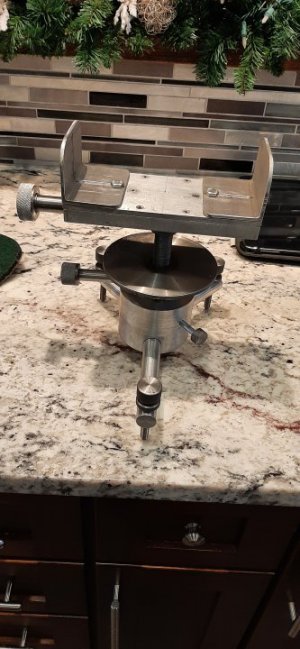
Over the last week, I have made a bit more progress. Looking back, I really admire/am jealous of those that can design a project in CAD and then go build it. Despite the number of photos I have looked at, this is still an "on the fly/design as progress allows" project. Once the base was complete, I started on the top. I want a laterally adjustable top aka windage top. I initially started with dovetails on the piece that attaches to the post but then struggled with how to make the matching sliding top. I think my dovetail cutter was too small for the material I was working with. After a few hours of effort, I decided to scrap that direction and go start fresh. I welded over the dovetails on the post top and then milled them square. I then used 3/16" aluminum for the top and made rabbeted slides for it. The lateral guides were cut, milled and tapped today. With the welding on the post top, of course, it warped a bit so I spent sometime trying to finesse a workable part out of it. I think I am there now. The guides have 1/4" x 20 holes in them to accomodate the adjustment screw but that is as far as I have gotten. I need to figure out how to fix an adjustment screw to the post top to move the sliding top. Still working on that. :rolleyes:
 

Attachments

  • 20220202_132906.jpg
    20220202_132906.jpg
    65.9 KB · Views: 27
  • 20220202_180106.jpg
    20220202_180106.jpg
    44.4 KB · Views: 19
  • 20220202_180150.jpg
    20220202_180150.jpg
    46.4 KB · Views: 23
After getting the top more or less done, I had to make it useful. Or maybe it is after making it useful, now to get it done....

This required the windage adjustment mentioned previously. And then the sides that need to be adjustable for various rifles. The next step is the stock stop. The felt is temporary, I think. Will have to see what bags I like for the front and after trying it with rifles, kind of what I want.

The windage screw is one piece. That was kind of fun. But the stock I used was not large enough to give the knob size I wanted so I turned a knob out of some cast aluminum and pressed it on. I got over zealous with the knurling and mushed it a bit. That will be easy to fix but anxious to try it out and see how the whole thing works on the bench. I figure there will be some changes coming so this is Rev 1. ;)

Does anyone have any suggestions as to how to shine that aluminum up pretty? I have tried WD-40 with scotch pads and steel wool and also fine sandpaper but it all just looks like scratched aluminum, although better than what I started with. But not as nice as freshly milled aluminum. Would a buffer wheel and paste of some sort be best?


Thanks for checking in. It has been a fun project so far, and I learned a lot, although it took a lot more time than I anticipated. 50/40/10 head scratching/making chips/fixing mistakes I think...:rolleyes:

Cheers, Shawn
 

Attachments

  • 20220209_112039.jpg
    20220209_112039.jpg
    40.3 KB · Views: 16
  • 20220209_225209.jpg
    20220209_225209.jpg
    36.7 KB · Views: 16
  • 20220210_080805.jpg
    20220210_080805.jpg
    65.6 KB · Views: 17
I have utilized automotive rubbing compound of various grits by both hand and machine polishing for aluminum. However there are numerous aluminum specific polishes available if you want to go that route. Just Google it. Side note if using a wheel or orbital polisher go easy as aluminum is soft enough you may remove more base metal than desired. I also suggest a good protective coating to reduce future oxidation once you get the level of shine you want. Good luck, it sure looks great!

Should get the X ring now
Jamie
 
Get some aluminum wheel polish from the auto parts store. I use mothers aluminum and mag polish
 
Get some aluminum wheel polish from the auto parts store. I use mothers aluminum and mag polish
+ 1 on the Mother's polish . It also works wonders on dull headlights . :encourage:
 
Thanks for the replies guys. I will check into the rubbing compounds.

Jamie, I checked out what an X ring is. Looks pretty crazy! But, then I would only have me to blame for poor shooting...... Right now, I can still blame the rest cause I know the builder.....;)

Cheers,
 
Last edited:
50/40/10 head scratching/making chips/fixing mistakes
That seems like a good ratio to me. 40% on making the mistakes with only 10% to fixing them?
That would up my productivity quite nicely, methinks.
 
Back
Top