Between Centers Mishap

macardoso

H-M Supporter - Silver Member
Joined
Mar 26, 2018
Messages
2,724
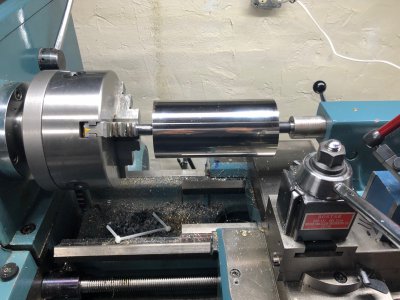
Wanted to perform a tailstock alignment on my lathe. Created a "dumbbell" test bar from 1" aluminum and rigged up a dog using some C-clamps, mini-vee blocks, and some scrap bar. Spindle center was turned in place from some barstock. I had a dead center in the tailstock. I've never done turning between centers but it seems straightforward endough.

It all started out ok, and I was taking some light wisper cuts on the lobe of the dumbbell and I started smelling this faint burning smell. Turned the lathe off and checked the chip pile for something smoldering, check the motor, and the belts. Everything was cold. I started the lathe up again and noticed the diameter I had just turned was wobbling off center. That's real strange... Then I touched the part - OUCH! Sucker is HOT! WTH!?

Well turns out I put a fair bit of pressure on the centers (on aluminum) with absolutely no oil on the dead center in the tailstock. I managed to friction weld my test bar to the dead center. Whoops!

Now I need to clean up the test bar and give it new centers and try this again. Is using a live center on the tailstock accurate enough for alignment? How might I clean up the dead center tip? I can get a set of real lathe dogs for $75 shipped (0.5"-2.5" - 5 pieces). Is this worthwhile? I have never needed one before but they might come in handy.
 
Always use live or veering center in tail stock or keep work oiled.

Tailstock on old lathe usually has a hole for oil or white lead and a daulber

We do not use a dog to drive when making a test tool.

Just good pressure and light cuts until alignment task is completed.

Measure diameters and shift TS until both same.

Once completed NEVER cut again but use dial indicator to check.

Sent from my SAMSUNG-SM-G930A using Tapatalk
 
Ah darn it. I had the diameters perfect from when I was doing my headstock a few weeks ago. Within a tenth.

Already cut them off though :cower:
 
Once completed NEVER cut again but use dial indicator to check.

Sent from my SAMSUNG-SM-G930A using Tapatalk
"But dont forget to resurface the dead center in the chuck side first"......is what I was instructed to do!
 
Waiiiiitttt a minute. I own a 6" precision ground cylindrical square (SPI brand). I would have to assume this would be running true to its centers right?
 
How might I clean up the dead center tip? I can get a set of real lathe dogs for $75 shipped (0.5"-2.5" - 5 pieces). Is this worthwhile? I have never needed one before but they might come in handy.
The aluminum welded to the dead center can be removed with sodium hydroxide,aka lye, aka drain cleaner, without damage to the dead center. Lye is very caustic and dissolves skin and other protein so use with caution. Wear PPE and when mixing, add slowly to water. Something like a 5 -10% solution will be fine. The bubbles coming off are hydrogen gas so use in a well ventilated area away from all flames. When all the aluminum has been dissolved, as evidenced by the lack of bubbles, rinse the center thoroughly in water.
 
Applying to much pressure to the tailstock when turning between centers will also raise the tailstock height by a few thousandths.
 
Keeping dead centres lubed (a must) and adjusted is a challenge until you develop a feel for it over time. A live center is a joy for many jobs, especially when working aluminum.
How much pressure to put on a dead center is still not obvious to me. Neither is how much pressure there should be on a live center although I expect that it can run more pressure than a dead center. The pressure on a live center still has to be readjusted as the work heats up.
 
Waiiiiitttt a minute. I own a 6" precision ground cylindrical square (SPI brand). I would have to assume this would be running true to its centers right?
I think that you are right. In any event, it is fairly easy to check. mount the square between center and check runout with a dial indicator. It should be zero. Carrying it one step further, if you don't change the position of the indicator on the carriage, the readings should be identical. If they're not, it would indicate that you would cut a taper. This is essentially the same as the Edge Technology Tailstock Alignment Tool. If you check their websote, they have a manual describing use.
 
Did the tailstock alignment last night. Numbers were pretty exceptional without any adjustments done. Don't know why I thought it was so bad.

image082.jpg

image085.jpg

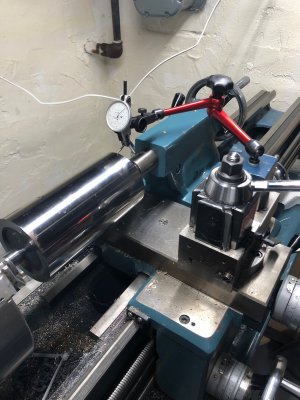
I used an Interapid 0.0001” test indicator at close to 12 degrees from the surface.

I used this to measure the misalignment between the spindle and tailstock using a center turned in place in the spindle. I found that the vertical alignment changes fairly drastically based on how hard I tightened the center. Good news it that when it is cranked down hard, the alignment is the best. I checked at each inch of the 4” travel (can’t measure at zero since the center is ejected)

Here are my results:
Vertical.
.0003” low at 1”.
.00025” low at 2”
.00005” low at 3”
0.0003” low at 4”

Horizontal
.0005” back at 1”
.0001” back at 2”
.0003” forward at 3”
0.0007” forward at 4”

So my tailstock is darn good. I got lucky. Looks like it is pretty flat vertically, and is rotated horizontally towards the operator by about .0004” per inch. That’s not great but not terrible. Not sure how to correct.
 
Back
Top