BP Power Feed Shaft Project w/?

Kroll

Active User
H-M Supporter Gold Member
Joined
Dec 23, 2012
Messages
1,307
Guys I have hit snag on installing my PF for the X axis.My mill had the 8F PF that I guess gave up ghost sometimes back. Anyway removing it I now see that I need an extension shaft so that PF will work. Well I guess this would be a good project for me since just turning an OD is still a big challenge,but I also wish I had an ideal of the length that I need to make it. So this project is a guessing game that I am going to break down into sections so that I don't get loss. My first project for this shaft is just turn OD down to 13/16 or .812 Now simple right, well not for me. On some of my other projects it seems that I always over shoot and miss,so this time going to take it easy which I rough it down to size with carbide insert. Then using Doc's HSS tool that he sent me roughing on one end and finish on another. I rough it down little more now I'm getting closer to the finish so switching to the finish end of the cutter and so far so good. Going to take it down just another thou and that should be it for the 13/16 which I will check with the coupling that connects lead screw to the extension shaft. Going to make shaft longer than what is needed since having to guess at length,but its trial & error which I hope no error:)
 

Attachments

  • HM.jpg
    HM.jpg
    696.8 KB · Views: 41
Are you supporting that with the tailstock?


Sent from my iPhone using Tapatalk
 
Yes skinny pieces longer than about 3" should be supported by a tailstock center, especially if your lathe is a bit worn and cuts taper

-mark
 
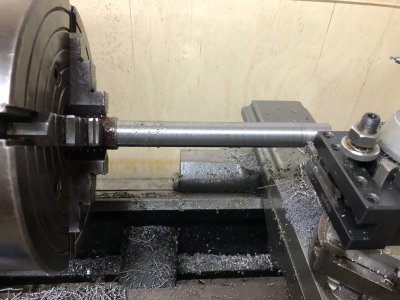
Before going any further I would strongly suggest relocating the shaft in the chuck. Rule of thumb is a work piece can be extended no more than 5 times the diameter beyond the chuck before you'll get taper due to deflection. First relocate it so less than 5X the diameter is sticking out. Then using a 60* center drill make a pocket in the end just large enough to accommodate a center.

Once the pocket is created you can extend the shaft with one end in the chuck and the other supported by a live center in the tailstock. Now you have a sturdy fixture and the shaft won't deflect as you push against it with the tool.

As for the finished diameter I would first either create or purchase a coupling. I made a coupling out of 1 1/2" diameter 6061 aluminum round stock. I cut off a 2" length then bored it ( actually drilled it) to .812". I then put it in the mill and drilled and tapped 2, 5/16-18 holes for set screws. The final step was to broach a 1/8" keyway under the set screw holes. I knew a new coupler would be necessary when I took apart the assembly. I'm not sure who made it, but it was a modified version of a Ruland 3/4" 2 piece coupling. When the hole was rebored it was about .025" off center. This caused the new shaft to wobble in the power feed bearing housing

As an FYI the original Ruland coupling would have needed to be modified again to work with the power feed. It was 2 1/4" long, and even pushed back as far as possible on the lead screw it would still rub on the new mounting plate for the power freed. Rather than attempt to resurrect that coupling given all it's problems, it was easier to just make a new one.

Once you create or purchase a new coupling you can decide how much more if any needs to be removed from the shaft for it to fit into the coupling.

In my case I already had a shaft that worked for the manual setup. It was a bit shorter than would have been optimal for the power feed, but I was able to reuse it. It no longer butts up to the leadscrew in the coupling, and is a couple threads short of the nut fully engaging on the handle, but it does work. My current plan is to use it as is until I'm satisfied with the performance of the power feed. Once that's accomplished I'll remove the power feed, measure the existing shaft and determine how much longer the new one should be. I'm thinking the optimal size will be only about 1`/2" longer than the existing one.

I probably should have measured the existing shaft when I had it out, but at that time I wasn't sure whether or not a new one would be necessary. Leaving your shaft a little over length is a good plan at this time. Once you get everything in place you can make a final measurement, cut and then thread the shaft.
 
Thanks guys I move the live center out of the way for pic, But as careful as I was when I was turning OD for the bushing that goes into the roller bearing I took off to much.That was my last piece so going to order myself some 7/8 1144, dang my bad luck. But this project is on hold for now so going to read all post and take all the advice make notes to keep by my lathe just as a reminder. Thanks Projectnut for the #'s and the details cause you and I have the same problem and same mill I believe. So going to read details and come up with a plan and make myself a drawing to look at instead of me guessing thinking I'm safe making a cut.
 
You've said that you're having trouble with getting to your final dimension with out over-shooting and turning the part under size. I would suggest that when you make a cut that is within .001-.002 of your desired final dimension that you make a spring pass. That is make another cut without moving the cutting tool. You will generally find that it will cut another thousandth or so without changing the DOC. Sometimes, depending on the amount of flex you're getting in the part, it will continue to cut on two or three spring passes.
Just some food for thought.

Ted
 
Good news guys I am back in business.Had to dig little more but found 1" 1144,just have to turn OD little more but I do need the practice.Thanks Ted for passing that info about spring pass.That is something that I need to do so that I can keep from over shooting.Most of my problems is the inexperience at lathe. With these tips they will help out lot. So pics to come guys,thanks again
 
What talvare said, but I would make a few spring passes with say, .020 or more to go to get the feel of things. Variables like the diameter of the work, hardness, how deep of a cut you are taking, and sharpness of the tool will all have effect on how much comes off with a spring pass. You can creep up on you dimension from a distance and not spoil anything. Plus it will help you to get to know your lathe.
 
Worth mentioning that spring passes don't always leave the best finish, particularly with carbide. I've taken to running spring passes as I go figuring how much spring I've got for a particular cut in whatever material, then shooting for the final dimension with a ~15 thou cut. I've achieved some lovely finished straight off the tool that way, but never off a spring pass as final. Thought I'd throw that in as it's something I've recently learned on my machine.
 
Back
Top