Building a Pulse EDM machine

Brino has it right. Digital meters are NOT the thing to watch varying signals with. The meter movement follows the source with a needle that you an actually see
moving (smoothly) back and forth while a bunch of numbers flashing on a DMM will impossible to follow unless the change in signal is slow enough to be able to watch.
(I thin that makes sense) An oscilloscope can follow the changes quite well too, even a digital one:distracted:
 
a beautiful job progressing with awesome speed.
I cant wait for the end result.
Congratulations Mark.
Charles,
I have to thank you because you inspired me to do this build by seeing your simple spark eroder. I originally set out to build a tap burner, similar to yours, but many moons ago I ran a large EDM machine in a machine shop, and decided it would be better to build a full blown machine as there is so much that can be done with it.

I am making a PDF file of the complete build as I go (with pictures) And will post the file here at the end of the build.
 
Hi Mark. Coincidentally I was just reading about that design. I'll be very interested to see your machine in action.

I'm not really up to speed on how they work in the case of broken taps, maybe you can explain the fundamentals? Do you size the plunger (wire or electrode thingy?) to be a certain % of the embedded tap body? For example, let say I broke a 3mm tap [0.118"]. Would you make the wire, say 0.0.090" diameter so it burns the center core of the tap body but doesn't affect the threaded portion to preserve the tapped hole condition? And then what, the outer thread remnants still clinging are weak so you can pick them out? Does the EDM know any difference between a dissimilar parent material? For example HSS tap stuck in aluminum part, could you burn a larger hole through both steel tap & aluminum part simultaneously like 4mm [0.157"] like to prepare it for a tapped permanent plug?

For a case in point example of attempted broken tap removal in aluminum using often recommended alum solution, my example here.
http://www.homemodelenginemachinist.com/showthread.php?t=26470
It didn't end well for whatever collection of reasons as mentioned in the post, despite cases where alum appeared to work for others. It's behind me now. I concluded it was entirely due to incorrect tapping head depth setup. But I think it would be wishful thinking that I'll never see another broken tap one day. For kicks I tried drilling out the tap with a carbide ball end mill. It sure didn't like gnawing on the top of it. I didn't want to ruin an expensive EM on a remedial experiment & thought a carbide drill would have to be precisely centered without wandering, so called it quits. I was coming to the conclusion maybe a high speed grinding spindle with abrasive bit pecking mode could take it down a million shavings later.
 
Being somewhat clumsy I have have had a large number of broken taps, mainly 4 and 5mm but only in steel.
My simple machine burnt them out without damaging the thread so I could pick out the flutes from the hole.
I used a 3mm copper bit for the 4mm taps and a 4mm brass bit for the 5mm and my (simple) machine is not a precision piece of equipment so probably didnt exactly follow the centre.
I havnt tried in aluminium (yet) but I cant see why you couldnt burn out a larger hole to plug.
Mine is a slow process so a 5mm tap took approx 3 hours total to clean.
 
Hi Mark. Coincidentally I was just reading about that design. I'll be very interested to see your machine in action.

I'm not really up to speed on how they work in the case of broken taps, maybe you can explain the fundamentals? Do you size the plunger (wire or electrode thingy?) to be a certain % of the embedded tap body? For example, let say I broke a 3mm tap [0.118"]. Would you make the wire, say 0.0.090" diameter so it burns the center core of the tap body but doesn't affect the threaded portion to preserve the tapped hole condition? And then what, the outer thread remnants still clinging are weak so you can pick them out? Does the EDM know any difference between a dissimilar parent material? For example HSS tap stuck in aluminum part, could you burn a larger hole through both steel tap & aluminum part simultaneously like 4mm [0.157"] like to prepare it for a tapped permanent plug?

For a case in point example of attempted broken tap removal in aluminum using often recommended alum solution, my example here.
http://www.homemodelenginemachinist.com/showthread.php?t=26470
It didn't end well for whatever collection of reasons as mentioned in the post, despite cases where alum appeared to work for others. It's behind me now. I concluded it was entirely due to incorrect tapping head depth setup. But I think it would be wishful thinking that I'll never see another broken tap one day. For kicks I tried drilling out the tap with a carbide ball end mill. It sure didn't like gnawing on the top of it. I didn't want to ruin an expensive EM on a remedial experiment & thought a carbide drill would have to be precisely centered without wandering, so called it quits. I was coming to the conclusion maybe a high speed grinding spindle with abrasive bit pecking mode could take it down a million shavings later.

You pretty much answered your own question. You can burn the center of a tap out and pick the pieces out. On a larger tap, you can make the electrode from brass tubing and burn down the flutes leaving a center core. This will make it go faster.
As Charles said , it takes some time depending on the current used , but I would rather spend three hours removing a tap and saving the part than as I have had to do in the past. Spend 6 or 8 hours beating and picking broken pieces and still doing minor damage to the part.

You can burn a hole as small as .040" with an EDM.
 
Mark
I am enjoying all the question coming up and watching the progress.
Very nice
Nelson
 
Last edited:
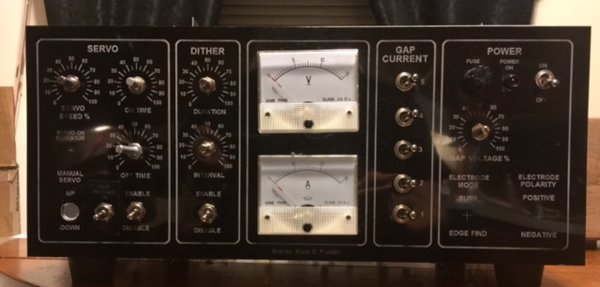
I spent the last two days mounting controls and wiring the transformers. There are still three switches to go in the front cabinet, but they wont be here until tomorrow.

controls installed.jpg


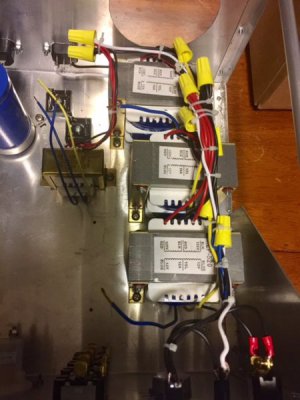
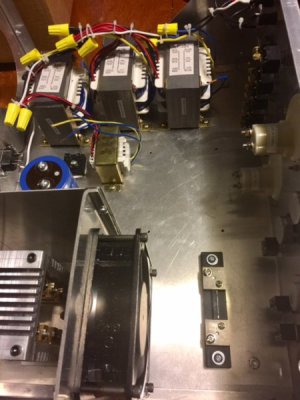
The primaries of the transformers are wired. I hooked them up one at a time and measured the voltage to make sure they weren't "bucking" one another. The Three 10 amp, 24 volt secondaries hook in series to give about 77 volts total out.
transformer wiring.jpg

transformer wiring2.jpg
The 25 amp bridge rectifiers are mounted to the cabinet bottom near the transformers.
 
Back
Top