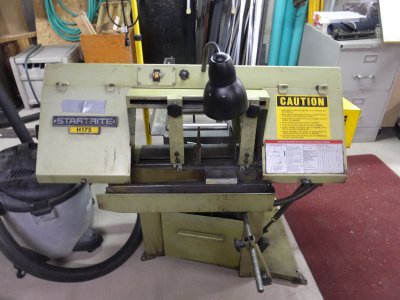
The saw has a spring with an adjustable anchor point at the pivot end of the head. I fully open the cylinder flow valve just to the left of the light in the first picture. Then attach a spring scale similar to this to the blade tightening knob (small black object on the left end of the saw below and to the left of the Startrite plaque on the front of the machine.
I then raise the head and pick an anchor point for the spring that allows between 5 lbs. and 10 lbs. of down force with the valve fully open. I then close the valve and slowly open it until I have 6 psi of pressure on the scale. I mark that point and make a reference point on the front of the saw with a magic marker.
That adjustable anchor point is a feature I haven't seen on a bandsaw (I haven't seen many of them). It's a neat feature
")
Cutting 6" material with a 10/14 tpi blade is far outside the normal rule of thumb. That being no less than 3 teeth engaged at any one time, and no more than 24 teeth. In this case there would be a minimum of 60 teeth engaged. It's only possible with extremely slow feed, and constant cleaning of the blade teeth. I try not to do it unless I'm really lazy. Changing the blade (98 1/2") is a bit of a PITA. If I only have a single cut to do I may take the liberty. Having said that it isn't a quick process. It may take several minutes to complete a single cut.
On the other hand, if I have multiple cuts to do it's far more productive to take the time to change the blade. It reduces cutting time considerably and lessens the chance of seizing the blade. When cutting large stock with a fine-tooth blade I have to watch closely to be sure the blade is actually moving through the stock. Sometimes it seems painfully slow.
The weight of the saw head is likely far more than is needed for proper down feed pressure. I only have the feed valve opened about 1/4 of the way to provide the recommended pressure. If I move it more than a few degrees beyond the reference point the head pressure is increased dramatically. If I move the reference point 120* from the off position the head is almost in a free fall. The cylinder on my machine uses 30W motor oil.
The rollers on my machine ride about 1/4" above the gullet of the teeth. If yours are set to ride against the teeth you may be removing the set (side to side offset) making a narrower kerf and allowing the gullets to fill to the point the blade will seize in the kerf.
I did notice that the infeed side blade guides on your machine are adjustable. Generally, they are moved as close to the vise as possible to keep the blade from twisting and making a curved cut. Another thing that will influence setting the guides and rollers is the blade tension. I noticed that in the Baileigh manual it mentions the blade should be tight enough that it will only move 1mm between the guides with "hand pressure". That's a bit subjective as are most band tension specifications. The manual for my machine recommends the blade be tightened as tight as possible using one hand on the knob. Again, extremely subjective, but generally trying to impart it should be tight rather than allowing enough play for the blade to wander.
Indeed, that 1mm of "hand pressure" play is pretty much the same as "make it as tight as possible with one hand on the knob, the other on the blade". I used to set it for less (I vaguely remember my old manual said 3mm - then, how hard are you supposed to press?).
Yesterday I thought about it this way. My blade is 6tpi, it moves 28m/min (or 1120 in per min) so we have 112 teeth go through the cut every second. Even if we want to cut only 50 microns (2 tenths of a thou) per tooth the blade should move half a mm per second. For 40mm (a bit under 2in) rod that cut should take under 2 minutes. The way I used to run that saw it would cut 5 times slower.
If I increased down feed the blade would slip. So I decided to set it really tight until it doesn't slip anymore at above speed. This turned out to be the "as tight as you can get it with one hand" tension. This indeed made it cut
a lot better.
TThen the cylinder. I took it off, I removed the oil into a clean container so it can be reused. The oil is extremely low in viscosity. It sloshes like water in my unheated shop (about 5C or 40F). I flushed the cylinder pumping diesel through it for a bit and I filled it with "hv48" hydraulic oil (much thicker). Hoping it would extend the slow moving range. Unfortunately with such thick oil it is pretty much impossible to get rid of tiny air bubbles. Also, it made no difference whatsoever to the rates of feed per settings! I don't understand how that can be, but it is true. I used 6 and a quarter before, now 6 and a quarter is still the right setting, but it got worse in a way. It seems to "jam" a lot more frequently.
So I'll be removing that hydraulic oil and before I put the original oil back in I will test it with diesel. If tiny air bubbles cause the jamming they should float to the top in a diesel filled cylinder much faster.
Also those cylinders have one design fault (if it can be called that). Specifically, when the rod is extended there is more space in the cylinder than when the rod is down, as the rod displaces some oil. So if one fills it with oil with rod up, it will be impossible to lower it. However filling it properly causes negative pressure when that rod is extended. If the needle valve has even a tiniest leak this negative pressure will suck in air into the cylinder.
So a method of opening the valve all the way, to raise and lower the saw quickly, will soon cause air to enter the cylinder as my needle valve seems to leak only when opened (almost) fully. Therefore I have to remember not to open it all to the end or near it.
Have you thought of using a mist cooling system?
I have a DIY mist system I made for my Chinese mini mill. I made it (sort of) portable so I could use it with the saw if I made some bracket to attach it. I didn't think about it before, because I had issues with using oil and mist cooling uses (typically) mist of oil. Now that I determined my blade tension was far too low, perhaps I should give oil another go, and trying mist on it is a good idea too. On the other hand maybe I'll try filling it with emulsion too. The problem with mist is that if you set it fine enough to use just a little bit of coolant it tends to fill the shop with that must and it's the last thing I would want to breathe in. So I tend to fill it with vegetable oils incase I do breathe it in. I've been intending to make a vegetable oil based emulsion for a while. Perhaps now is the time
I really like machining with water emulsion coolant... But as everyone I hate cleaning an old dried up flood coolant sump.
The best way to make a blade (or any cutting tool) last longer is to get rid of the rust and mill scale before proceeding.
Aaron
Thanks, that's a good tip.
Edit: I've tried filling it with diesel... No change. It still gets stuck. Perhaps even a bit worse.
Now I'm trying to polish the valve's needle (the seat is just a hole that looks OK). We'll see if it helps.
Edit2: No, it doesn't
I start to understand why people give those saws bad reviews.
I polished the needle for mirror polish. I didn't do anything with the seat because it looked fine, also I would have to make a custom tapered big to recut it. I cleaned everything. I made oil of almost same viscosity it had before by mixing my hydraulic oil and my spindle oils. Made sure there are no air bubbles. I replaced o rings in the valve stem.
Still, when set to fairly slow feed (like one you would need for 5in solid round). It just slowly slows down and eventually stops. Grabbing the valve's knob and pulling on it to the side sometimes frees it without having to change the setting. It does this every few inches of travel.
I'm an my wits end with this valve. I think it is just a generally ****ty product. If I was making a valve like this I would make the stem a sliding fit in its channel. They, however left lots of clearance there and there are two o-rings to take that clearance. The result is that the valve stem is very easily misaligned a little. When you set the saw to drop quite fast this doesn't matter much, but if you want a very slow rate of drop the remaining orifice is tiny and even slight misalignment causes it to close...
Perhaps other models have slightly less crappy version of the valve... The only way I see it now is that I need to make a proper valve for it. I have no other ideas
If any of you is experienced in needle valves please answer two questions.
1.Is it better if the seat of the valve is tapered too? The existing valve uses a simple hole and a tapered "needle". I thought one needs two tapers perhaps the seat with a slightly wider angle for precision towards the end. Is that a good idea, or useless work?
2. Cheap needle valves have the needle come to a point and use its threads or shaft for alignment, but I also saw pictures of valves where the needle becomes straight below the orifice. Which one is better, if any?