Cholchester Student Tune up help

Deema

Registered
Registered
Joined
Jan 21, 2018
Messages
44
I have a Colchester student MK2, the square head version. I've tweaked the compound slide and got it down to a backlash of circa 20microns, or just under 1 thou. which I’m delighted with. I’m now trying to tune in the cross slide. The nut and shaft have very very little wear and I’ve eliminated virtually all of the backlash and still able to smoothly move it from one side to the other. What I’m coming up with though, is there is end play, in other words the screw is moving along it’s axis. I have the manual and apart from tightening up the nut within the handle, there doesn’t appear to be any way of removing the end play? tightening the handle just increases friction and there is no thrust bearing. I have looked at other Colchester lathe manuals and I can see that for instance the Triumph has on the screw at the opposite end to the handle an arrangement where a nut and a thrust washer allow end play to be eliminated. Is there a way of getting rid of end play on the Student?

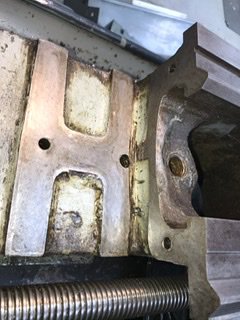
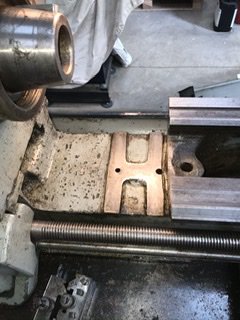
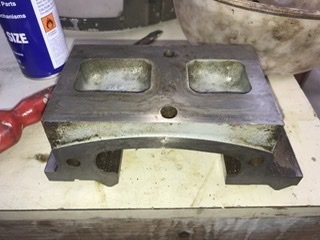
I have also noticed when I have been levelling the lathe that the gap insert in the bed isn’t absolutely flush with the rest of the bed. I need to take it out and reset it. I have read that this is difficult to get right. Any advice on the best way to get it properly aligned would be appreciated.

Finally I have a 3 jaw L0 taper Bernard chuck that I’d like to take apart to clean up and re-oil. I’ve removed the jaws and the three bolts but can’t see any easy way of getting the chuck to come apart. Is there a technique to open these up......or should I leave well alone?
 
When you tighten the handle, though the friction goes up, does the end play reduce? If not, the end play could be coming from somewhere else.

Pics of your chuck would be helpful.
 
Hi DAT510, the backlash is down to around 30 microns or just over 1 thou. If I tighten the handle the end play reduces significantly. If I slacken it off I get movement / appears as increased backlash. I’m certain the issue is endplay. The ’backlash‘ at 30 microns is with the nut tightened up so I can just move the slide.
 
To make sure we are both using the same terminology....

For me:
Backlash is the slack/slop/clearance between the treads of the leadscrew and it's Nut. Backlash can be corrected by tightening the gap on a split leadscrew nut or if you don't have an adjustable leadscrew nut, through the replacement of the nut and or leadscrew if they are excessively worn.

For Me:
End Play is the forward and backwards movement of the leedscrew in it mounts.

Are those the definitions you are using?

That said, backlash of 30 microns is great. On my lathe and mill, without creating excessive wear on the leadscrew nut, my backlash is about 3-5 thou. (I can tighten it up more, but that just wears out my leadscrew nut faster, and the rotational friction goes up). On a manual machine with a traditional ACME screw, backlash is part of the territory. I've worked on machines with 0.010-0.015" backlash and greater. As long as I follow the rule of always taking readings while rotating the leadcrew the same direction, Ive been fine.

As for End Play, Some of my machines are double nutted on the leadscrew, so I can get rid of most of the endplay without having to put tension or compression on the leadscrew. On my other machines, without double nuts, when the endplay was excessive, I've used shim washers to takeup the extra play.

Hope this helped?
 
Thanks DAT510, yep, that’s my definition of backlash and endplay.
thats a very interesting point you make about tightening the nut. My lathe has the double nut and wedge on the screw and now I’m not sure how tight is too tight! tomorow I will have another play with it and see how silky smooth it is / whether to back off the wedge and have more backlash?

The screw is only held at the dial, so no option I don’t believe to add a shim. The dial needs some play to allow it to move. At the moment the only solution I can think of is possibly adding a thrust bearing behind the dial housing and the apron.

Anyway, today I removed cleaned and replaced the gap piece. It had crud underneath it. Initially I put oil on the mating surfaces, but found that that kept it from seating fully.....I could detect a small ridge. Second time I used Metalguard to prevent rust and no oil. All went back nicely. A job I hadn’t been looking forward to, but in the end no big deal.....note to self don’t believe everything I read!
 

Attachments

  • BF568A29-7E87-429F-8495-85D9A3624954.jpeg
    BF568A29-7E87-429F-8495-85D9A3624954.jpeg
    35.8 KB · Views: 7
  • A0236EA9-E081-417B-875A-1CA0F93CAF3B.jpeg
    A0236EA9-E081-417B-875A-1CA0F93CAF3B.jpeg
    35.9 KB · Views: 7
  • 59D63D31-F114-4EA0-9D92-F09489A04D72.jpeg
    59D63D31-F114-4EA0-9D92-F09489A04D72.jpeg
    30.4 KB · Views: 7
Last edited:
After aligning the bed insert, and cutting a headstock test piece I convinced myself that the headstock was out of alignment and cutting a taper. I rechecked the alignment of the lathe with a machinists level, and all was good. So, I released the 4 bolts (wish the manual had said how many there were!) and then just nipped them whilst I adjusted the head. The gears for the powered traverse had to come out so text cuts were initially done by hand. After three tweaks, I had it as close to perfect as I can use a Micrometer!. So, all bolts tightened up, gears back in and a proper test cut made. Still perfect. Again, not a job I’d looked forward to but in the end very easy to do.
 
Back
Top