Clausing 5428 rebuild

Good luck with the refurb. I have a Clausing 5418 lathe that takes about 30 seconds to come to a stop after shutting it off at 900 RPM with a 5C collet chuck mounted. Really nice, solid, smooth machine. You're going to love the lathe once everything is put back together.

Bruce
 
Cleaned up the insides of the headstock. This was a filthy mess. I’m not ready to commit to a complete tear down and rebuild, just want to clean it up and get it usable.

Basically what I did is hose it down with WD40 degreaser, and have it a scrub. Then used POR15 Marine Clean in a household steam cleaner. Not sure how good the Marine Clean is for it, probably not very good because when I drained the steam cleaner, the stuff coming out was black.

So I tried to dislodge as much goo as I could with the steam cleaner, they blew out all the water with compressed air. Then alternate between steam and air.

I also put some cardboard in the cabinet to keep the crud from getting on the motor and lower drive stuff.
 

Attachments

  • t1.jpg
    t1.jpg
    3.6 MB · Views: 10
  • t2.jpg
    t2.jpg
    1.4 MB · Views: 10
  • t3.jpg
    t3.jpg
    1.3 MB · Views: 9
  • t4.jpg
    t4.jpg
    3.5 MB · Views: 9
Last edited:
Found out the rear idler bearings were also shot. It was a real treat pulling the rear idler. Basically what I did is there’s a small set screw towards the tail stock, pull that. The end of the shaft has a tapped 5/16 hole.

The trick with the rear idler is that there are two C-clips on it, that center the idler pulley on the shaft. You have to hammer the shaft in all the way to get enough clearance to pop off the outer clip. Then pull the shaft out so the pulley just touches the bed. Now pop off the inner clip. Hit them hard so the fall thought they bed opening for the belts. They’ll end up in the base cabinet somewhere, you’ll have to dig for them. Try to make sure they don’t fall between the bed and the chip pan, you’ll have a hard time fitting them out then.

Thread some all-thread into this hole. Get three nuts, lock a pair on the end of the all-thread to keep it from spinning. Then grab some pipe or large nuts or something to slide over the 5/8 shaft and use the third nut to pull the shaft out, pressing against the base.

Got this idler finally pulled, cleaned up and installed new bearings on it.
 

Attachments

  • t1.jpg
    t1.jpg
    2.6 MB · Views: 7
  • t2.jpg
    t2.jpg
    1.6 MB · Views: 7
  • t3.jpg
    t3.jpg
    1.7 MB · Views: 6
  • t4.jpg
    t4.jpg
    2.4 MB · Views: 6
Last edited:
Mystery Solved

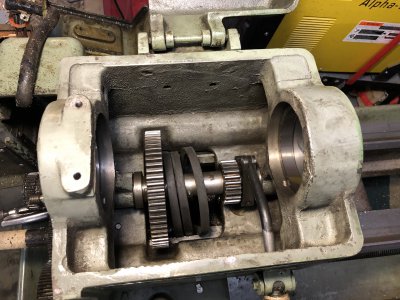
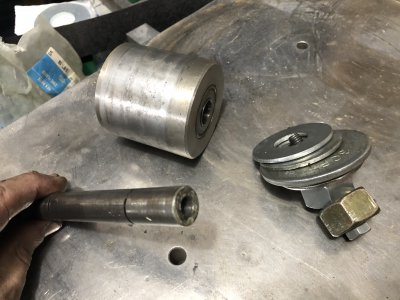
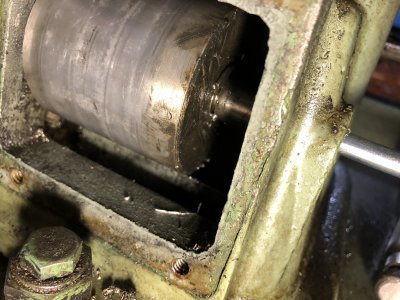
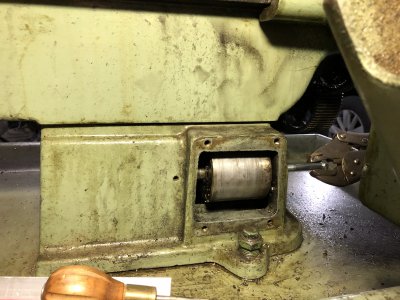
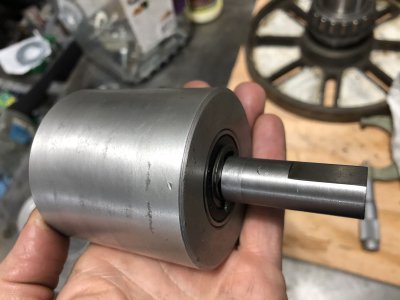
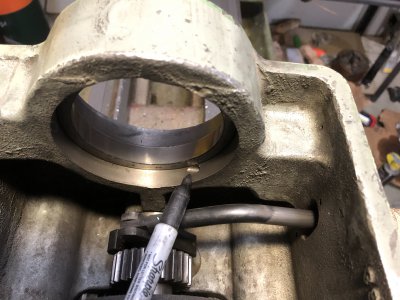
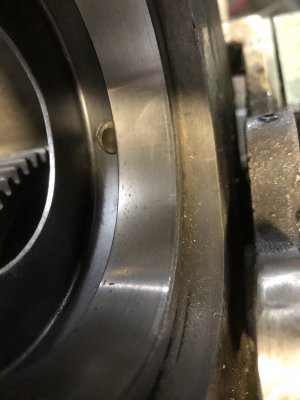
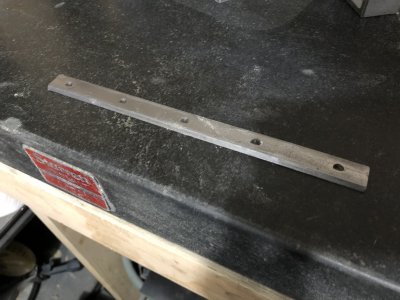
These stamped cover plates for the spindle bearings have these notches on each one. When I pulled them out of my lathe, they were in random orientations, so I thought they were some sort of train hole. Like most everything with my lathe, it was assembled all wrong. I read through the manual, and it didn't say anything about which way to orient these notches. So tonight I put them up in their recesses, and noticed the notches line up with the oiler holes.

The notches are an opening for the oil inlet. These cover plates aren't just dust covers, they actually provide an oil reservoir for the bearings. If properly assembled, the bearings ride in about 1/2" of oil. So, it's critically important to line them up properly.

I literally can't figure out how my lathe was even operating with the oil holes plugged up like they were.

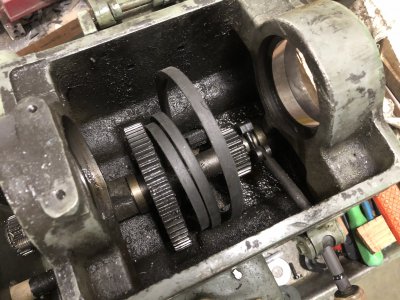
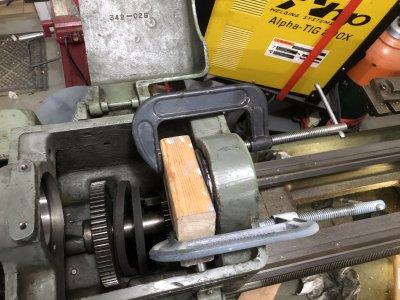
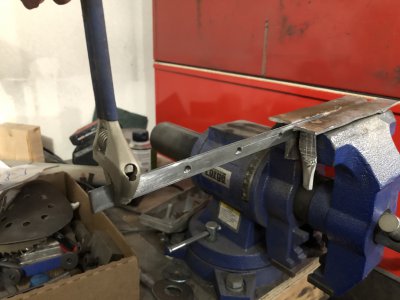
So, here are some pics showing what I'm talking about. I installed these covers with a block of wood and a couple C-clamps. The clamps help to keep the covers square when installing.
 

Attachments

  • IMG_1357.JPG
    IMG_1357.JPG
    1.5 MB · Views: 172
  • IMG_1361.jpg
    IMG_1361.jpg
    3.4 MB · Views: 173
  • IMG_1358.JPG
    IMG_1358.JPG
    1.8 MB · Views: 172
  • IMG_1359.JPG
    IMG_1359.JPG
    1.6 MB · Views: 169
  • IMG_1364.JPG
    IMG_1364.JPG
    1.8 MB · Views: 174
Last edited:
Great job figuring out the purpose of the notches. Figure they'd put them there for a reason, you nailed it.

Bruce
 
Straightened out the cross slide gib. This too was badly bent and twisted. Basically what I did was inspect for twist on the surface plate by rocking, and noticing the twist direction. Then place it in the vise and twist the opposite direction with an adj wrench. Check constantly on the surf plate as this material is very soft.

I unbent it by hand, more control that way. Move in tiny increments and check constantly.

Noticed a very strange wear pattern too, these vertical striations.
 

Attachments

  • t1.jpg
    t1.jpg
    4.2 MB · Views: 5
  • t2.jpg
    t2.jpg
    1.6 MB · Views: 6
  • t3.jpg
    t3.jpg
    4.8 MB · Views: 5
Last edited:
Gee Andy so many photos. I will link your project on my Facebook page if it's OK with you? You should have told me as I helped start this HM forum. I now contribute here too and have my own page here at the top of forums. You could send the bed to Steve Watkins in Navasota Texas and he could plane the bed and all you would need to do would be to scrape some new oil pockets in it and put some Rulon 142 om the saddle to bromhit back to the original centerline.
 
I'm glad you posted this Andy- shows just what types of abuse an older lathe can suffer- Good on you for trying to save it.
Interesting too that the later model Atlas 12" lathes apparently copied the headstock design- I have one and it has the same backgear -undergear arrangement
mark
ps by the way, Coleman camp fuel makes a good cleaner/degreaser

Thanks, yeah this thing is pretty much a disaster.

Atlas is Clausing, I’m not sure of their exactly history, but the later Atlas / Sears was made by the same folks, would not surprise me if Atlas used Clausing parts.

I’d be real careful with Coleman fuel. Parts washing fluid is designed to have a low vapor pressure and high flash points, making them less of a fire hazard. Coleman fuel is pretty much the opposite, it ignites very easy. I’d recommend the parts washing fluid at Tractor Supply, it’s much safer. I sure wouldn’t want to have anyone here accidentally catch themselves or their house on fire.


Sent from my iPhone using Tapatalk Pro
 
Back
Top