

-
Welcome back Guest! Did you know you can mentor other members here at H-M? If not, please check out our Relaunch of Hobby Machinist Mentoring Program!
You are using an out of date browser. It may not display this or other websites correctly.
You should upgrade or use an alternative browser.
You should upgrade or use an alternative browser.
Clausing 5903 Crossfeed Screw repair.
- Thread starter Tim9
- Start date
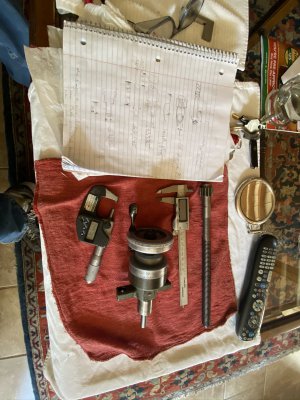
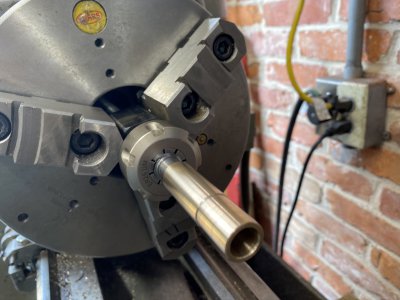
ericc, it doesn’t need bronze. I could have made a steel bushing. The issue is that the original screw is probably cut from a round stock 5/8”. They cut the screw and then left one end which is the end next to the dial.... they left that part raise about .624”.
My threaded rod is threaded the entire length. And when I cut the threads off until I have solid steel, I’m left with a spot that’s only about 0.440”. So i need an area which is 0.624”
The raised area is where the gear is mounted. Like I said, I could have used steel. I prefer to machine bronze. I have a chunk of bunting cast bronze. Zoro sells it. @25.00 for a 13” length. This bushing I made which connects the threaded rod to the dial housing is only @ 2.20”
Anyway.... Bronze is plenty strong enough. And now it’s just bronze against bronze bearing surface inside the crossfeed.
So this morning I am ready to machine the other side of the screw.... the bronze bushing I Loctited to the threaded rod. I haven’t put a pin yet. I’ll do that at the end when I’m ready to assemble and have to drill the holes for the roll pin on the gear which also attaches to the dial housing.
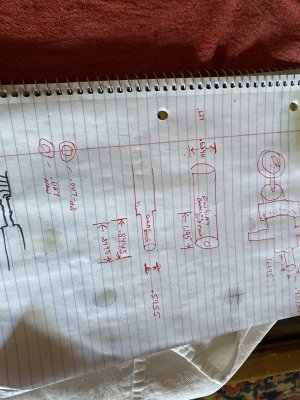
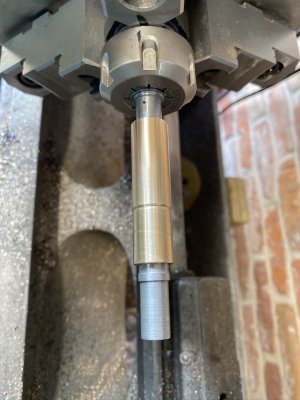
First step. Double check my specs. My original prints I made suck. So I’m going to disassemble everything again and recheck the specs. I also put a couple of turns of blue masking tape on the end of the rod to hold the Delrin support bushing tighter. After I get my specs, I have to bore the bushing to accept the dial housing end which is 0.4373 .
Then, machine outer diameter to 0.6240 and an area .0.8445 long a diameter of 0.5955 diameter to accept the gear. New prints too !!
Attachments
-
 E4C6647A-F89F-4C24-A629-90F1F849C6C7.jpeg452.3 KB · Views: 10
 -
 29C5EA8F-9984-4173-BAA4-1659D8F350DC.jpeg646.5 KB · Views: 11
 -
 83660817-6A21-4CAD-867C-21A7AF4EEEA7.jpeg787.4 KB · Views: 11
 -
 C817F3CD-3AF3-4FF6-8FA5-81EC56BB5A56.jpeg587 KB · Views: 12
 -
 3FD9CEA5-64CA-474B-81EF-569CA150DA92.jpeg2.1 MB · Views: 11
Last edited:
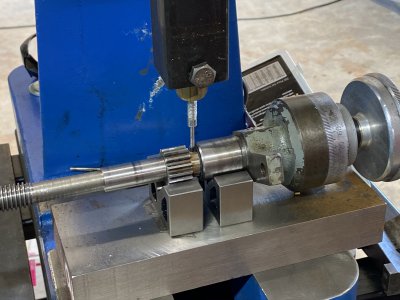
So I mounted the threaded rod and bushing back in the lathe... Which is in the ER 25 chuck . I should have marked the position before I took it out. The collet hasn’t been disturbed, but it’s never good when anything gets removed from a three jaw and then reinstalled.
Anyway, I checked for out of round and was out around 2 thousands. I don’t think its going to affect anything adversely. If I had to do it over again, I would have used my 4-jaw chuck.
machined outer diameter to0.6240 and then the outer end a diameter of 0.5955” for a length of 0.8445
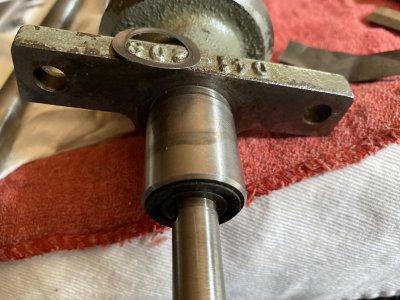
FWIW, the end which attaches to the dial housing doesn’t contact to small washer on the housing. The gear is a length of 0.8495. And the gear contacts the small stainless washer. I made a small Delrin washer about 0.025“ thick to replace the stainless washer which is 0.005”
I always had some slop in the dial which I could not remover through adjustments. I’m hoping the extra 0.020” takes this slack up.
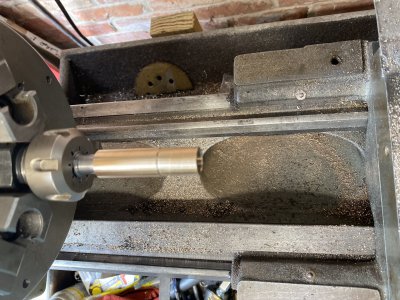
I also made a test bushing the same diameter as the dial shaft. This shaft is 0.43730”
Of course, my test bushing is really close but no... it’s not .43730”. Me and my Clausing shoot for within a thousandth.
I bored the bushing to specs and checked it with my test shaft.
It did make that popping noise when I forced it in and then pulled it out.
Anyway, I checked for out of round and was out around 2 thousands. I don’t think its going to affect anything adversely. If I had to do it over again, I would have used my 4-jaw chuck.
machined outer diameter to0.6240 and then the outer end a diameter of 0.5955” for a length of 0.8445
FWIW, the end which attaches to the dial housing doesn’t contact to small washer on the housing. The gear is a length of 0.8495. And the gear contacts the small stainless washer. I made a small Delrin washer about 0.025“ thick to replace the stainless washer which is 0.005”
I always had some slop in the dial which I could not remover through adjustments. I’m hoping the extra 0.020” takes this slack up.
I also made a test bushing the same diameter as the dial shaft. This shaft is 0.43730”
Of course, my test bushing is really close but no... it’s not .43730”. Me and my Clausing shoot for within a thousandth.
I bored the bushing to specs and checked it with my test shaft.
It did make that popping noise when I forced it in and then pulled it out.
Attachments
Last edited:
And of course, nothing is simple. On a positive note....all day yesterday the news was doom and gloom because a storm is approaching. And yet, it was really cool this morning and the sun shined most of the day. The storm has been dumping rain on the Florida Coast.
But, the screw up was when I went to assemble the dial shaft. I didn’t bore the bushing deep enough. And I had to fit the gear so I machined a little bit more length so the gear slid a little more. If I had missed this detail on the gear, then the roll pin hole may have cut into the end of my bronze bushing. I want the gear to extend right past the shaft by a few thousandths since the gear end is a bearing surface to that little Delrin washer. Machined it and then it slid on a few thousands more.
But, the screw up was when I went to assemble the dial shaft. I didn’t bore the bushing deep enough. And I had to fit the gear so I machined a little bit more length so the gear slid a little more. If I had missed this detail on the gear, then the roll pin hole may have cut into the end of my bronze bushing. I want the gear to extend right past the shaft by a few thousandths since the gear end is a bearing surface to that little Delrin washer. Machined it and then it slid on a few thousands more.
Attachments
Last edited:
Took care of those minor details.... bored the bushing a little deeper. Has to be around 0.850”
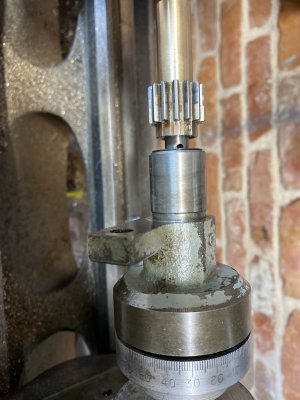
Removed the shaft from the collet chuck. Mounted in the mill vise. Just a V block and a supporting group of 1-2-3’s and shims.
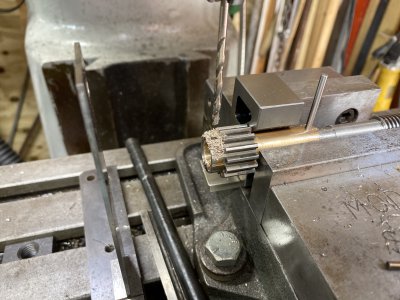
Mounted the gear on the end. First I centered and drilled the other end for the dowel. Then lined up and drilled just one side in line with the gear. The gear is my guide.
I then mounted the dial shaft to make sure everything was properly lined up and drilled and doweled it.
Removed the shaft from the collet chuck. Mounted in the mill vise. Just a V block and a supporting group of 1-2-3’s and shims.
Mounted the gear on the end. First I centered and drilled the other end for the dowel. Then lined up and drilled just one side in line with the gear. The gear is my guide.
I then mounted the dial shaft to make sure everything was properly lined up and drilled and doweled it.
Attachments
So...I’m sorry to say...the excitement got to me. No more pics. Anyway, I just cut the shaft to size and stuck it in the lathe. It’s good to go. My backlash is about 0.014 .
Much better than the old screw which was always at least 70 thousands. Sometimes worse. The Crossfeed is nice and tight and turns smoothly. I was pretty careful to get everything lined up and true because when I replaced my feedscrew on my little South Bend it wasn’t lined up truly and it had a tight spot on every revolution. No such problem on this repair. I’m really happy with it and the new Acme Threaded rod was only around 35.00 total including the shipping.
I bought an acme nut too from Roton. I might try to figure a way to make a new nut. Then I’ll have even less backlash but I can live with this for now.
Attachments
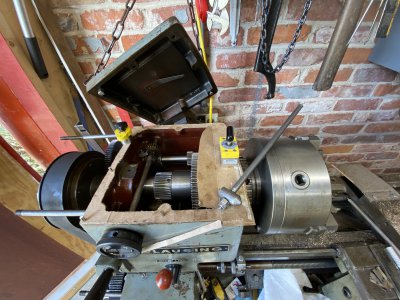
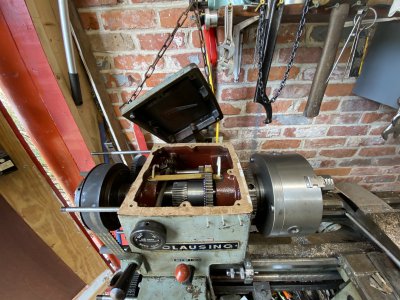
I figured I’d do a little extra maintenance on the Clausing. I drained the oil and refilled it when I first started using it but never had the headstock cover off. So I pulled off the cover....drained and flushed out the reservoir. When I first pulled the cover I ran a magnet around the bottom and came up with a little rusty sludge and signs of water. This lathe did sit out in the weather for an unknown amount of time. So I mopped the bottom of the reservoir with some rags to get all that stuff out.
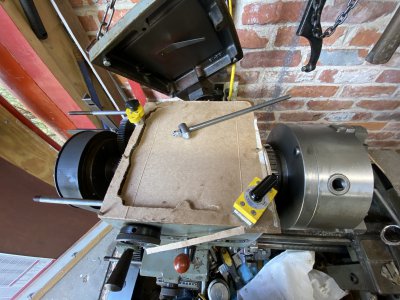
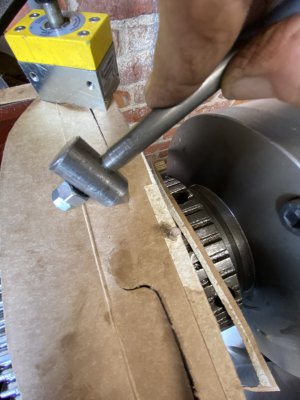
I didn’t want to wait for a gasket so I made a new little hammer with a small head and an angled end and flat end to make gaskets. Works like a charm. Heres’s a few pictures of making the gasket using the hammer. The gasket material is a Corn Flakes box.
I didn’t want to wait for a gasket so I made a new little hammer with a small head and an angled end and flat end to make gaskets. Works like a charm. Heres’s a few pictures of making the gasket using the hammer. The gasket material is a Corn Flakes box.
Attachments
-
 FAD87EFE-6B45-4B00-92D4-81E90D51AE2B.jpeg822.5 KB · Views: 15
 -
 0B67C092-FF9D-4804-A34C-506E3E9855EF.jpeg3.4 MB · Views: 15
 -
 45EBE0AE-90F6-4FF8-9C2C-098E543F9446.jpeg3.7 MB · Views: 13
 -
 F5924A1B-45D7-4A76-90E0-1FC8EBD41FDC.jpeg1.3 MB · Views: 14
 -
 E812224F-5842-4CBC-B000-2490E5AA8D54.jpeg3.7 MB · Views: 13
 -
 46D49A3D-03FB-41B1-88A7-767713A63F00.jpeg3.9 MB · Views: 13