[How do I?] Deal with this?

Bamban

Active User
H-M Supporter Gold Member
Joined
Jul 13, 2014
Messages
1,051
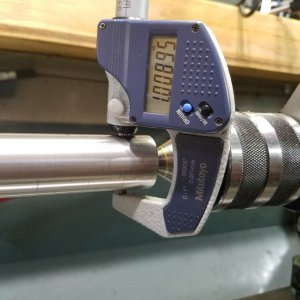
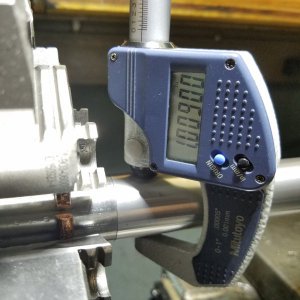
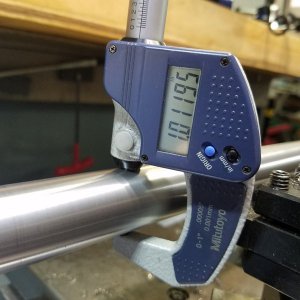
Over the months I've been doing 20 inch AR barrels, I had the TS dialed in to the HS, but I never measured the center part of the barrel until recently. Today just to see if what I saw before was repeatable, so I started another barrel for my own consumption for the upcoming match at the end of the month. It looks like the what I saw before is repeatable.

Could this fat in the middle be corrected by machine scrapping? Others suggested to just emery cloth the situation. Well, that is another art on its own. I tried it I could not get the material even the length of it.

The fat in the middle is not a critical dimension, but I would rather get it fixed if fixable. Again, this 1236 is an old Taiwanese lathe, it may very well be something I just need to live it.

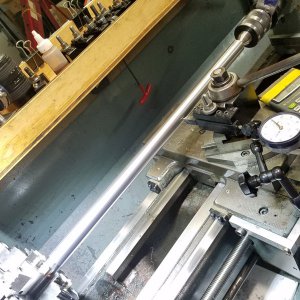
The 6J is a set thru that I dial the barrel on the register that I turn during chambering. The barrel is screwed on to a long barrel extension and it is held in place by a copper ring to allow the barrel to pivot.

Thoughts?20170421_161100.jpg 20170421_160907.jpg 20170421_160924.jpg 20170421_160954.jpg
 
Last edited:
The old school way to contour a barrel was to cut tapers, then blend the whole thing together with a lathe file. If you were to do a shearing cut with a lathe file, measuring frequently, you could probably remove the bulge without too much effort. If you wanted to go farther, you could probably put in a bit of swamp to it.
 
I guess it could be deflecting a bit but I would think the deflection would be accompanied by chatter esp with carbide tooling (not sure thats what you are using). I turned some rimfire blanks from 1.065 to .625 I used my follow rest I got consistent dia. and a nice surface finish.
 
Last edited:
Do a search for "follower rest". Your center section is just pushing away from the tool. How you've done it without a lot of chatter is what I want to know.

There is no chatter, and even with 0.002 t0 0.005 cut the finish is excellent, no chatter. Using DCGT 32.51 uncoated for aluminum, they are real sharp, but do n not last long. Yes, I have been looking for a follow rest and in fact I thought about building a pneumatic follow rest.

The barrels I get from Shilen are only 1.032 unturned, there is not a lot to take off.
 
Last edited:
The old school way to contour a barrel was to cut tapers, then blend the whole thing together with a lathe file. If you were to do a shearing cut with a lathe file, measuring frequently, you could probably remove the bulge without too much effort. If you wanted to go farther, you could probably put in a bit of swamp to it.

Thank you.

The good thing about AR15 barrels the contours are all straight and just steps down to another straight dimensions. The shoulders are just chamfered at 45 degrees and not more than 0.020 just to break the edge.

OK, I give up. What do you mean by "put a bit of swamp to it"
 
All it takes is a little bit of droop in the barrel (too tight between centers?) to throw the cutter off the centerline and increase the diameter but admittedly .02" is a lot of difference. Since you brought up scraping are you thinking that there is significant wear in the middle? Typically wear shows up near the headstock first. What kind of carbide are you using? I like that you're getting a nice finish even with the odd condition.
 
Hi Bamban,
if you have a straightedge, you could hold it to the aft side of the front bed v -longitudinally, then the aft of the rear bed way
do a visual check or a check with feeler gauges to ascertain depth of wear.
if you need a straightedge, i'd gladly send one to use

as a suggestion, you could also sweep the ways with a DI mounted to the carriage and see if there is detectable wear
then i'd consider an inspection of the cross slide & gibs, then a sweep of the saddle, transverse to the longitudinal axis

if the machine is worn, it may be worn in 2 axes or possibly has a concave section of bed or cross slide

even simple, leadscrew to leadscrew nut clearance, or cross slide wear could account for some slop and/or dimensional insanity :bang head:
 
Mike,

Will do. I can sweep the ways, but I do not own any straightedge. The rest I can do.

Thanks for the input.
 
Last edited:
All it takes is a little bit of droop in the barrel (too tight between centers?) to throw the cutter off the centerline and increase the diameter but admittedly .02" is a lot of difference. Since you brought up scraping are you thinking that there is significant wear in the middle? Typically wear shows up near the headstock first. What kind of carbide are you using? I like that you're getting a nice finish even with the odd condition.

I am thinking maybe bed wear or carriage wear. I will follow up with UlmaDoctor's suggestion. I will also play with tension on the barrel from the TS.

I am using DCGT 32.51 uncoated and designed for aluminum. They are real sharp, but fragile and do not last long. When turning, interchangeably I use CCGT 32.51 also for aluminum. Either one gives me good finish. I never tried to learn how to grind and sharpen HAS or carbide bits since these indexable ones are in the neighborhood of 15 bucks for 10

I think the difference is close to 0.003, not 0.020. (1.01195-1.009)

The thing that bugs more is the fact the little Jet 1024 UlmaDoctor sourced for me in CA and shipped to TX, cuts very straight.
 
Last edited:
Back
Top