Debugging my lantern pinion

dewbane

Michael McIntyre
H-M Lifetime Diamond Member
Joined
Mar 2, 2018
Messages
232
My second attempt at making a lantern pinion was almost a success. The part was guaranteed to be bad, because the parting tool grabbed, and snapped it off prematurely, but I continued anyway as a practice run. I moved the Y axis out 0.129" with my DRO to drill a 0.258" bolt circle with a #60 drill, before installing 0.040" music wire for the lantern doodads. I forgot what the lantern doodads are called. It's not bad for a second try, but I have the following problems:

The #60 holes seem to be slanted. Not shocking that such a tiny bit deflected, but what to do about it? I ran the mill in low gear at about 100 rpm, and fed very slowly with the fine feed knob.

I probably had a work holding problem. I ran a DTI over the top of the part while it was in the chuck on the rotary table, and it was about 0.030" high on one side. Not sure how I can solve that, but as I write this, it seems obvious that this is probably causing the slant I detected. The only surface I can grip is only 0.080" wide. Maybe I need to sacrifice concentricity, drill this on the lathe, and make some kind of arbor that I can grip more positively in the chuck. (Or swap to the collet chuck or the 4-jaw so I don't have to sacrifice concentricity.) It could just be a crappy scroll chuck. I don't even remember where I bought a rotary table with a weird 4-jaw scroll chuck. I took the chuck apart and went through it, and it's as good as it can be, but it's not a good chuck. It's an okay chuck at best.

The #43 hole in the center is off-center. Made two of these, and had that problem both times. My 0 setting has to be damn close, because my pin holes are coming out the same distance from the edge all the way around. I don't see any way I could drill a perfect circle relative to the part, and wind up with the center hole dramatically far off twice in a row. Bit deflecting again? A #43 drill is not very stiff.

Anyway, here's the picture. I think it's kind of cool how you can see the witness marks of the parting tool chattering and catching. That little high spot there is what snapped the part right off before I had hit the target diameter:
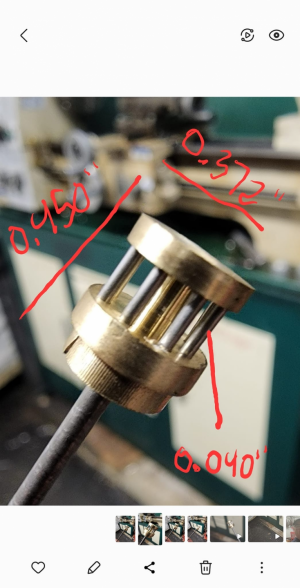
1660553049612.png
 
Success! I bet you learned a lot! Tom Griffin (www.tomstechniques.com) has some nice info on it regarding speeds for drilling, milling and lathe work. The formula for RPM's is:

RPM = (Material factor) / (cutter/work diameter)

I don't recall the material factor for brass, but for steel Tom recommends 400 (brass is probably 800 - 1000). If drilling a 1/2" hole in steel, the math works out to:

RPM = 400 / (0.5) = 800

For a #60 drill bit, you'll want to crank up the speed to the max. It'll still be slower than the formula would recommend unless you are using a router or really high-speed spindle.

One thing you learned is that there's a work-holding challenge. I'd chuck up the brass in the lathe and face it. Center drill and drill the #43 axle hole. Then give yourself at least 3/4" length to chuck on the mill. I'd use a spotting drill to start the holes, just a peck. You could use a center drill also, the lead end is usually 120 deg.; works well as a spotting drill. Then drill the #60's. The spotting holes with give you a countersink at the holes. Pull the brass from the mill after the holes are drilled and face the surface again to remove the countersinks. Then part on the lathe.

It'll be tough to keep those tiny #60's on center when starting to drill the holes. The spotting/center drill I mentioned above might leave you a "nib" in the bottom center of the hole which would take the #60 off center. You may also try spotting with the #60 with just 0.030" sticking out of the chuck. As you noted, the drills are pretty flexible, but a lot of that flex comes from the amount protruding from the chuck. Another potential issue is the runout in your drill chuck, a #60 at 0.040" is really tiny!

From your description you've got a good handle on what's going on! It may take a few tries but you'll get there. I can't tell you how many times I'm made 5 of something to get 1. . .

Bruce
 
I was afraid running the spindle anywhere close to the theoretical ideal speed would increase the tendency of the drill to whip. I have to have pretty big stick out, because these holes are relatively deep. I didn't spot the holes out of laziness, but it would really be worth it. I was already planning to leave extra meat on the top flange, so I can machine off the stubs from the wires. This would plow over any spotting marks too.

The big thing is I've been trying to use scroll chucks, and you're right, I just need to leave more meat on the part while I'm doing the delicate stuff, and finish it up and part it off after that's done. I need to move from the lathe to the rotary table back to the lathe, and I should be using 4-jaw chucks or some collet system.

I have a plan for all of this, and it's reasonable to assume I'm going to make a good part one of these times. I'm not that far away.

Then I just have to make two more just like it. Whee! The last one will be a lot better than the first one, so I will make a fourth, and so it will go.

And then I move on to the next hardest part to make, which is probably the cutters for the wheels.

It's kind of a cool feeling. I'm like Mark Watney. Work the problem. Solve enough problems, you get to have a clock.

But today, I get to go shopping for collet systems. No use continuing with a setup that just isn't adequate.
 
I have seen this problem when I needed a hole through 0.5" thick 6061T6, where one side would be off by 0.002" or more. No alteration of drilling speed or drilling pressure helped. Nor did traming the mill under 0.000,1" nod and pitch. Drills drill neither straight nor round holes.
 
You can fit the bit deep in the chuck with only 1/16 or so sticking out to start the holes.

Get work close to chuck so it is not extended far.

Place so you start the hole, shift drill in chuck for more stickout and repeat.

This takes longer but drill bit is so short it cannot wonder as easily.

Speed varies but pressure should be minimal to not stress the bit.

Peck to keep chips out and oil well.

If you needed to do many you could make a drill bushing from steel that just fits on the part and is thick enough to insure drill bit stays straight.

Sent from my SM-G781V using Tapatalk
 
I spent hours weighing the pros and cons of ER32 vs. ER40, and I talked myself out of buying anything at all. It's just too big of an investment to make right now. I'm stuck with all these scroll chucks, and I'm going to try using an indicator to help get better concentricity out of them. It isn't ideal, but neither is dropping a bunch of money on a new setup. This is not a good time for a big investment.

One thing I can't get beyond in my thinking is leaving this stub on the bottom. Yes, I need something to grip, but brass is like $600 a pound right now. The only way to not waste the material is to leave a big enough stub that it could be a new part. The problem there is vertical clearance. With a Jacobs chuck in the spindle and a three-jaw chuck on a base plate on a rotary table, I don't have much vertical clearance. I'm bumping up against the top of the column's travel as it is.

Ironically, switching to collets would address that problem too. Maybe if I make it through December without going broke. Taxes to pay, car insurance, settling up the electric bill for the year. Lots of big ticket expenses coming up.

Adulting sucks.
 
if you want to hold a small round part in a chuck without leaving a stub, make a temporary pot chuck. Grab a piece of alu round a bit bigger than the part you want to hold, stick the scrap in your chuck and drill/ bore to a bit under the diameter of the part and a little bit less deep. Drill a smaller hole through. Take it out and cut it length ways with a hacksaw, then put it back in the chuck. Stick a bit of material in the hacksaw slot so it doesn't close up completely, then finish the bore to the size of your part (maybe a bit over). Loosen the chuck enough to remove the material in the slot, stick the part in and tighten chuck.

It's a fair bit of work for just one part, but you can use it again for the same size of part or bigger (by boring it out). You can also do the same with alu soft jaws on your mill vise - #JimDawson is a pro at that.
 
I probably had a work holding problem. I ran a DTI over the top of the part while it was in the chuck on the rotary table, and it was about 0.030" high on one side.
You probably had the part installed in the chuck jaws so its backside wasn't in contact with anything flat (like the chuck face). In this situation it can be difficult to properly install the work . The way to get around that problem is to use a chuck spider, a thing that fits between the jaws. It basically translates the flat surface up to the base of your part.

If you have a 3D printer you can print one. I've used a small piece of (flat) scrap that was the right thickiness and used it to do much the same thing. If you're doing that on a lathe chuck be sure to remove the alignment piece before turning your lathe on!

Regarding your drill bit drift problem, the best solution would be to use a new, high-quality tungsten carbide drill bit; but lacking a high-speed spindle your odds of breaking it on a manual machine are pretty high. The TIR of your drill chuck could be a limiting factor, too. The next-best would be to use a new, high-quality HSS or cobalt drill and crank your spindle up to its maximum RPMs. A good drill will be very straight so you shouldn't have any kind of drill whipping problem. Especially if you start with the drill protruding just a little ways out of the drill chuck.
 
A carbide bit would definitely either make a straight hole or explode. I didn't even think about carbide drills existing at sizes this small, but they do. It's not the worst idea, and carbide bits this size have larger shanks that would be better to grip in a chuck. Or probably large enough to grip in an ER32 collet for that matter. That's not a crazy idea, although the chances of the bit exploding are very high.

The work was just floating in the air, up above an empty chasm. I tried throwing a parallel under it, but I didn't have a parallel remotely small enough. Chuck spider. I need to think about that. Or a pot chuck could work. More to look at there.

Or I could just throw away a few inches of brass. I'm only making three of these, or whatever number I end up having to make to get three usable ones.

Good food for thought.
 
The pot chuck or soft jaw approach is also really handy if you need to turn the part around for another op, like facing and chamfering.
 
Back
Top