- Joined
- Feb 1, 2015
- Messages
- 9,574
A few days ago, I commented in another thread about using a soldering gun for demagnetizing tools, parts, etc. For a long time, I have used 10AWG copper wire for making my own soldering tips. At one point, I reshaped one of the tips into a circle and it worked very well for demagnetizing screw drivers and small wrenches. The problem was the loop was only 1-1/2" in diameter which prevented use on larger items.
You can't just make the loop larger as that adds length to the circuit which adds resistance, lowering the current to the point where it is no longer effective. The magnetic flux is proportional to the number of turns, n, times the current. In my case, there was one turn and about 310 amps, as measured with my ac clamp-on ammeter. This was for a total loop length of about 5". The current is determined by the voltage of the soldering gun, about .13 volts, and the resistance of the wire, about .4 milliohms @ 20ºC. If I doubled the diameter of the loop, I would double the length of wire required which would halve the current and the magnetic flux. Clearly, I wouldn't be able to make a larger loop using 10 AWG wire.
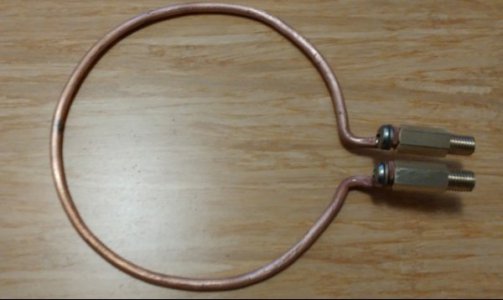
However, if I used a heavier gauge wire, its resistance per foot would be lower, allowing me to use a longer length while still maintaining the desired current. I had a length of 6AWG wire which has a resistance of about .4 milliohms per foot. 14" of this wire would give me a loop with and inside diameter slightly more than 4" with a resistanc comparable to my original loop.
A started by making adapeters for my soldering gun. The OEM tips were secured with 5/16-24 nuts. I happened to have a brass hex standoff, 3/8" across the flats and with tthe ends threaded for 10-32 screws. I cut off about 1-1/8" from each end, faced the ends, and turned about 1/2" to .312". Then I threaded the ends for 5/16-24. To prepare the wire, I heated with a torch to anneal it and straightened it. Then I flattened about 1/2" on each end and prick punched the ends about 1/4" from the end, flipped over and repeated on the back side. I used a nail set to expand the holes to fit 10-32 hardware. I pinched rather than drilled the holes because punching displaces the metal rather than removing it giving me more meat on the sides of the hole. I also annealed the copper during and after working to prevent tress cracking. Finally, I bent the wire at a 90º angle about 3/4" from the ends and bent the wire into a loop about 4" in diameter.
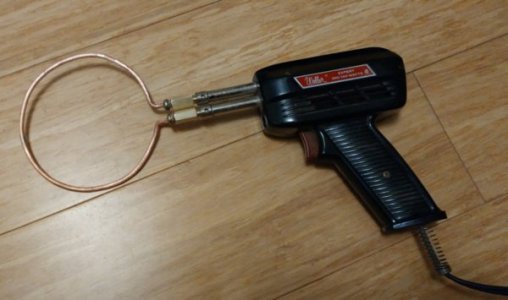
Assembly consisted of removing the OEM tip and screwing in the two adapters, and attaching the loop with two 10-32 x 3/8" screws. I decided that I wanted the planeof the loop parallel to the plane through the center of the soldering gun and did that while assembled.
The current through the loop was measured at more than300 amps. This was somewhat more than anticipated. Copper has a fairly large temperature coefficient with the resistance doubling with a 200ºC temperature increase. The much larger mass and volume of the heavier wire resulted in cooler operation and a higher current. After about a minute of operation, the temperature of the wire had risen enough to drop the current to about 270 amps.
To test the effectiveness of the demagnetizer, I magnetized a large screwdriver and was able to pick up a 70 gram bolt. After passing through the demagnetizer, it could only pick up a 75 mg. washer, about 1/1000 the magnetic force. The loop is large enough for me to demagnetize my 1-2-3 blocks and V blocks and to demagnetize my calipers.
While I made a round loop, the loop could have any desired geometry. A rectangular loop could be used instead. While the loop doesn't get as hot as the soldering tip, it does get too hot to toouch. This could be lessened by doubling or tripling the number of turns , keeping the same loop diameter. The current will be half or one third, respectively and the resultant power dissipated half or one third. In the case of multiple loops, the wires will have to be prevented from shorting by insulation or an air gap.


