Drilling errors and solutions

Kaylee Frye

Registered
Registered
Joined
Oct 28, 2016
Messages
11
Hi all,

hope I'm in the right forum - this is barely machining, but I need a machinist's mindset for advice.
I am the metalworker for a small custom furniture shop, and lately we are making a lot more designs that rely on bolt connections rather than welding.

I am able to finish the projects, but I can't get the drilling accurate enough to make the parts interchangeable- my most recent example is that I had to make a set of three conference tables. Since the parts couldn't be interchangeable (misalignment by 1/32 here and there), I had to mark every individual piece and mark its orientation, which I felt was sort of a waste of time, a brain cramp to not mix up, and will make installation a little less straightforward for the install team.

Basically, I'm asking all for help, ideas, and brainstorming on how to standardize my drilling process to be a little less custom and individual, so that I have to mark every side of everything every time. But who knows, maybe this is just how things are and I just have to get used to it?

I'm attaching a photo of a perfect example of my drill bit not catching my center punch mark, and drilling misaligned holes. Why?! It's gotta be something obvious that I'm missing? maybe I have to sharpen up those centerpunches? Do I really have to make a jig for almost everything? I know to centerpunch for the drill bit to catch, but I still have a hard time making that drill bit catch instead of slide around the punched dimple. Maybe I'm not punching a big enough dimple? I've read that people will start their holes at 1/4" but it seems maybe I have to start even smaller to end at an accurate enough 1/4" hole.

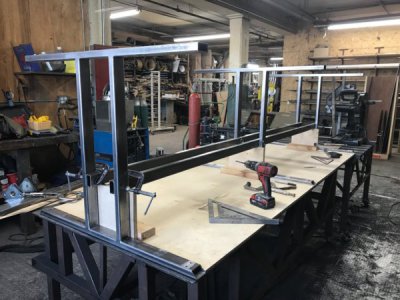
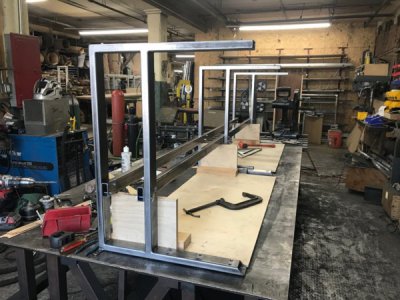
I'm also attaching 2 photos of the conference table legs I was working on --- I used a steel jig I welded together to mark the holes on the legs, and then I used the line up of the legs as a jig to mark the holes on the long support runners. Maybe projects like this have to end up being very individual, steel warps and bows and is never perfect to begin with. Or maybe I should have enlarged all holes on the runners by 1/16" or so"? During the build, I resisted enlarging all holes, only enlarging when I had to, because the tighter the hole, the better the table pieces fall into square. What do you think? I feel like there must be an easier way that I haven't thought of.

Thanks so much to all who share any thoughts! It's really appreciated, I promise to come back to the forum and leave my own advice where I can in return.
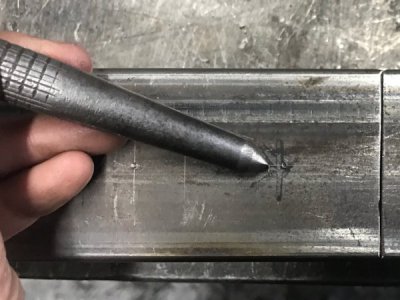
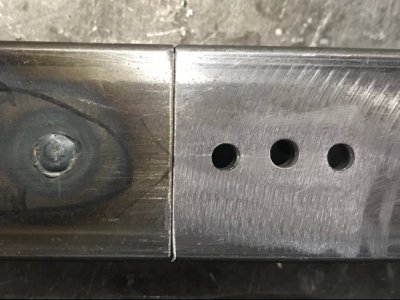
Centerpunch_error1.jpg

Centerpunch_error2.jpg

Conferencetable1.JPG

Conferencetable2.JPG
 
I think your punch marks have to be larger to catch the point of the bit. Also since your holes are shallow you may want to use a stub bit, which may give you more control and will be stiffer. And perhaps a handheld jig that fits over the bar may also help. It is too bad that there isn't some place you can allow for adjustment, like a slot or over size hole.

David
 
In making interchangeable parts here are two solutions: One is to make a jig which contains drill guides for locating the holes. That would be fixed to the part in a reproducible fashion and the holes drilled through the guide holes. Drill guide bushings are available that are hardened to prevent wear. This technique will save you much time in locating and center punching and should bring your positioning accuracy down to a few thousandths of an inch.

The second method is to simply drill oversized holes in on or both of the mating pieces. The holes would be oversized sufficiently to accommodate your positioning errors.

Here is an example of the drill guides. They are pressed into larger holes in the jig.
https://www.travers.com/h-style-precision-drill-jig-bushings/p/99067/?keyword=drill guide bushing&lite=true&pricelistname=SITE&hawkmm=2
 
Last edited:
For drilled holes that will be repeated, use a jig, at least over the width, as often as possible. In fact, use jigs for anything that you will be doing again. If it is used enough, a jig saves the time spent making it many times over, and makes the work more accurate and more repeatable, as well as making the parts interchangeable. For one-off hole locating in structural steel, I tend to use two center punches, a 60 degree sharp prick punch to accurately mark the hole center, followed by a much wider angled sharp punch, in the 120 degree included angle range for 118 degree drills, which leaves a divot the drill can truly follow, starting in the center of the divot. The divot only needs to be slightly bigger than the chisel point of the drill. Another concept I use when using a drill press (or mill) with flat and smooth work 90 degrees to the drill is to simply use a 135 degree split point stub length drill which starts it's own hole without walking. In that case a setup more rigid than loose on a drill press table is needed to locate the hole. A mill and solidly clamped work is necessary, or a drill press with solid stop and fence, and the work clamped down. Like you, I find it really annoying when a hole ends up in the wrong place and it has to be made oversize to fit. If I was a pro like you I would spend lots of thought on shop made tooling that will speed your work while also making it more precise, even in a custom shop.
 
When only two holes are involved, one of the holes is often sloted in the direction of a line between the two holes. This allows for assembly when there is error in positioning the holes. It will not correct any rotational error caused by an error in locating the holes in the direction perpendicular to the line between the holes, however. It is also not easy to do if your are working with hand power tools.
 
A drill jig is definitely helpful if you are doing this manually. Stub bits are a big help on machines where flex is an issue, but I'm not sure it will help a lot here. Even using a drill jig a punch mark can help the drill bit find its correct location.

However given that you are doing this manually I doubt you have the ability to make a drill jig, so consider this. Punch accurately, punch harder, pilot drill, then drill. A smaller drill bit will find and stay in the punch mark easier. The pilot hole will keep your bigger drill in the correct location.

A sort of 2 in one approach might be to use a pilot point drill bit. The problem is once the pilot point is dull they are done and they are hard to resharpen. Maybe just having a bunch of them on hand would do the trick. Its always a trade for cost of time vs cost of tools and materials. I would avoid step drills (Christmas Trees) as it has the same problem as a pilot point and costs more. Also an over zealous helper can do alot of damage with a step drill.

I didn't mention split point bits above. They do not tend to wander like chisel point bits, but they are not what you typically find in metall cutting drills from the usually sources. You still need a big enough punch mark to locate the drill and its still easier to drill a smaller pilot hole first.
 
Last edited by a moderator:
If you are marking the layout accurately and the problem is picking up the scribed intersection, try using an automatic center punch. They have steep angle tip so you can see the scribe intersection clearly. After the automatic c/p mark, use a 118/120 center punch (as mentioned above).
 
Wow, thanks everyone! This is all super helpful to think about. Of course everything points to I really need a mill eventually to make pretty slotted holes, but! Encouragement on the value of taking time to make the jigs and the points about the different types of bits and center punches is helping me think. Can't mill jigs yet, but I've been welding some up alright. Good to know I'm not wasting time by doing so, and good to know I have more options when it comes to the drill bits too.
 
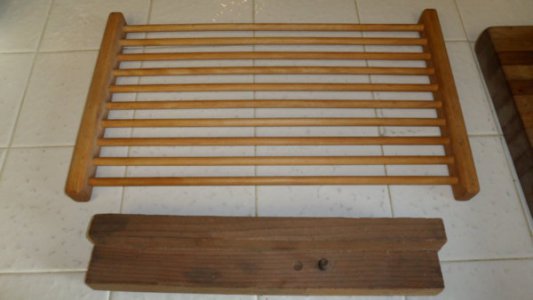
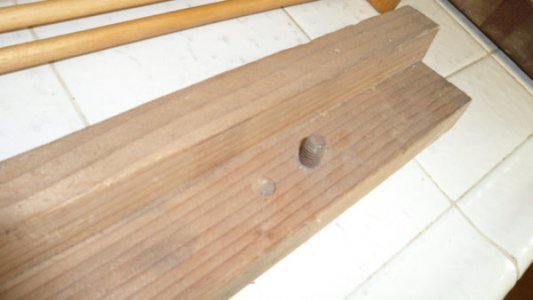
About 35 years ago I made 10 of these cookie cooling racks for all the women in my life (that would be mom, sisters, aunts, grandma, friends, etc., and just one GF...) as Christmas gifts. The jig I used for spacing and drilling all the dowel holes is also in the pictures. The jig was made and set up in less than half an hour, rough cut wood, nailed together, and one old bolt as an indexing pin located at the correct distance from the fence. The jig was fixed to the drill press table with C-clamps. I chose a drill bit that drilled holes to a tight tapping fit for the dowels I had bought. The hole spacing and centering was carefully set by testing on scrap wood until correct. The pin (bolt) indexes against the end of the rail for the first hole, and after drilling it is advanced and indexed over the pin, repeat until 10 holes. A sacrificial block was pressed down on the top of the rail while drilling to prevent tear out. Repeat for 200 holes on 20 side rails. Cut the 50 36" dowels in half for 100 18" parts (using another jig/stop to get all the lengths correct easily, finish sand all the parts, use a mallet to pound the rails and dowels all together tightly (no glue), sand the slightly protruding dowels flush with the rails on the belt sander, soak with food grade linseed oil using a saturated rag, finished! Took most of one day to do them all from start to finish. Jigs do not at all have to be fancy and expensive. Anything that makes repetitive work go more smoothly, quickly, and accurately is worth the effort. There were only a few measurements on this entire job. I could be set up to do another run in half an hour or less. I cannot even guess how long it would have taken to do the 10 racks by laying out and drilling all 200 holes individually, and measuring and cutting 100 dowels and rails individually, with no jigs at all -- and the finished racks would have been much less uniform.
SAM_1774.JPGSAM_1777.JPG
 
Last edited:
If you are using a hand-held drill, it isn't unusual to have drift when using jobber drills. If it was me and I had to make multiple pieces all fit, I would make a jig to fit a sharp prick punch so marking out is consistent. Then I would use a rotabroach to drill the holes. A rotabroach has a sharpened pin to orient the cutter and it will locate in the prick punch hole accurately. You can also visually see when a rotabroach is cutting evenly so you are less likely to cant the drill. A rotabroach also cuts burr-free holes so you have less clean up to do.
 
Back
Top