Edge finder question.

Some standard friction type edge finders do not work as well as others. They need to be high quality, and they need to be taken care of, keep them clean and don't crash them. Buying a used one sometimes is asking for someone else's problem child. I have a 3/8" Starrett that I bought new and a 1/2" Micro Tools (USA) that I bought used. Both work well, and it is nice to be able to fit two collet sizes. I also have an import set of four edge finders that I bought new as a newbie. I have never even tried that set, though it is shiny and pretty and also has cone shaped tips (???) and also has both 3/8 and 1/2" shanks. I keep the mill between about 700-1000 rpm when using them, faster when using the .200" contact points. I try to not let the edge finder run on when kicked over, I think that might cause wear that may slowly ruin the snappy kick over.
 
The 1/2" edge finder is my go-to tool for precisely locating and edge. One main reason is that the edge finder is independent of spindle runout; something that cannot be said of probes, including

A characteristic of the edge finder is that if you approach too fast, there are two things that can cause a false trip. The first is if the finder is wobbling, it can trip prematurely giving an undershot reading. Secondly, if moving too fast, you can overshoot the edge before it edge finder can trip.
I will approach an edge relatively rapidly to get a rough sense of where the edge is. I then back off and begin a slow approach.I have a DRO on the mill/drill and the CNC has the ability to jog in .0001" steps as well. I will approach the trip point at about .001"/sec. The final approach is done at about .0001"/sec. I repeat my process to verify that the trip point is consistent within .0001". To reset the edge finder, I back it off by about a thousandth and use the face of my fingernail to center the edge finder.

When I have found my edge, I will zero the DRO, lift my edge finder to clear, move towards the the edge by 1/2 the diameter of the edge finder, and reset my zero. For finding the center of a feature, I find one edge and zero the DRO then move to the opposite edge , using care not to change the rpm or z axis and find that edge. My DRO's both have the ability to divide by two, which wi;ll place the zero point at the trrue center of the feature. This works for rectangular features and for circular features, both inside and outside.

For circular features I try to hit close to the center for the other axis and when finding the second edge, I make sure that I am at the same position on the second axis. Once the center is found for the first axis, I move on to the second axis and repeat. Usually, this is sufficient but if my estimate of the other axis zero was off, I will find the first axis zero again. Usually, there is no correction.

The same process can be done without a DRO. Just advance the dial by .001" and see if the edge finder trips. If not, repeat the process. With practice, you will be able to find an edge to better than .001" in a matter of seconds. This process accounts for any backlash, placing the zero point halfway between. Depending on the operation and the amount of backlash in the machine, you would want to correct for backlash by moving to your desired point and an additional amount equal to half the backlash.
 
On addition to using an edge finder, I have a laser circle generator. To make it more versatile, I have mounted it in my boring head so that I can easily adjust the size of the circle. The circle generator is detailed here: https://www.hobby-machinist.com/thr...in-your-shop-today.14637/page-363#post-553286 in post 10,872.

I also have a digital microscope with about 300X magnification which allows me to find a feature to within +/-.0001", thanks to some software written by Jim Dawson.
 
Thanks for the info, Now to start collecting for one. And relook and try my edge finder also.
 
Regarding a laser edge finder, all the laser pointers s that I have seen have a focusing lens. The pointers are factory focused for a parallel beam. Unscrewing the lens slightly would bring the focal point closer which does two things for you. First, it shortens the working distance and secondly, it produces a smaller dot with the shorter distance.
 
Hi RJ, Guys,

Unfortunately the pen/laser pointer that I used doesn't have that facility ! But I agree that it would be very useful in getting the smallest possible dot size.

I've since purchased several laser pointers including one that had interchangeable lens, non have any focusing ability. Most had rectangular or oval spots. Not really suitable. I did experiment with pin hole adapters, little tubes with various size pin holes in the end, which actually worked, but as the pin hole gets smaller the brightness drops dramatically. On the basis that increasing the laser power to compensate was not wise, I gave up trying to reduce spot size. I value my eyesight too much to take that risk.
 
If not mistaken on the pointers they have to use something that causes the true beam to be broken up some. That in turn causes the beam to spread more and not be as solid. Even on higher power things like I use for fibers, the beam is spread/distorted before it enters the fiber thus making a distorted/less solid dot. It will shine through a 2KM long fiber but will not make a nice dot on metal at 3 inches. Even still you have to be careful of reflected laser as it can almost be the same as getting it shined in your eye. But if your surface finish is like most of mine it takes a lot to reflect anything.
 
Hi Ken,

Yes the risk of eye damage particularly from reflections gets worse as the laser power goes up. I've seen the damage that can be done by laser diodes salvaged from blue ray drives.

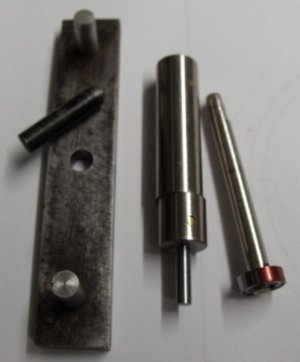
This afternoon I took a couple of pictures of my other edge and center finders. So whilst I am here I've attached them.

10-08-2018-001.JPG
Sorry for the poor focus. The one on the right is a 12 mm diameter ball race, pushed on the end of a bit of 6 mm drill rod. The red is just a marker so that you can see when it touches. The one in the middle is my version of the Starret edge finder. It is made from 1/2 " silver steel rod 55 mm overall length with a 4 mm probe 15 mm long. It works very well, the small diameter probe allowing me to get into holes.

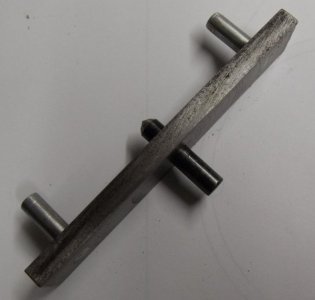
10-08-2018-002.JPG
This one is again a home brew center finder intended for use on bars and rods up to about 70 mm. The pin in the middle is a hardened center punch. Again made from 6 mm drill rod as are the pins pressed into the piece of 20 mm X 6 mm X 100 mm bar.
 
Thank you all for your input.

I love the the things you learn about different techniques and methods. Think I need to practice a bit more and keep saving those pennies for tooling. And by pennies I mean dollars and by dollars I mean....

John V. Minnesota


Sent from my iPhone using Tapatalk
 
Back
Top