Edwards Radial 5 build thread --- PHOTOS!

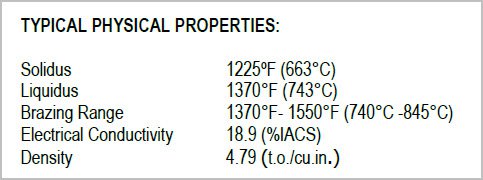
I'm glad we had this conversation. How did I miss your silver 'brazing' post? BTW I used Harris Stay-silv white flux & Saftey-Silv-45 brazing filler metal. I concur with your comment about melting temp, its stated on the spec sheet. You made a very good point about 'interference engine'. I'm pretty sure this radial is the same, so I'll confirm that. That removes a lot of handwringing if any of the timing gears lets go.

OK I'm going to have to plan my next step about some kind of retention pin for the CS gear. Getting accessibility to the rear bearing for eventual replacement is almost a certainty based on any methanol fueled glow engine I've ever met.
 

Attachments

  • SNAG-2022-01-31 6.22.09 PM.jpg
    SNAG-2022-01-31 6.22.09 PM.jpg
    41.7 KB · Views: 28
So seems you were brazing in your practice pieces as well.

I'd recommend getting your hands on some Stay Brite (4% silver) soldering wire and give soldering a whirl on some practice pieces.

Much, much lower temperature; much less prone to errors; much easier to disassemble/redo if you mess it up; etc.

And I'd think that silver solder on that component will be plenty strong enough.
 
Yes, I've used Stay Brite as my go to solder on RC & other widgets. It's very forgiving. Not as strong but I haven't dug into the details.

This was my first venture into silver brazing. Actually it mostly went according to plan but I found the dabbing the wire approaching happy temp a bit hit & miss. Newbie syndrome. So I laid a few small segments along the joint into the flux. Then careful uniform heat, the flux goes glassy clear & very shortly after the solder wicks & makes a nice little fillet. I machined off the back face to see if I had wicking in the (~0.001") gap and its visible.

What I wasn't expecting was the Titanic brown faux finish. This was junk box 1018 & on this one I used the yellow map gas with air bleed type torch head. The flux came off immediately with warm water no problem. But the brown oxide was more persistent & took some 3M scrubbing & Dremel action. That's another reason I was more apprehensive on the gears - getting into all the teeth nooks & crannies to clean out. Apparently there is yet another product to protect the non-flux surface from this effect. I just bought some citric acid powder which I'm anxious to try (in a water solution). I've played with a few more samples this time using propane & regular torch tip. Seemed a bit better but not really. Sorry I should stop now & keep the topic to your engine.
 

Attachments

  • IMG_4221_edited-1.jpg
    IMG_4221_edited-1.jpg
    50.6 KB · Views: 14
  • IMG_4228_edited-1.jpg
    IMG_4228_edited-1.jpg
    83.1 KB · Views: 12
Episode 20 || Valve Spring Retainer Locks

Okay, another component of the valve train done; if all these bits aren’t quite making sense, they should after another post or two.

These little bits were by far the smallest machined parts of the motor so far. It’s really hard to convey just how tiny they are, and made me appreciate even more the insane skill that watchmakers possess.

Here’s the drawing of them. They’re little split tapered thingies that lock into the tapered bore of the valve spring retainers from Episode 19. These will be what eventually lock the valve springs into place.
1643772491025.png


First thing I did was indicate in the angle of the compound using the 20* d-bit I ground for the tapered bore. That way the retainer locks would mate just right with the retainers.
1643772513247.jpeg 1643772533319.jpeg


Then I just turned down sufficient length of taper, without much regard to exact lengths. I parted the extra off to length by lining it up with an actual valve retainer.
1643772560193.jpeg 1643772576479.jpeg


Spotted/drilled/reamed out the innards to 3/32”. Super small.
1643772597062.jpeg 1643772611757.jpeg


Using my micrometer stop on the bed ways, I parted it off to length -- a hair over 1/8" long. Then a slight chamfer by hand on the IDs both sides with a 90* single-flute cutter.
1643772632395.jpeg 1643772648886.jpeg


It’s really hard to convey just how small these parts are. I can barely hold on to them. Using the cutest little grinding vise I’ve ever seen, I split it in two with a jeweler’s saw. (You can barely see it even clamped in the jaws. Look all the way on the left side.)
1643772681790.jpeg 1643772720576.jpeg


I did a bit of hand filing to smooth things out. They’re quite a pain to even hold onto while hand filing. I must have dropped each half of each lock 4 or more times.
1643772742024.jpeg 1643772756714.jpeg


I think the next thing I’ll make will be the springs. This valve train is starting to bug me. Too many components.


TIME ON VALVE SPRING RETAINER LOCKS: 5.5 hours
CUMULATIVE TIME: 364 hours
 
I found the 5th cylinder head that I’ve been missing!!

It was in the pocket of my light fall jacket. Found it while tidying up my closet.

Big relief; it would probably have taken an extra 10 or more hours to make a new one I’d guess. Still have a couple more steps to do to finalize it, but it’s super close.

823EF259-527E-4BE1-A204-B395A73E5148.jpeg
 
Glad you found it intact, right where you put it.......
I would hate to do all those setups again to start over making just one.
 
Teaser photo.

Getting pretty close with the whole top end valve train business. Should be able to post the next update within the next couple days.

1644553917761.jpeg
 
Back
Top