-
Welcome back Guest! Did you know you can mentor other members here at H-M? If not, please check out our Relaunch of Hobby Machinist Mentoring Program!
You are using an out of date browser. It may not display this or other websites correctly.
You should upgrade or use an alternative browser.
You should upgrade or use an alternative browser.
Edwards Radial 5 build thread --- PHOTOS!
- Thread starter JRaut
- Start date
- Joined
- Mar 9, 2018
- Messages
- 465
Thanks! I aim to please.I just love this project.
I'm certainly open to that, I just don't happen to run in the RC airplane circles so I don't know of anyone looking for a motor currently. The thought of bringing it to a local RC aviation meetup/event has crossed my mind, so perhaps I'll do that once (if) it's operational and reasonably reliable.Are you tempted to maybe loan it out to an RC enthusiast to have an airframe made around it? Be lovely in a biplane. Gotta be good seeing it actually power a plane.
- Joined
- Mar 9, 2018
- Messages
- 465
Episode 21 || Valve Springs and Buttons
Sigh… another post about making components of the valve train. I’m antsy to get onto bigger and better things. But I’ve still got at least one, probably two more posts about valve component stuff before I can move on.
Valve Springs
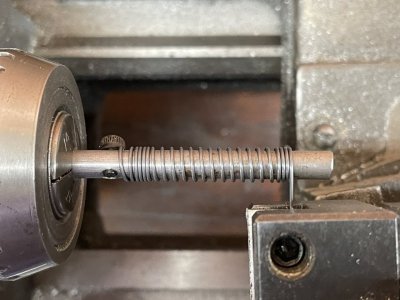
I’ve never made a spring before. So I did a bit of research by watching this Old Tony’s spring video and by taking a look at Our Bible. The plan is basically to just wrap some piano wire around an arbor of the correct diameter, which should be about 1/4” for these springs. The active coils are wrapped with the half-nuts engaged, carriage advancing somewhere around 10 TPI (with the actual rate to be fine-tuned using trial and error).
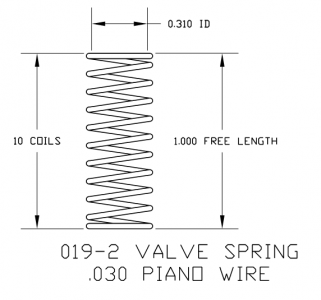
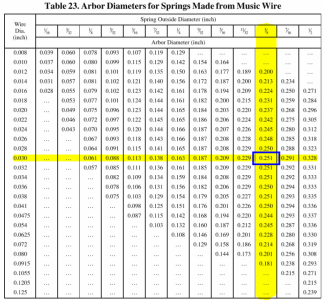
So that’s what I set about doing. I made a little winding arbor from a scrap bit of 1/4” steel. Filed a flat into it and drilled/tapped a hole for a 10-32 SHCS, which I used to grab onto the end of the piano wire. I fed the piano wire through a regular AXA tool holder, clamped with light/modest pressure over a scrap of aluminum to make a drag shoe.
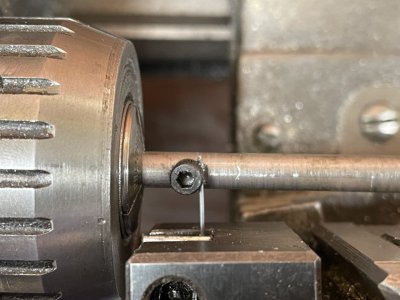
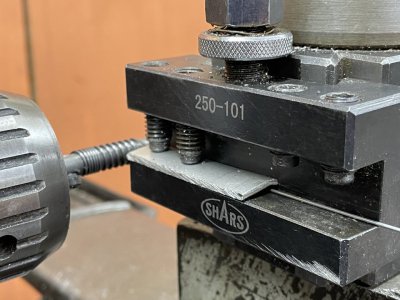
Dialing things in took quite a bit of trial and error, but the winning formula turned out to be about 11.5 wraps with my change gears set to cut 12 TPI. Before engaging the half-nuts and again after wrapping the active coils, I made sure to wind a few extra inactive coils, which I just trimmed off after finishing the spring. Even after getting things dialed in, the springs didn’t turn out quite as consistent as I expected. And the overall shape is surprisingly really sensitive to how well the inactive coils are wound at the start/end too.
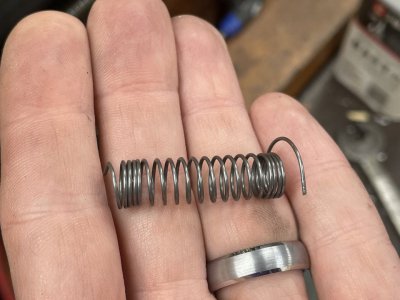
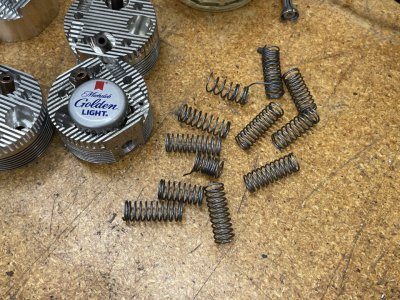
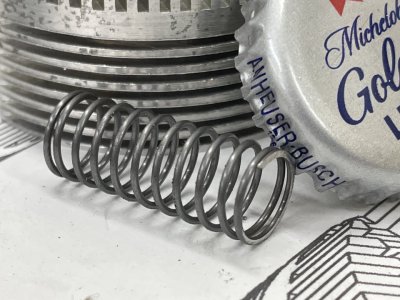
Here are a bunch of scrap springs I made while dialing things in.
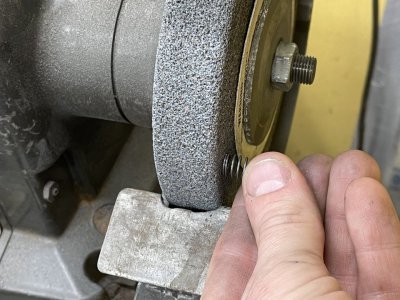
A few seconds on the side of a grinding wheel and the springs were all finished. Not too difficult at all.
Rocker Buttons
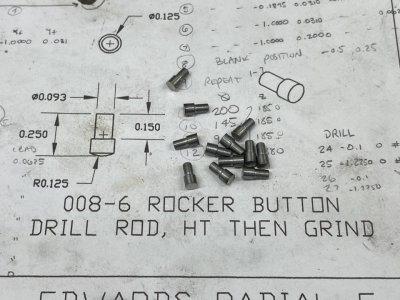
The drawings for these buttons call for grinding in the final radius after hardening. Using some 1/8”-diameter O1 steel, I turned out a dozen of these (two extra) on the lathe, leaving the length a little long for final grinding. Next step is to harden.
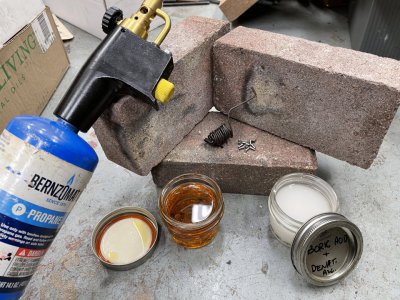
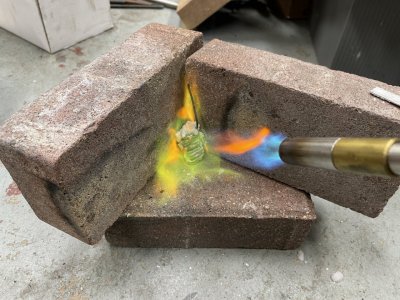
After seeing Clickspring use a mixture of boric acid and denatured alcohol to prevent buildup of scale during hardening, I figured I’d give it a whirl. Here’s my hardening setup. MAPP gas would have been better, but the propane seemed to work well enough for these small parts. The boric acid gives it a funky green/yellow flame.
[EDIT: I just noticed that the box in the background says "YoungLiving essential oils". Neither me nor my wife participate in any of those nasty "be your own boss" pyramid schemes. I think a recent eBay purchase must have come packaged in that box; I've been using it as a trash receptacle and it'll go out on my next garbage run. No offense if any of you or significant others do participate in such scams.... well... maybe I do mean offense --- cut your losses and get out.]
The buttons were definitely hard after quenching, but not glass hard. So I didn’t bother to temper them (would have tossed them in the oven for a half-hour or so at 450F to take the edge off). An old file can just barely make some scratches in them, so they’re probably around HRC 55-60 or so. Good enough.
Then over at the D-bit grinder, I ground in the spherical profile of the correct radius to the button. Setting up the grinder took a bit of effort, but once set up, grinding the spherical profile on the buttons took no time at all.
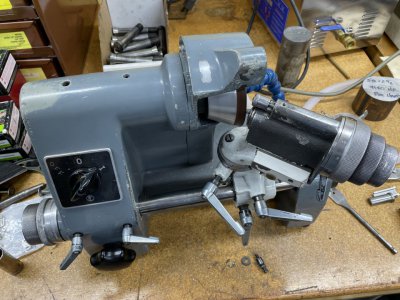
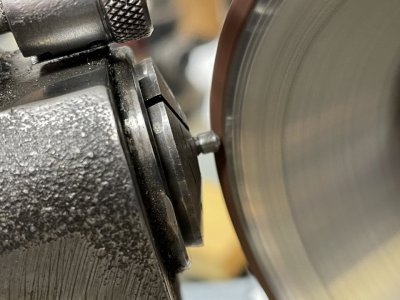
The buttons are held into the rocker arms by a 0.003” interference fit. I threw a little heat at the rockers to make installation a bit easier. Pressed them home using a set of pliers, and protected the parts a bit from damage with some thin scrap cloth.
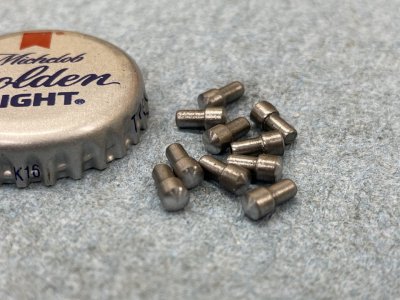
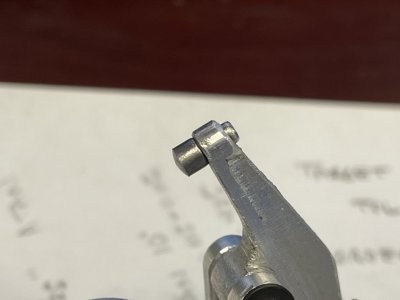
Valve Lash Adjuster Screws
These turned out to be a huge pain in the you-know-what, and I gave up on them for this posting. I’ll have to revisit them later.
It all seems simple enough ---- just use a ball end mill in the tip of a set screw, I even had a double-sided 5/64” ball end mill on hand for some reason. Well, it all failed miserably for two reasons:
I’ve started making up some custom lash adjusters out of some 1/8” O1 drill rod; I’ll harden them after I finish up.
Head / Upper Valve Train Assembly
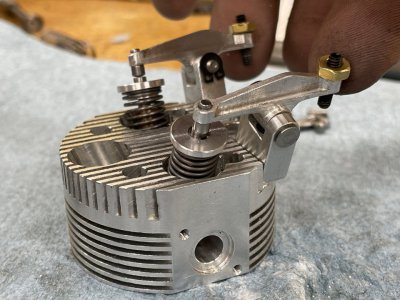
And here’s one of the heads with the top-end valve train completely assembled! Note that I’ve got some set screws installed for the lash adjusters, but those are just place-holders. As I just said above I’ll still have to make new ones of those.
The drawings don’t call for those brass adjuster lock nuts, but they seem necessary and appropriate to me.
One other thing:
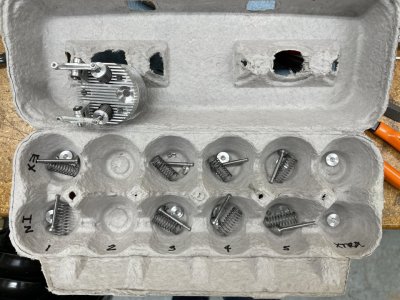
One of the YouTube channels I watch is Jafromobile. While I’m not much interested in working on the same types of projects that he does (modding cheap Hyundai motors), I really enjoy his editing style and presentation. Anyway, he uses egg cartons to organize parts when disassembling valve trains on the 6-cylinder heads he works on, so I adopted the same strategy. It works great!
I’ve still got one or two more posts dedicated to the valve train before I finish all this business up. Remaining components include: valve adjust screws, push rods, tappets, and push rod guides. I suppose I’ll just keep the valve train rolling to get it over and done with.
TIME ON VALVE SPRINGS & BUTTONS: 9.5 hours
CUMULATIVE TIME: 376 hours
Sigh… another post about making components of the valve train. I’m antsy to get onto bigger and better things. But I’ve still got at least one, probably two more posts about valve component stuff before I can move on.
Valve Springs
I’ve never made a spring before. So I did a bit of research by watching this Old Tony’s spring video and by taking a look at Our Bible. The plan is basically to just wrap some piano wire around an arbor of the correct diameter, which should be about 1/4” for these springs. The active coils are wrapped with the half-nuts engaged, carriage advancing somewhere around 10 TPI (with the actual rate to be fine-tuned using trial and error).


So that’s what I set about doing. I made a little winding arbor from a scrap bit of 1/4” steel. Filed a flat into it and drilled/tapped a hole for a 10-32 SHCS, which I used to grab onto the end of the piano wire. I fed the piano wire through a regular AXA tool holder, clamped with light/modest pressure over a scrap of aluminum to make a drag shoe.


Dialing things in took quite a bit of trial and error, but the winning formula turned out to be about 11.5 wraps with my change gears set to cut 12 TPI. Before engaging the half-nuts and again after wrapping the active coils, I made sure to wind a few extra inactive coils, which I just trimmed off after finishing the spring. Even after getting things dialed in, the springs didn’t turn out quite as consistent as I expected. And the overall shape is surprisingly really sensitive to how well the inactive coils are wound at the start/end too.


Here are a bunch of scrap springs I made while dialing things in.

A few seconds on the side of a grinding wheel and the springs were all finished. Not too difficult at all.


Rocker Buttons
The drawings for these buttons call for grinding in the final radius after hardening. Using some 1/8”-diameter O1 steel, I turned out a dozen of these (two extra) on the lathe, leaving the length a little long for final grinding. Next step is to harden.

After seeing Clickspring use a mixture of boric acid and denatured alcohol to prevent buildup of scale during hardening, I figured I’d give it a whirl. Here’s my hardening setup. MAPP gas would have been better, but the propane seemed to work well enough for these small parts. The boric acid gives it a funky green/yellow flame.


[EDIT: I just noticed that the box in the background says "YoungLiving essential oils". Neither me nor my wife participate in any of those nasty "be your own boss" pyramid schemes. I think a recent eBay purchase must have come packaged in that box; I've been using it as a trash receptacle and it'll go out on my next garbage run. No offense if any of you or significant others do participate in such scams.... well... maybe I do mean offense --- cut your losses and get out.]
The buttons were definitely hard after quenching, but not glass hard. So I didn’t bother to temper them (would have tossed them in the oven for a half-hour or so at 450F to take the edge off). An old file can just barely make some scratches in them, so they’re probably around HRC 55-60 or so. Good enough.
Then over at the D-bit grinder, I ground in the spherical profile of the correct radius to the button. Setting up the grinder took a bit of effort, but once set up, grinding the spherical profile on the buttons took no time at all.


The buttons are held into the rocker arms by a 0.003” interference fit. I threw a little heat at the rockers to make installation a bit easier. Pressed them home using a set of pliers, and protected the parts a bit from damage with some thin scrap cloth.


Valve Lash Adjuster Screws
These turned out to be a huge pain in the you-know-what, and I gave up on them for this posting. I’ll have to revisit them later.
It all seems simple enough ---- just use a ball end mill in the tip of a set screw, I even had a double-sided 5/64” ball end mill on hand for some reason. Well, it all failed miserably for two reasons:
- The set screws that I bought for the job were just too damn hard and my lathe couldn’t spin nearly fast enough to make any progress on them.
- To get around the hardness issues, I fully tempered a few set screws (propane torch to red hot, then air cool) to see if that would help the cause. It did, but the other issue is that the 5/64” ball end mill equates to almost exactly the minor diameter of a #4-40 thread (0.078" vs 0.081"). So even when I was able to drill into the softened screws, there wasn’t any material left!
I’ve started making up some custom lash adjusters out of some 1/8” O1 drill rod; I’ll harden them after I finish up.

Head / Upper Valve Train Assembly
And here’s one of the heads with the top-end valve train completely assembled! Note that I’ve got some set screws installed for the lash adjusters, but those are just place-holders. As I just said above I’ll still have to make new ones of those.
The drawings don’t call for those brass adjuster lock nuts, but they seem necessary and appropriate to me.

One other thing:
One of the YouTube channels I watch is Jafromobile. While I’m not much interested in working on the same types of projects that he does (modding cheap Hyundai motors), I really enjoy his editing style and presentation. Anyway, he uses egg cartons to organize parts when disassembling valve trains on the 6-cylinder heads he works on, so I adopted the same strategy. It works great!

I’ve still got one or two more posts dedicated to the valve train before I finish all this business up. Remaining components include: valve adjust screws, push rods, tappets, and push rod guides. I suppose I’ll just keep the valve train rolling to get it over and done with.
TIME ON VALVE SPRINGS & BUTTONS: 9.5 hours
CUMULATIVE TIME: 376 hours
Last edited:
I'm really enjoying your approach to documenting this build. Clear descriptions and very nice pictures. The time spent on each component and the running total really puts the scope of this project into perspective. Thanks for sharing!
- Joined
- Mar 9, 2018
- Messages
- 465
Thanks @FirstramI'm really enjoying your approach to documenting this build. Clear descriptions and very nice pictures. The time spent on each component and the running total really puts the scope of this project into perspective. Thanks for sharing!
I've not seen anyone lay out how much damn time it takes to make all the bits and pieces, so I figured I'd try to keep track.
The hours I'm showing are definitely an underestimate. It doesn't include as much 'noodling' time as I've spent, and probably doesn't include a bunch of time looking at drawings and planning.
But it's at least a good starting point for folks interested in undertaking similar projects.
- Joined
- Mar 9, 2018
- Messages
- 465
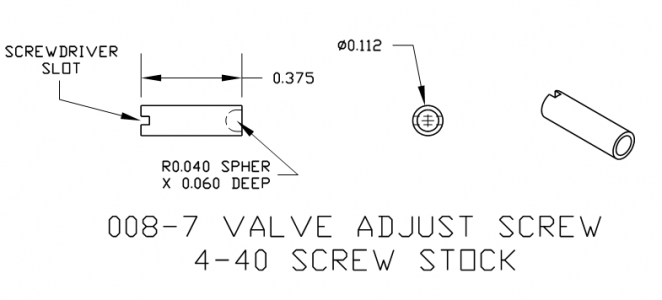
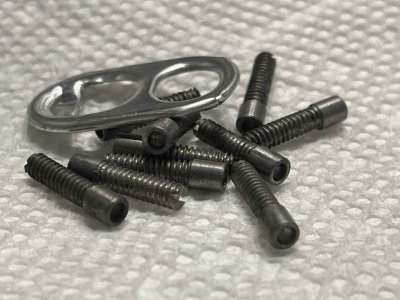
Okay, I made the little #4-40 lash adjustment screws off camera.
1. Turned some O1 to size on the lathe
2. Cut threads with a #4-40 die
3. Drill spherical hole/pocket in the end
4. Harden
5. Temper
I'm not all the happy with how they turned out ---- rough threads, crappy screwdriver slot, off-center push rod hole, etc. ---- but I'm happy they're done.
For some reason these parts just irked me.
Anyway, they're done and I can now move on to the push rods, tappets, and a slight modification to the cam housing bell.

- Joined
- Sep 5, 2013
- Messages
- 3,206
I think at that size they would have irked me too!
I work on a fair number of minuscule bits as well and find all typically goes well until I reach that tipping point where even my small tools are too big. After that it just becomes painful as I continue to struggle on but with no real hope of meeting the quality that I want. Good on you for sticking it out. As others before me have said, this is an amazing thread and worth every read.
-frank
I work on a fair number of minuscule bits as well and find all typically goes well until I reach that tipping point where even my small tools are too big. After that it just becomes painful as I continue to struggle on but with no real hope of meeting the quality that I want. Good on you for sticking it out. As others before me have said, this is an amazing thread and worth every read.

-frank
- Joined
- Nov 25, 2015
- Messages
- 8,234
I have a lot of respect for people who work in miniature. I think it takes a lot of patience, problem solving, and accuracy. A part that might be only .040 having a .001 error is a lot more off than a .250 part having .001 off.I think at that size they would have irked me too!
I work on a fair number of minuscule bits as well and find all typically goes well until I reach that tipping point where even my small tools are too big. After that it just becomes painful as I continue to struggle on but with no real hope of meeting the quality that I want. Good on you for sticking it out. As others before me have said, this is an amazing thread and worth every read.
-frank
- Joined
- Mar 9, 2018
- Messages
- 465
I'm about to start making up the tappets, which ride along the cam ring and activate the valves via the push rods and rocker arms.
The drawings call for the hardened O1 steel tappets to ride directly in the 7075 Aluminum cam housing in 1/8" reamed holes.
So that's how I made the cam housing, but I'm now thinking that adding in some bronze tappet guides would be a more robust solution.
I don't really intend for the motor to get much actual use, other than just firing it up from time to time, but the guides do just seem like the right thing to do.
Only trouble is there's not a whole lot of room in there to add pockets in the cam housing for new unplanned-for tappet guides. The guides would be about 0.200" OD and 0.125" OD. I suppose that'd work, but it'll just get a little crowded.
Anyone have any thoughts on the matter worth sharing?
Thanks in advance.
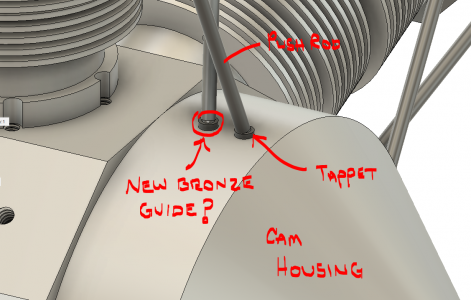
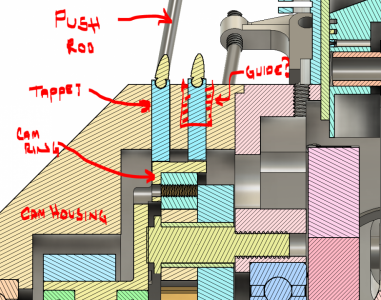


- Joined
- Sep 5, 2013
- Messages
- 3,206
Interesting dilemma, I can absolutely see why you’d want to put guides in and I think we intuitively expect them to be there if it were a full-sized engine. But space is tight — by my rough estimation just scaling your photo there it looks like maybe you’d have 0.050” between the two outer diameters of the guides at 0.200” each. That’s probably doable, although not quite as comfortable as a full eighth between the two holes if there are no guides.
Would you insert the guides first and then ream both the guide as well as the remaining portion of the cam housing as one assembly at 0.125”? If not and the guide is the only reamed bearing surface for the tappets it might not give you as reliable a bore for the tappets to run without risking getting cocked (the length of the guide being shorter than the unlined bore in the cam housing).
Visually I think the presence of the guides would be superb — that little extra kick that the eye would again be expecting to see on a bigger specimen. But, worth the risk of running the bores together? Only you can decide that part.
-frank

