- Joined
- Jun 29, 2014
- Messages
- 4,058
Recently acquired a 3D Printer and have been plinking away making a few little things here and there. One weak spot in my opinion is the extruder fan and cooling fan arrangement. Here is a stock photo of the setup:

There are two 24V fans on the hot end. The axial fan on the front cools the extruder hot end. The centrifugal fan on the right cools the filament as it is extruded onto the print. Air is ducted downward and to the left of the hot end across the tip of the nozzle from the centrifugal fan.
One thing I like about this setup is that it looks simple, compact, neat and tidy. There are not a lot of wires dangling about and the hot part of the extruder is well guarded so it is safe. That's about it though - keep in mind my opinion is based on my limited experience with the machine.
The one thing I don't like about it is that it is actually not simple, and it isn't necessarily easy to work on. It is hard to see the extruder tip - the working end of the 3D printer - so you need to twist and bend downwards to watch and see what is happening. I'd prefer an easy viewing window as the machine is working. Also, the axial fan is bonded or something like glued or double-side taped to the sheet-metal guard. One of my fan blades broke off (cheap import axial fan) and so I went to remove the fan to replace it. I couldn't remove the fan from the guard. And the guard is the only way to mount the fan with this design. The more I work on this thing, the less I like it.
So, I went on the internet and started reading about this hot end and it turns out there are about 101 different hot end ducted modifications you can download and print. Being a tinkerer and having some free-time, I convinced myself that I can do better. We will see.
I order a couple of 24V centrifugal fans off eBay. These seem to have more airflow and appear to be the more popular choice for most modders on sites like Thingiverse.
I dubbed around with orienting the fans in certain directions to come up with some aesthetically pleasing design in F360. I eventually came up with the following prints:
1) This is the backplate. Extruder cooling on the left, nozzle tip cooling on the right. The hot end is installed between the two plenums. It will bolt right to the X axis carriage. You may also notice I've modeled my own plenums for the centrifugal fans.
.JPG")
I couldn't get things to look streamlined. All of mods out there for ducted fans has the fans installed with their factory plenums (I hope that is the right word). The fans stick out all over the place. I want them out of the way, but where I can see that they are rotating and functioning. So, basically I'll be removing the fans from their plenums and installing them on to the back plate:

I had to model covers for each of the fans and their corresponding plenums. Here they are mid-print:

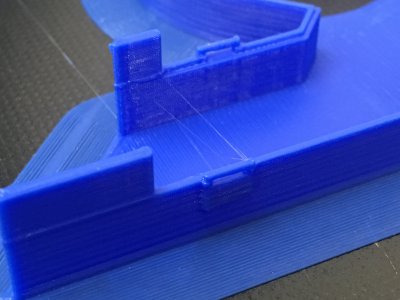
And here is some of the latching detail for the covers.

Those thin walls and latches are about .028" thick. The level of detail these machines can achieve is remarkable.
Will be working on fitting up the fans and making sure the latches securely keep the covers in place. More photos to come in a few days.
There are two 24V fans on the hot end. The axial fan on the front cools the extruder hot end. The centrifugal fan on the right cools the filament as it is extruded onto the print. Air is ducted downward and to the left of the hot end across the tip of the nozzle from the centrifugal fan.
One thing I like about this setup is that it looks simple, compact, neat and tidy. There are not a lot of wires dangling about and the hot part of the extruder is well guarded so it is safe. That's about it though - keep in mind my opinion is based on my limited experience with the machine.
The one thing I don't like about it is that it is actually not simple, and it isn't necessarily easy to work on. It is hard to see the extruder tip - the working end of the 3D printer - so you need to twist and bend downwards to watch and see what is happening. I'd prefer an easy viewing window as the machine is working. Also, the axial fan is bonded or something like glued or double-side taped to the sheet-metal guard. One of my fan blades broke off (cheap import axial fan) and so I went to remove the fan to replace it. I couldn't remove the fan from the guard. And the guard is the only way to mount the fan with this design. The more I work on this thing, the less I like it.
So, I went on the internet and started reading about this hot end and it turns out there are about 101 different hot end ducted modifications you can download and print. Being a tinkerer and having some free-time, I convinced myself that I can do better. We will see.
I order a couple of 24V centrifugal fans off eBay. These seem to have more airflow and appear to be the more popular choice for most modders on sites like Thingiverse.
I dubbed around with orienting the fans in certain directions to come up with some aesthetically pleasing design in F360. I eventually came up with the following prints:
1) This is the backplate. Extruder cooling on the left, nozzle tip cooling on the right. The hot end is installed between the two plenums. It will bolt right to the X axis carriage. You may also notice I've modeled my own plenums for the centrifugal fans.
I couldn't get things to look streamlined. All of mods out there for ducted fans has the fans installed with their factory plenums (I hope that is the right word). The fans stick out all over the place. I want them out of the way, but where I can see that they are rotating and functioning. So, basically I'll be removing the fans from their plenums and installing them on to the back plate:
I had to model covers for each of the fans and their corresponding plenums. Here they are mid-print:
And here is some of the latching detail for the covers.
Those thin walls and latches are about .028" thick. The level of detail these machines can achieve is remarkable.
Will be working on fitting up the fans and making sure the latches securely keep the covers in place. More photos to come in a few days.