Ender 3 upgrades

MikeWi

Active User
Registered
Joined
Jan 21, 2013
Messages
860
I thought I'd share some thingiverse links to the upgrades that I've made for the Ender 3

Belt Tensioners:
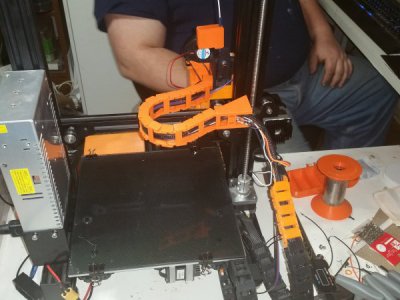
Cable Chain for the rear wiring harnesses:
Rear Cover for the LCD Display:
Petsfang cooling duct: designed by an engineer who does this for a living!
extruder knob:
filament guide: I found that you don't need the popular guide up at the top of the printer if you use this.

If you decide to add a Raspberry Pi to run Octoprint on, then this case is just the thing:
Raspberry Pi Cover: This also has a box and lid for a buck converter if you want to power on the raspberry pi with the printer's power switch.

You can get stepper motor damping mounts to greatly reduce the noise, but the newer Ender 3's have a press-on pulley that may keep you from using them on anything but the Y-axis. You need this adapter to use it.
Y-axis damper mount:

I highly recommend this youtube channel: I've learned more from this guy than from anyone else. I just changed out the stock motherboard for a MKS Gen L board with trinamic steppers following one of his videos. It's eerie how quiet the printer is now. The stepper damper isn't even needed now.

Teaching Tech:
 
Nice upgrades--all I have done to mine is the petsfang with 5015 fan and milled an aluminum extruder for use with flexible filament and moved the extruder back away from the z screws.
 
I think I have just as much (or even more) fun modding the printer as I do using it for practical things. :)
 
Mine just showed up a couple of days ago. I'm still definitely on the low end of the learning curve, but I'm getting there. So far, I've swapped to the Creality glass build plate and swapped to an EZR Extruder to hopefully be able to run flexible filament to do some way wipers, dust boots, dampeners, etc.

What did you use to slice the cable chain links and what settings did you use? PLA? PETG?

Thanks,
Will
 
The settings have long since changed. as have many of the mods I listed! :) I use Cura 3.6 for slicing now. Simplify 3D was helpful when I was learning, but I have to admit now that it's a waste of money except for some very specific circumstances.
The links were printed in PLA originally, but I'm not happy with them. I later added some links from PETG and they are much better (and quieter).

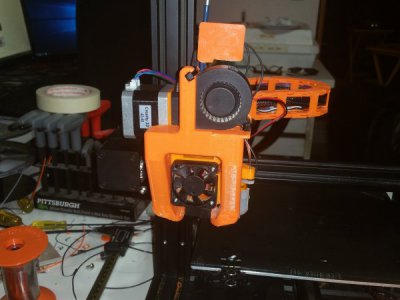
Here's the current list of changes:
I'll attach a couple pics.
287860287861
 
Almost forgot a very important change! I switched from Marlin firmware to Klipper. It runs on a Raspberry PI using Octoprint, and it does the work of decoding the gocode. Instead of the 8bit mainboard trying to crunch the numbers, Klipper can do it on the 32bit platform. It also is able to print much, much faster. Most of my prints are running at twice the speed or more that they used to. A big time-saver when you have some prints that run over 10 hours that you want to run often. Other advantages as well, but you do have to be handy with computers for this one, as you're working with the Linux OS that's on the Raspberry PI. They give you all the info you need, but be warned.
 
Thanks @MikeWi!

I went with the EZR extruder and capricorn tubing, so I don't think I'll be swapping to direct drive for a while. Unfortunately, I'm having trouble getting the PETG cable chain links to not have a crazy amount of stringing, but this is only day 4 or so with the printer, so I have plenty of settings to mess with yet.

I printed that bearing mount filament guide setup from your original list of mods, and the outer ring is printing way too small to fit onto a 608 bearing. Did you have trouble with that?

Thanks,
Will
 
I had the opposite trouble actually. You can adjust for that in the slicer. compare the size you get with the size you want and use the (difference? I actually can't remember if it's the straight difference, or a percentage). I use Cura, and they have a item called "Horizontal Expansion" strangely, you use a negative adjustment for a too small hole and vice versa. I had to adjust mine by -.09mm

I should have added Capricorn XS to the list. Much better than the stock tubing, and you can safely print up to 175c with it (if you don't have birds). this means I don't have to buy an all metal hotend for what I print.
 
@MikeWi -- I spent Sunday getting some PETG first layer adhesion issues sorted. It's much better and I'm getting consistently 80~85% of the quality I really want, but I'll play with hot end temperature a little and get things dialed in.

I ended up using the scaling multiplier in Cura for the filament guide. I needed to print at 120% of provided size to get it to fit the bearing. I also had to give the bracket a couple of licks with a file to get it to fit below the nut on the roller guide. I'll report back on other upgrades as I get them printed and fit in place. Next up is the belt tensioners and the lead screw guide bearing mount.

Thanks,
Will
 
Wow, that seems like an extreme amount of difference. Wonder why? YMMV, but if it helps any, I print my PETG at 250c on an 80c bed. Helps with bed adhesion and layer adhesion as well as allowing me to extrude faster.
Edit: 250c is the "max' temp listed for my filament, Hatchbox PETG.
Edit of the Edit: I just realized I said Capricorn XS can print up to 175c Duh! Any of them can do that! I meant 275c See here
 
Back
Top