- Joined
- Nov 23, 2014
- Messages
- 2,606
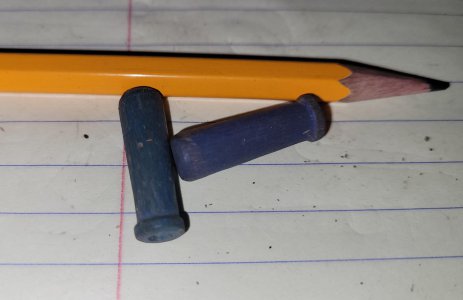
Back with another reproduction Erector set part. This one never had a part number; collectors call them the “blue wooden shift handle”. I’ll start with the obligatory history lesson. . .
The A. C. Gilbert Company introduced the p/n A49 110V electric motor in 1938. The motor’s gearbox had a shift lever to engage the drive in either forward or reverse. They also included a 5/16” diameter wooden-handle that was ~1” long and shaped like a baseball bat. The center at the knob end had a 5/32” hole drilled ½” deep into the knob handle end. The gearbox could be shifted without the knob, but it did provide a more “user-friendly” handle.
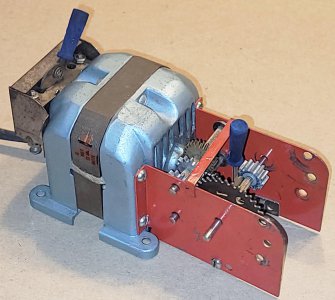
In 1940, the company added a p/n ‘NV’ whistle which screwed to the back of the A49 motor. The rear of the motor armature had a gear attached. A cam lever on the ‘NV’ brought a brass strip in contact with the gear resulting in a “the bearings need oil” sound, though Gilbert called it a whistle. The larger sets from 1940-46 included the ‘NV’ and a 2nd blue wooden shift knob.
Blue wooden shift handles included in motorized Erector sets from 1938 - 1962.
A49 motor with an "NV" whistle on the backside.
I used to have a Rockwell 10” lathe with 4C collets and a taper attachment that was used to make them. It went pretty quickly; set the taper attachment to 3 deg., use a 5/32” drill bit in the tail stock as a depth stop to set the length, and a carriage stop near the headstock to set the LH edge. The process was to set the tailstock to 1” on the quill, loosen the collet, slide the dowel until it hit the drill bit, then tighten the collet. Slip a drill bushing over the dowel; the bushing was left on the 5/32” drill bit, and drill a ½” deep hole. Slide the drill bushing off the dowel, move the carriage (with a parting tool mounted) to the knob end, and plunge in ~1/16” to break the surface. Then whip back to the LH side, plunge lightly to mark the LH end, move down toward the TS by 1/8” and make the longitudinal cut at the 3-deg. angle. Then back up to the LH edge, plunge a little deeper and work radii into the sides of the knob and barrel end with a triangular file. Finish parting off the dowel, shut off the lathe and repeat the process. I could comfortably make ~30 per hour with that setup (they sell for $2-$3 each).
I’m always looking for ways to take time out of my projects. My plan was to drill the 5/32” diameter, ½” deep hole in the knob end with the same drill bushing, then cut the profile in one shot with a tool made to the shape of the knob. I started with a piece of ¼” O-1 steel and cut a 5-deg. relief angle on top. Laid out the profile and cut the barrel-end radius and knob end with a 0.090” end mill. Next, went to the die filer to work the middle to my scribed line.
Cutting the forming tool on the BP with a 0.090" end mill
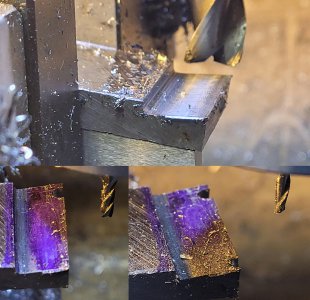
Angled the table on the Oliver die filer and worked away the center section
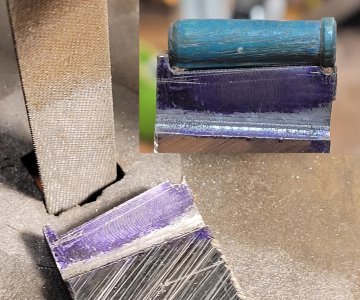
I left the LH side of the form tool a little long, this area would part the knob off. Ideally, I’d plunge the form tool in to shape the shift knob and be on the verge of it snapping off on its own just as the shape was finished. I left that area long with the intend of shortening it up to find that “sweet spot”. In reality, it didn’t work. . . Birch dowels aren’t as stiff as metal; I kept grinding the LH edge down and got to the base of the radii on the barrel end. Plan “B” was snipping them off with a side cutter.
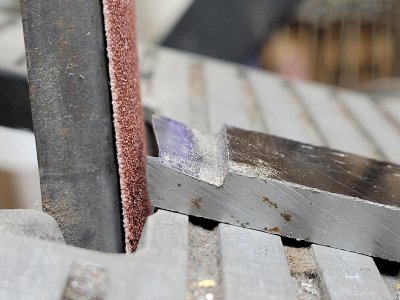
Grinding back the built in "parting tool"
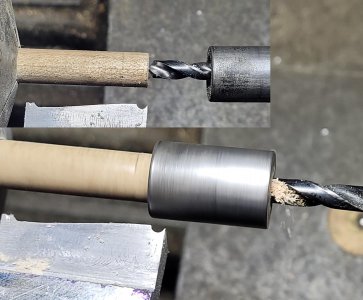
I make heavy use of drill jigs. This one nests over the 5/16" dowel and holds a 5/32" drill bit on center which lets me skip the center drilling step
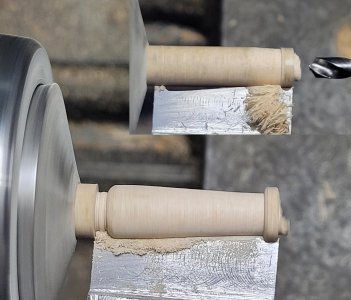
Pecking away with the forming tool. Snip off with a side cutter and sand the nib off the end.
It worked out okay, I’m up to around 35-40 of them an hour with this process. I didn’t show it, but the barrel ends get touched with a belt sander to take off the nib. Then they’re tossed into a cup of blue aniline dye overnight. Dump the dye into another cup, and dump the knobs on paper towels for drying.
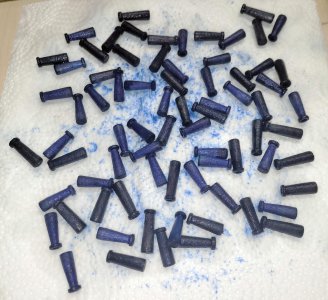
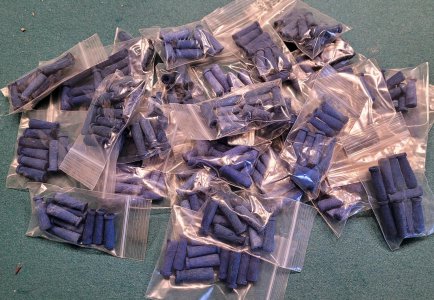
About 300 of them ready for shows!
Thanks for looking, Bruce
The A. C. Gilbert Company introduced the p/n A49 110V electric motor in 1938. The motor’s gearbox had a shift lever to engage the drive in either forward or reverse. They also included a 5/16” diameter wooden-handle that was ~1” long and shaped like a baseball bat. The center at the knob end had a 5/32” hole drilled ½” deep into the knob handle end. The gearbox could be shifted without the knob, but it did provide a more “user-friendly” handle.
In 1940, the company added a p/n ‘NV’ whistle which screwed to the back of the A49 motor. The rear of the motor armature had a gear attached. A cam lever on the ‘NV’ brought a brass strip in contact with the gear resulting in a “the bearings need oil” sound, though Gilbert called it a whistle. The larger sets from 1940-46 included the ‘NV’ and a 2nd blue wooden shift knob.
Blue wooden shift handles included in motorized Erector sets from 1938 - 1962.

A49 motor with an "NV" whistle on the backside.

I used to have a Rockwell 10” lathe with 4C collets and a taper attachment that was used to make them. It went pretty quickly; set the taper attachment to 3 deg., use a 5/32” drill bit in the tail stock as a depth stop to set the length, and a carriage stop near the headstock to set the LH edge. The process was to set the tailstock to 1” on the quill, loosen the collet, slide the dowel until it hit the drill bit, then tighten the collet. Slip a drill bushing over the dowel; the bushing was left on the 5/32” drill bit, and drill a ½” deep hole. Slide the drill bushing off the dowel, move the carriage (with a parting tool mounted) to the knob end, and plunge in ~1/16” to break the surface. Then whip back to the LH side, plunge lightly to mark the LH end, move down toward the TS by 1/8” and make the longitudinal cut at the 3-deg. angle. Then back up to the LH edge, plunge a little deeper and work radii into the sides of the knob and barrel end with a triangular file. Finish parting off the dowel, shut off the lathe and repeat the process. I could comfortably make ~30 per hour with that setup (they sell for $2-$3 each).
I’m always looking for ways to take time out of my projects. My plan was to drill the 5/32” diameter, ½” deep hole in the knob end with the same drill bushing, then cut the profile in one shot with a tool made to the shape of the knob. I started with a piece of ¼” O-1 steel and cut a 5-deg. relief angle on top. Laid out the profile and cut the barrel-end radius and knob end with a 0.090” end mill. Next, went to the die filer to work the middle to my scribed line.
Cutting the forming tool on the BP with a 0.090" end mill

Angled the table on the Oliver die filer and worked away the center section

I left the LH side of the form tool a little long, this area would part the knob off. Ideally, I’d plunge the form tool in to shape the shift knob and be on the verge of it snapping off on its own just as the shape was finished. I left that area long with the intend of shortening it up to find that “sweet spot”. In reality, it didn’t work. . . Birch dowels aren’t as stiff as metal; I kept grinding the LH edge down and got to the base of the radii on the barrel end. Plan “B” was snipping them off with a side cutter.
Grinding back the built in "parting tool"

I make heavy use of drill jigs. This one nests over the 5/16" dowel and holds a 5/32" drill bit on center which lets me skip the center drilling step

Pecking away with the forming tool. Snip off with a side cutter and sand the nib off the end.

It worked out okay, I’m up to around 35-40 of them an hour with this process. I didn’t show it, but the barrel ends get touched with a belt sander to take off the nib. Then they’re tossed into a cup of blue aniline dye overnight. Dump the dye into another cup, and dump the knobs on paper towels for drying.

About 300 of them ready for shows!

Thanks for looking, Bruce

