- Joined
- Jul 31, 2020
- Messages
- 765
I can be rather bad at having too many projects going on at once.
So many of them required "other things" have to be completed before I can get to the next step of the project.
This particular one has been in the making for WAY to many months.
I welded up a large (oversized) steel table for my mill. The first welder I was using (a flux core wire welder) seemed to barely be up for the task.
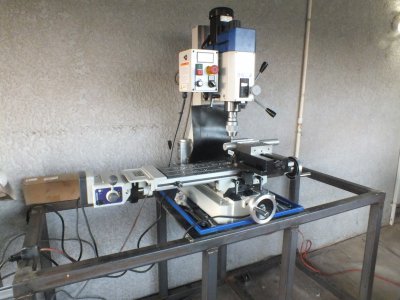
So, I had to stop that process until a better welder was at hand. The table was made with 1/8th wall 2 inch square tubing. The top where the Mill sits is a 3/8ths inch plate (I wanted it to be stout). Under the plate was additional angle iron which was aligned with the bolt holes. The plate to the side of the mill will be 1/4 inch, but it is not welded in place yet. It will hold a vice.
The bottom line is that the table was complete enough to put the mill on it. The top 3/8ths plate and angle iron bracing below was drilled clearance holes for the four bolts which will secure the mill. The blue chip tray made a great template for the holes.
The bolts which were shipped in a bag with the mill were a bit short for me to use. But, the ones which were used to secure it to the pallet were more than long enough. Those were recycled.
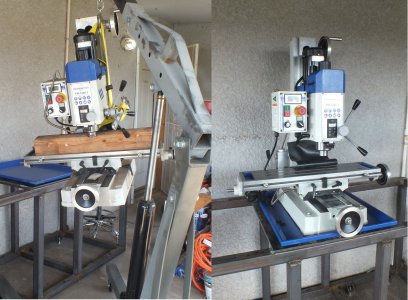
An engine hoist was slated to lift the mill up, and put it on the table. However, the front legs on the hoist were not far enough apart to get around the outside of the wood pallet the mill was on. So, with the help of three family members, we lifted it off, and pulled away the pallet, so the hoist could be used to lift it onto the table.
Once the hoist was secured, the lifting went smoothly, the big challenge was the front legs on the hoist were so long, I could not move the mill close enough to the middle of the table, without them pressing against the wall behind the table. It was heave-ho time, shoving the dangling mill forward at a 45 degree angle, to get it closer to the center of the table, all while lowering the boom. Lots of fun.. but no fingers were lost.. no mills were harmed during this operation.
Some notes for others who will want to hoist up their PM 728-VT. The oil lines leaving the one-shot oiler are in a vulnerable position once a lifting strap is placed under the head, and *wrapped* around the column. I removed all of those fittings and lines before I put the strap on it. I knew they would become casualties once the strap cinched tight. The overall balance of the mill was good, and it did not seem to misbehave when hoisted up. Follow the manufacturers recommendation on lowering the head, placing a wooden block, and LOCKING all vertical movement down.
Double picture below. Left side was it being hoisted. Right side is the Mill in place.
So many of them required "other things" have to be completed before I can get to the next step of the project.
This particular one has been in the making for WAY to many months.
I welded up a large (oversized) steel table for my mill. The first welder I was using (a flux core wire welder) seemed to barely be up for the task.
So, I had to stop that process until a better welder was at hand. The table was made with 1/8th wall 2 inch square tubing. The top where the Mill sits is a 3/8ths inch plate (I wanted it to be stout). Under the plate was additional angle iron which was aligned with the bolt holes. The plate to the side of the mill will be 1/4 inch, but it is not welded in place yet. It will hold a vice.
The bottom line is that the table was complete enough to put the mill on it. The top 3/8ths plate and angle iron bracing below was drilled clearance holes for the four bolts which will secure the mill. The blue chip tray made a great template for the holes.
The bolts which were shipped in a bag with the mill were a bit short for me to use. But, the ones which were used to secure it to the pallet were more than long enough. Those were recycled.
An engine hoist was slated to lift the mill up, and put it on the table. However, the front legs on the hoist were not far enough apart to get around the outside of the wood pallet the mill was on. So, with the help of three family members, we lifted it off, and pulled away the pallet, so the hoist could be used to lift it onto the table.
Once the hoist was secured, the lifting went smoothly, the big challenge was the front legs on the hoist were so long, I could not move the mill close enough to the middle of the table, without them pressing against the wall behind the table. It was heave-ho time, shoving the dangling mill forward at a 45 degree angle, to get it closer to the center of the table, all while lowering the boom. Lots of fun.. but no fingers were lost.. no mills were harmed during this operation.
Some notes for others who will want to hoist up their PM 728-VT. The oil lines leaving the one-shot oiler are in a vulnerable position once a lifting strap is placed under the head, and *wrapped* around the column. I removed all of those fittings and lines before I put the strap on it. I knew they would become casualties once the strap cinched tight. The overall balance of the mill was good, and it did not seem to misbehave when hoisted up. Follow the manufacturers recommendation on lowering the head, placing a wooden block, and LOCKING all vertical movement down.
Double picture below. Left side was it being hoisted. Right side is the Mill in place.
Attachments
Last edited:
") .
.