First "Complex" Machining Project

Skowinski

Registered
Registered
Joined
Nov 9, 2017
Messages
222
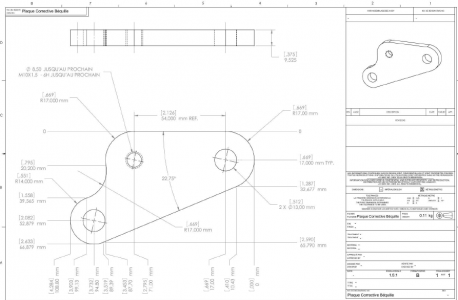
Hello All - I'm about to set up to start trying to produce the part shown below. I have a plate of aluminum about 12mm thick and 10-15mm larger in x and y dimensions than is necessary. My milling machine is manual, as is my lathe.

First question - to accurately drill/tap these holes in the correct positions I think I can just carefully move the right distances in X and Y. Is there a better way? I'm new to this and my tooling isn't built up substantially yet, don't have a swivel base for my vise etc.

Second question - is there any way with a manual machine I can produce the radiuses on the corners? I presume I'll make the entire part on the mill.

Nothing has to be super accurate in dimensions (+/- a mm for most aspects) except for the hole locations, because bolts will go through them into already made blind holes on the part this bolts to.

Thanks for any advice.
1611007139971.png
 
A rotary table can be used to make the radii. You just need to index the "center" of the radius you wish to cut with that of the rotary table. Move your end mill in to the desired radius in relation to the rotary table and then rotate the part. (This may take multiple passes depending on the depth of cut.)
 
Make all your holes in a blank first. Use your dials to move from one to another, taking care to observe backlash. The Flats can be cut using dowel pins on the holes resting on the top of the vise and shims to bring the flat surface horizontal and using the procedure in the video above. Use that same procedure to cut the radii.

Edit: You won't be able to cut the concave radius that way though. I would make tha feature while drilling the holes by using a boring head or fly cutter.
 
The outside radii are brute force simple. Just clamp up a vertical pin the same size as the hole and swing the part. The hole need not be finished size, use whatever size fits whatever pin is on hand. Swing the part by hand is fine, taking a few thou per pass, adjusting X or Y as necessary. If the part is visible, as in finish is important, might I suggest you make a couple rounded corners on scrap so you'll get a "feel" for what you're doing.

The inside radius has several answers, the simplist, to me, is to use the largest milling cutter you have and call it good. (redrawing "on the fly", as it were). Or using a fly cutter and move in slowly. Then there is the process of using a swivel hole outside the actual part and doing the same thing as the outside radii. Making the fall-out piece the actual part. To fancy for me, I would just use the first suggestion. But then I'm quite lazy when it doesn't matter. It all depends on what you're making. . .

.
 
Very informative posts here. I was thinking about the inside radius and really like the suggestions for completing that.

Do you have a DRO on your mill? If so, this should be pretty straightforward.
 
Depending on how precise you need the radii cut, use BillHudson's method, or 4 setups on a rotary table.

A rotary table also makes the 22.5º edge easy, too.
 
Back
Top