First facing cut - carbide insert - 5/8" brass round

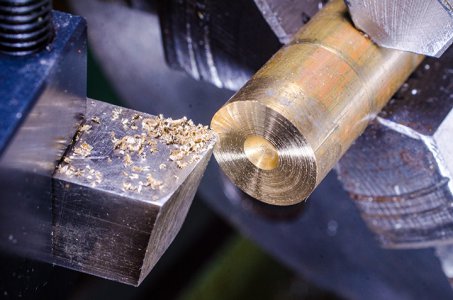
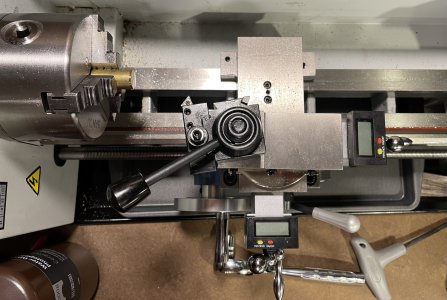
IMO , you need a travel indicator for longitudinal movement . In your first picture , by moving over the saddle one thread on the lead screw , you have moved over to much . Looks like that moved over about .030 . With a travel indicator you can move over whatever you want , I would suggest .003-.005 . And the lock is a must . There are many ways to get a travel indicator mounted on your lathe , below is just a suggestion . Right now on my mini lathe I have my travel indicator held in place with a mag base .
Mark .
1683671225086.png
 
Last edited:
Check out @mikey's lathe tool grinding help thread for a deeper dive into cutter grind profiles. Here is the basis information to start:
Geometry-of-turning-tool.pngmini_magick20190408-4455-1mee3zv.png
 
Here's my HSS brass tool, zero top rake, slightly rounded nose, modest side and end clearance. I also use TPG inserts in zero-rake toolholders now, but HSS does the job. Minimal grinding required. Approach at a slight angle to the workpiece for clearance. Light cuts work best, I think.
 

Attachments

  • brass1.jpg
    brass1.jpg
    171.5 KB · Views: 14
  • brass2.jpg
    brass2.jpg
    164.4 KB · Views: 15
Also, it is useful to keep a honing stone nearby for honing your HSS. It's the difference between "pointy" and "bigger band-aid, please". Very little in the way of lathe tooling is ready to run as received. I keep a cheap little Norton combo stone and some India stones on hand for touch-up, and a set of diamond lapping plates for sharpening tools in earnest. It's easy to keep tool corner edges as crisp as knives. Use stones to polish out nicks and worn spots too.
 
LMS 5100 mini lathe:
So I have everything tightened up, adjusted, etc and I'm attempting my first facing cut. The carbide tool isn't grabbing and just vibrates and pulses when it touches the stock. I can get it to bite in, but it takes quite a bit of force and chatter, and I know that something is off. Gears are in the middle neutral position, half nut locked on lead screw. I've tried it at 600 rpm and 1800 rpm. Same result no matter how fast I'm spinning. I feel like I'm missing an important step in my process. Photo attached. View attachment 447250
Looking at his picture, it appears the tool post is clocked incorrectly and it looks like your cross slide is hitting your backsplash as well. Couple that with the fact that your cutter has material trying to be removed on both sides of the point and you got a pretty long day ahead of you. I would rotate the tool post 90 degrees first of all. Secondly I would use the tool you have, 4th from the top in your picture. Turn the tool over, as @pontiac428 (Mr. Newman) had rightly pointed out, we are looking at the bottom of these tools. That dogleg in tool 4th from the top should turn towards the chuck.
1683691786116.png
I'm hoping there is enough relief ground into that tool to allow you to make a cut. This is HS steel now, so slow your RPM's just a bit and start with a few light passes.

Edited to add that you will need to remove some of the angle tool post. At that angle your cross slide is likely to hit the backsplash every time. By making the tool more parallel to the face of the chuck you will extend your reach closer to center. You probably dont want to be perfectly parallel with cutter #4, but take out a bunch of that angle. Also edited to read rotate the tool post 90 degrees not 180.


Keep us posted!
 
Last edited:
Try and get your setup orientation a little closer to this picture. Notice where the dovetails are on the tool post, and the angle of the tool post relative to the face of the chuck.
IMG_9841.jpg
 
I've used one flute of an old mill bit with good results.
 
Ok, thanks again you guys. I really appreciate all of the great feedback. Based on comments I’ve got things moved around so I’m looking for a little more feedback. Please ignore the carbide insert, it's just there for a placement photo. My quick change tool post may need to be adjusted because if I put the loading bars at 9 and 12 o'clock the tightening down handle almost collides with the height adjustment when clamping it down. Here’s where it sits now.
 

Attachments

  • IMG_1254.jpeg
    IMG_1254.jpeg
    540.1 KB · Views: 43
Last edited:
Someone (previous owner) has assembled the tool post backwards, it's easy to do. You will need to take it apart and reassemble the screw clocked 180°. The wedges are confusing at first, just mark the tops with different color markers until you're familiar with the process. They need to be cleaned out once in a while anyway!
 
Back
Top