- Joined
- Feb 7, 2013
- Messages
- 2,485
Yesterday I pushed the button to open the shop door and nothing happened so I had to manually open the door to get my
skid steer out so I could push snow. After I was done with that, I removed the garage door opener to see if I could find out
why it didn't work at all. It was DEAD. I looked it over and couldn't find anything wrong with it so went to town to buy another
one. After checking three places and not liking any of the garage door openers at all. No, I don't want an emergency battery
in it and certainly not WI-FI or even the light sensors or maybe infrared sensors so went home without one.
The next step was to remove the circuit board from the unit and try to find out what was going on. The first thing I found was the
limit switch was a little loose on the circuit board and the solder connections could be seen as loose but only by using a 10 power
lens. I soldered the three connections and reinstalled the board and still it was DEAD!
Then I looked over the suspected electrolytic capacitors and did some testing using my home made ESR tester. I found a 100MFD
at 50 volt capacitor that didn't even register as a capacitor so replaced it. After reinstalling the board again, the unit showed some life.
After that it was a relatively easy matter to reinstall the opener and connect up the chain and mount the opener in it's usual position.
Also, I replaced one of the light bulbs that was inoperative with an LED after cleaning up the cabinet and bulb cover.
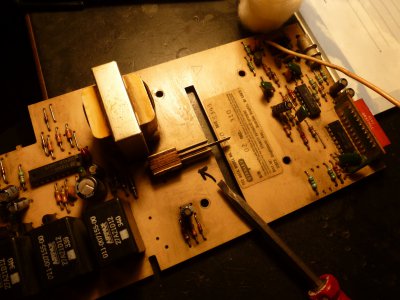
The arrow points to the SPDT switch which was loose on the board.
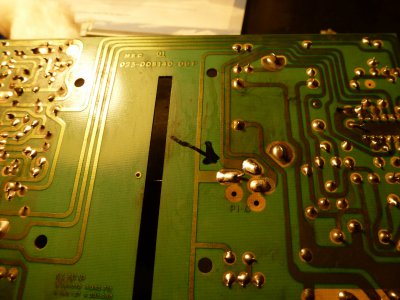
The above photo shows the three connections that had worked loose on the board.
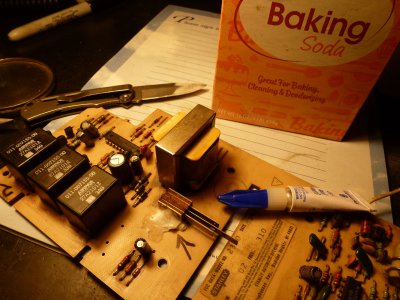 This photo shows how I stiffened up the mounting of the switch using cyanoacrylate glue and baking soda. Also in the photo is the large electrolytic
capacitor that I replaced with another from the junk box that tested good.
So all in all it was an interesting day with a positive ending with no expense. There are two garage door openers in the shop and the other
one I found doesn't work either. I had thought of just swapping them at first but since it was dead too, I elected trying a repair on the first one.
Now at my leisure, I can take a look at the other one and see what might be it's demise. Stanley no longer is in the garage door opener business
so it's up to me to keep them working or replace them. Have a good day out there in HM land.
skid steer out so I could push snow. After I was done with that, I removed the garage door opener to see if I could find out
why it didn't work at all. It was DEAD.
 I looked it over and couldn't find anything wrong with it so went to town to buy another
one. After checking three places and not liking any of the garage door openers at all. No, I don't want an emergency battery
in it and certainly not WI-FI or even the light sensors or maybe infrared sensors so went home without one.
The next step was to remove the circuit board from the unit and try to find out what was going on. The first thing I found was the
limit switch was a little loose on the circuit board and the solder connections could be seen as loose but only by using a 10 power
lens. I soldered the three connections and reinstalled the board and still it was DEAD!

Then I looked over the suspected electrolytic capacitors and did some testing using my home made ESR tester. I found a 100MFD
at 50 volt capacitor that didn't even register as a capacitor so replaced it. After reinstalling the board again, the unit showed some life.

After that it was a relatively easy matter to reinstall the opener and connect up the chain and mount the opener in it's usual position.
Also, I replaced one of the light bulbs that was inoperative with an LED after cleaning up the cabinet and bulb cover.
The arrow points to the SPDT switch which was loose on the board.


The above photo shows the three connections that had worked loose on the board.
 This photo shows how I stiffened up the mounting of the switch using cyanoacrylate glue and baking soda. Also in the photo is the large electrolytic
capacitor that I replaced with another from the junk box that tested good.
So all in all it was an interesting day with a positive ending with no expense. There are two garage door openers in the shop and the other
one I found doesn't work either. I had thought of just swapping them at first but since it was dead too, I elected trying a repair on the first one.
Now at my leisure, I can take a look at the other one and see what might be it's demise. Stanley no longer is in the garage door opener business
so it's up to me to keep them working or replace them. Have a good day out there in HM land.


