Gilbert Erector set 1913 motor

BGHansen

H-M Supporter - Diamond Member
H-M Lifetime Diamond Member
Joined
Nov 23, 2014
Messages
2,606
Been awhile since I’ve posted a reproduction Erector set part thread. Here’s one that took quite a bit of time and involved a number of different parts that go into an assembly: circa 1913 Erector set motor. Here are a few pictures of the finished product.


Reproduction assembled 1913 Erector set motor
20201206_133323.jpg
20201206_133333.jpg

And it runs on 6V!
20201206_133016.jpg


First, the obligatory history lesson. . . A.C. Gilbert introduced the Erector set in 1913. The sets came in various sizes numbering from No. 0 up through No. 8. Sets No. 4 – No. 8 included a “kit” to build an electric motor. The construction was a bit involved, so the factory offered to assemble the motor for $0.50 if the child sent the parts back to the New Haven factory.

Here’s a snippet from the 1913 manual showing the construction of the motor.


page 01.jpgpage 02.jpg


The Gilbert company sold over 30 million Erector sets during their history. Why reproduce a motor? Turns out the 1913 motor is extremely scarce, there are less than 10 known to exist. The last original motor to show up on eBay surfaced in 2007 and sold for $3500! I threw one on eBay and here’s where it ended.


Capture.JPG


Naturally, a reproduction is not worth anywheres near an original. I took on the project more as a learning experience than anything. I bought a Tormach 1100 CNC mill in July, 2019 and made heavy use of it to make the parts that make up the motor assembly. I still haven’t learned any CAD/CAM packages (have access to both Solidworks and Unigraphics) and plug along with G-code. Fortunately, the parts in this motor are relatively simple to plot out with my Post drafting machine, programming was fairly easy.

If you look at most small DC motors, the field magnet and armature are generally made from stacks of steel plates. Lots simpler to stamp out a pattern and stack them for thickness. This motor had field core and armature made from solid iron castings.

I have lots of photos, so this will take a few posts. First part is the field core casting. I’m one of the lucky few to own an original motor. And “NO”, I didn’t pay $3500! I noticed what looked like the armature and field core castings in a non-descript pile of parts. I didn’t ask the seller for more photos which would potentially create some competition on the bidding. Instead, I took a chance and won it for $40. You can imagine my sh*t-eatin’ grin when the package arrived; Yup, won most of a 1913 motor! From there I measured/traced the part and made up a couple of drawings.

The original field core was made from cast iron. I went with A36 for the reproduction. The rough block is 2” x 4” x 1” thick. The original was also investment cast with probably a wax pattern. As a result, there was no parting line down the center of the part and no draft in the pattern as it wasn’t removed from the ceramic mold. I tried a couple of methods for making the part.

My first attempt was to run the pattern to 1.1” deep in a piece of A36 bar stock 2” x 4”. Then band saw off the part and clean up the opposite face to a 1” depth. I snapped a couple of ¼” deep end mills with DOC of around 0.080” on a full-width cut at a feed rate of 4 IPM. I wrote a pre-drill routine to knock in a series of ¼” holes so the end mill had some relief.

I ended up using either a ¼” rougher or ¼” 4-flute carbide end mill to a depth of 0.55”. Did one side, flipped the part and ran a mirrored routine to cut the opposite side.


First side done
20201208_131059.jpg

Flipped the part and aligned the edges using a passive probe and parallel
20201208_132546.jpg

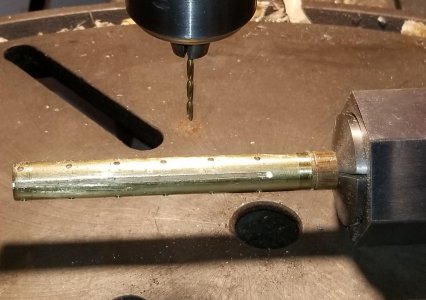
First op was drilling a hole for end mill clearance
20201208_132957.jpg

Rough hog out the hole with a 3/8" roughing end mill
20201208_135227.jpg

Routine complete on the back side.
20201208_142935.jpg


My alignment between cuts was not perfect, generally got within 0.005”. There was a little step where the opposite side routines met. The step was metal-finished with a 2” x 42” belt sander.

The original part was investment cast and had a stipple finish from post-casting sand or bead blasting. I tried simulating this with an impact hammer, but even at 15 psi was getting too deep of a dimple. I ended up going with a double-cut carbide burr in a Foredom grinder. It worked out pretty well, took me about 20 minutes to go over the part to add some radii on the edges and hit the flat surfaces for a simulated sand/bead blasted finish. Wish I had a bead blaster, that might have done a better job quicker.


Wore rubber gloves and a full helmet while doing the surface finishing. Lots of little slivers flying!
20201208_152541.jpg

Finished part after grinding the surface. The burr did a pretty good job giving a cast-like appearance
20201121_192842.jpg

20201121_192848.jpg
 
Last edited:
Wow. That thing really jogs my memory. Even though my Erector set was 60s vintage.
At the age of about 9 I built a small motor out of tin cans that resembled that one. I still remember the thrill when it first ran.
I still have it somewhere- I really should dig it out- I'm sure it still works
Bravo Bruce! :)
-Mark
ps 848 $ for a repro? I should start building those LOL
 
Last edited:
This second post will cover the construction of the armature. Like the field core casting, this part was originally made from cast iron. Again, no draft or parting lines on the part as it was investment cast likely from a wax pattern. I used 1 ¼” diameter 1018 for this part.


Set up with the 4th axis
20201101_155831.jpg


This part was a natural for the 4th axis on the Tormach. I cut a prototype out of a polyethylene round, then went to the 1018. I’ve got a tail stock for my 4th axis, but was worried about running into the live center. The part is 1” long by 1 ¼” diameter; at that diameter a stick-out of 3” from the chuck worked fine without a tail stock. My 1018 stock was in 10” lengths (eBay win); it dawned on me late in the project to cut them to 5”. Then stick out 3”, cut 2.5” of the pattern, flip the round 180 and cut the back side.


End view of the prototype
20201102_163843.jpg

And cutting the real deal
20201116_111908.jpg
20201116_124607.jpg

Finished up 4th axis work. Rod stock is 5" long, part is 1" so some lathe work ahead
20201123_161626.jpg

As an aside, I learned some features of the Tormach regarding the 4th axis. I set up the 4th for alignment by chucking up a round and swept the surface moving in X. Tapped the round to get it trammed in much like tramming a vise. I also swept the top of the round (trammed the Z) which fortunately was spot on, so no shimming of the 4th axis base was required.

I found the center of the piece by touching the side with a Haimer 3-D taster and moved up/down for the max needle movement. Zero’d Z and Y, then moved to the opposite side in Y, moved to a Z of zero, and jogged Y until the Haimer was zero’d. Noted that Y location, moved above the round and moved Y to half-way between Zero and my opposite side mark. Zero'd the Y at the center of the rod. Then jogged down in Z until the Haimer zero’d and reset Z at zero (my CNC routine was written with Z=0 at the surface of the round, not the center).

Well, I for some reason went to the SETTINGS tab on the Tormach and discovered there is a 4th axis centering routine built into the machine! I have a passive probe for finding the edges and surface of a part. All of those routines are in a tab called PROBE/ETS. The reasoning for Tormach putting the probing routine for the 4th axis in the SETTINGS tab instead of the PROBE tab escapes me, but at least I now know where it is.


PathPilot has a built in routine for finding the center of your stock when using the 4th axis
20201102_152734.jpg


Faced, parted and drilled the 5/32” center axle hole on the lathe. Then off to the CNC Bridgeport to machine a relief on the ends of the armature.


Facing the blank
20201126_161816.jpg

Parting
20201126_162434.jpg

Facing the parted side and cutting to length
20201120_163004.jpg

Center drilling and drilling the axle hole
20201120_163050.jpg
20201120_163224.jpg

Secondary op to the ends of the armature
20201204_095513.jpg

Yeah, have a little bit of work in store. . .
20201204_095853.jpg


Lastly, did some surface finishing with a Foredom grinder. The original part was investment cast and post-casting sand or bead blasted leaving the finished part with a rough surface. A double-cut burr did a pretty nice job adding some radii and mucking up of the surface for a bead blasted finish.


Roughed up the surface for a bead blasted like finish and added some radii
20201204_102702.jpg

Part prior to grinding on the left, finished part on the right
20201204_104933.jpg
 
Last edited:
Third part was the armature support/bearing brackets. These were originally made from 0.050” CRS and nickel-plated. I opted for 303 stainless steel in a No. 10 finish instead. The stainless in a No. 10 finish looks very close to nickel-plated steel and saves me from having to plate the parts.

I started this part by making a holding fixture for the Tormach. My plan was to make the part in three operations. First one would drill holes in the blank. Second operation cut the part to shape. The third operation drilled the hole for the armature shaft.


Spotting, drilling and tapping holes for the 3 operations in an aluminum holding fixture
20200830_161841.jpg
20200830_163217.jpg

Milling a pocket to capture the blank
20200830_164400.jpg

Drilled and tapped holes for a "back stop" to locate the bracket by the base so the armature axle hole location was the correct height relative to the base
20200904_104500.jpg
20200904_105230.jpg


The part has its base bent to a 90 for screwing to a wooden-block base. I was worried about pre-drilling the hole for the armature shaft, then folding the flange for the base off a few thousandths and end up with a vertical alignment problem. I opted for drilling the armature shaft hole after the base flange was bent so that surface could be used as the locator for the hole.


First op, drill holes and mill a clearance hole (no function, but the larger hole is in the original part)
20200904_131519.jpg
20200904_132140.jpg

Clamped the blank in place for the 2nd op which was cutting the profile
20200904_134409.jpg

Bend the base
20200904_125131.jpg

3rd op: Bolt the blank to the fixture using the base as the locator for height and drill the armature axle hole
20200904_125702.jpg

20200905_114924.jpg


Next is the wooden base. The part originally had prick-punched holes to mark the screw locations for the various components. Another natural job for the CNC. The base was originally Cherry or Chestnut. I didn’t show the operations, but planed and cut blanks to size. A 30 deg. carbide engraver was used for the prick punching.


20201129_190741.jpg
20201129_190813.jpg
 
Last edited:
Next parts were similar, so both are described here. First, the armature commutator which had 3 brass contacts screwed to either a plastic or wooden cylinder. The OD was ½” so I started with some ½” brass tubing from Graingers. I took an oak dowel and turned it down to a slip fit into the tubing. Then epoxied the dowel into the tubing.


Turned the 1/2" dowel between centers to accept a piece of 1/2" OD brass tubing
20201115_133223.jpg


Mounted the brass tubing in a 5C collet held in a hex collet block and carefully cut through the brass along the axis. Rotated the collet block two flats and repeated.


Slitting the contacts for the commutator
20201114_161628.jpg


The screws connecting the armature wiring to the plates were tiny #2 wood screws. I drilled a line of #53 holes through the brass and half-way through the dowel. Again, rotated and repeated on the other 2 faces. Then went to the drill press and drilled the brass alone with a #43 clearance drill so the screws would slip through the brass and thread into the dowel.


Drilling the armature wire attaching screw holes
20201114_162738.jpg
20201114_164355.jpg


Sometimes better to be lucky than good. . . My ½” drill collar naturally slid over the brass, but it was also the same ½” length as the original commutator. Next step was to slip the drill collar over the brass/dowel and band saw a “chunk” off. Used a 2” x 42” belt sander to sand it to ½” in length.


20201114_165344.jpg


Chucked up the ½” drill collar in the lathe and center drilled and drilled a 5/32” central hole for the axle. I left about 1/16” of the brass tubing setting outside of the collar on purpose. The dowel was ½” long, but the contacts were 7/16” long. The extended dowel is the insulator for the commutator as it sets up against the armature support brackets made above. They could have used a fiber washer to isolate the commutator, but went this route instead.


Center drilling the commutator while mounted in the drill stop
20201114_165541.jpg

Drilling the 5/32" axle hole
20201114_165625.jpg

Left a 1/16" of the commutator contacts out of the bushing for filing
20201114_165831.jpg
20201114_165912.jpg
20201114_170119.jpg


I couldn’t find the #2 x 1/8” wood screws required, so made a little fixture to hold the ¼” ones I did find and sanded them to length. I pre-threaded the dowel holes with a full screw, so the sanded ones are screwing into pre-threaded holes. I can see silver-soldering or somehow permanently attaching a #2 screw to a screwdriver in my future. There’s just not a lot to grab onto with a #2 x ¼” screw. It'd be nice to have a tap of sort for pre-threading the #2 holes.


Drilling a #43 clearance hole through the brass for the #2 screw
20201114_164355.jpg

Finished commutator
20201115_123255.jpg


The other similar part is the motor switch. It was the same sized diameter dowel or plastic cylinder as the commutator, but only used 2 of the brass contacts spaced on opposite sides. Pretty much the same process here as with the commutator. In fact, the contacts were made from commutator contacts. I used a square collet block to hold the dowel and drilled a through hole for the contact screws and a half-through hole for the finish nail used as a switch handle.


Motor switches. They use two of the commutator contacts and a finish nail for the switch handle
20201115_142755.jpg


If the market supports more than 20 of these motors, I’ll make a couple of hardened drill bushings for the holes. It’d be a lot quicker to slip a collar over the tubing/dowel assembly and hand drill the #53 holes.
 

Attachments

  • 20201114_164355.jpg
    20201114_164355.jpg
    267.6 KB · Views: 17
Last edited:
The commutator and switch brushes rub up against contacts made from brass. They are pretty simple to make with a shear and corner notcher. The majority of time was in the layout work. So, another natural for the CNC. My routines use a spring-loaded diamond engraver to scratch in the pattern. The brass blank was held to an aluminum base with double-sided carpet tape. I’m still a strictly G-code guy which worked well for these routines. I plug the length and width of the blank into the routine and hit START. The routine calculates the number of parts it can fit in the X and rows in the Y based on the blank size.


Let the CNC do the scribing of the contacts for the switch and commutator brushes. Also spotted the screw holes for punching by hand.

20201126_155054.jpg
20201127_105507.jpg


I made the prototypes by doing the cutting to size first, then punched the screw holes for attaching the contacts to the wooden block. I found it much easier to do all of the punching with the blanks still together.


20201127_111138.jpg
20201128_120745.jpg


I used a corner notcher and Roper Whitney #218 punch press to do the appropriate trimming to size. The commutator brushes were bent by hand using a pliers. I lucked out a bit on the switch contacts as they could be gang-bent on the DiAcro brake and hand cut after the fact.


Cutting the commutator brushes
20201128_121157.jpg

Bent the base flange by hand
20201128_123714.jpg


Used a 1/2" square punch on the Roper Whitney to cut to the scribed line
20201128_125310.jpg

Top row ready for shearing from the balance of blanks
20201128_125555.jpg

Four rows ready for bending
20201128_131404.jpg

Gang-bent the tabs on the DiAcro brake
20201128_132216.jpg
20201128_132818.jpg

Hand-cut to separate the parts
20201128_133353.jpg
 
Last edited:
The motor had a ½” diameter pulley which was done on the lathe. Chucked up a ½” round, center drilled, and drilled the 5/32” axle hole. I used a DCMT (think that’s the bit) to cut the groove. I started to part the pulley before cutting the “V” groove so the width was marked. The pulley is 0.20” wide, lots easier to eyeball the “V” in the center with the width marked on the ½” round. Parted the pulley after the “V” was cut. Then a little clean up of the parted end with a 2” x 42” belt sander.


Center drilling and drilling the 5/32" axle hole
20201204_083548.jpg
20201204_083711.jpg

Pre-parting to mark the length of the part
20201204_083856.jpg

Cutting in the "V" groove
20201204_084039.jpg

Parting
20201204_084559.jpg

And a few finished parts
20201204_093822.jpg


I didn’t show it, but the commutator was pre-assembled to the armature shaft. I center punched the 5/32” axle at the center of the commutator location for some friction and pressed the commutator on the shaft. Used a drop of polyurethane glue for belt and suspenders.

The armature and pulley were pressed onto the axle shaft. I didn’t show it, but used a ball peen hammer to slightly peen over the holes on one side of each part so they’d have some interference to the shaft.

The field core was originally wrapped with 20-gauge cotton-covered enamel wire. I found some on eBay and pulled out an appropriate length for the “kit” version of the motors. Same for the armature wiring which was 26-gauge. My manual dexterity isn’t the greatest for winding these things. I’m thinking about making up a spool/vise similar to what’s used to tie flies. Or, just offer a kit only.


All of the component for the motor
20201206_131315.jpg


I can’t complain about what my first one sold for on eBay. In fact, the buyer took two (I offered an assembled motor and a kit). The next two bidders accepted offers also. Looks like I’ll be out making more parts. . .

Thanks for looking,

Bruce
 
Last edited:
Looks like your first unit was underpriced! Really a cool and clever project.

I remember the first motor I made, with wire wrapped nails...it was just magical when it actually worked.
 
wow thats alot for a motor maybe start making and selling more?
Yup and yup. First one on eBay sold for $848 which after eBay/PayPal fees netted around $735. I offered two versions: One assembled and one as a kit like it was originally sold. The winning bidder took both. I made offers to the number 2 and Number 3 bidders also which were accepted. Up to around $2800 in profit at this point, so I'm up to about minimum wage in time spent on this project. I figure the World-wide demand is for maybe 20, am working toward that number. I've got 6 completed ones ready to go after yesterday's sales. Trying to strike while the iron's still hot.

Bruce
 
Back
Top