

Newbie here. I posted an intro in which I mentioned hand tool restoration as a hobby of mine. One of the members asked me to post my methods and share pictures. So here goes...
First credit where credit goes. I once stumbled onto a youtube channel where I found a lunatic guy calling himself Scoutcrafter was restoring old hand tools. I decided to watch to see why in the world anyone would want to waste their time making their old and used tools look nicer.
After about 2 videos I knew I was destined to become one of those lunatics. Preservation of the tools my dad and grandfathers handed down to me made a lot of sense and I have done it in their honor. Handling the tools makes me wish they could talk and tell me their stories.
Disclaimer: Some tool collectors cringe when they see a restored tool b/c they say the removing of what they call "patina" (a cool sounding name for that typical dark coating of embedded rust on your 30 year old pair of pliers that actually is nothing more than rust anyway) ruins the tool's history. So I won't polish away the patina on a rare and collectable tool, I will remove crusty and red looking surface rust to prevent further degradation though. The typical dark coating of dark "patina" rust is not polished off to a shiny finish.
Most tools I restore I also use.
Procedures:
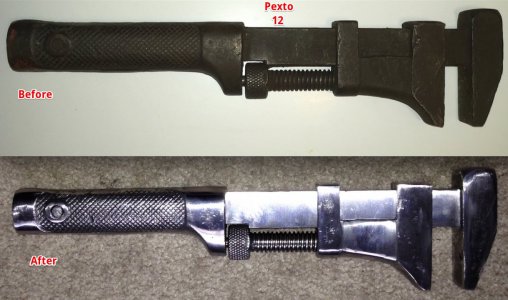
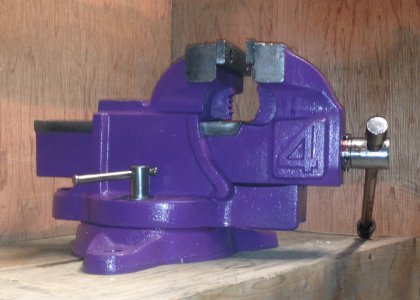
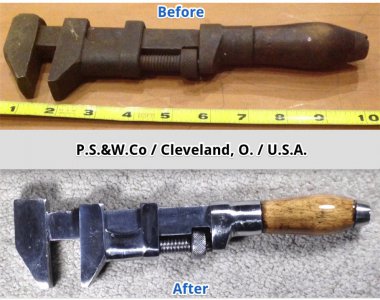
1. Rust & dirt removal:
Rust (aka patina as well) is removed with a wire wheel and then Evaporust - incredible stuff. A white vinegar soak overnight is just as good (IMO), but the vinegar's usefulness is used up quickly compared to Evaporust lasting for a long time. So w/ vinegar @ $2.00 a gallon, the 20.00 Evaporust gallon which lasts for a long time was a no brainer after I got into this.
Step 2 - depending on circumstances: Sanding away gouges if needed.
Sanding away gouges/restoring original profile (like removing a mushroomed head on a punch). Harbor Freight 2 inch belt sander using varying grits from coarse to fine. The idea is to remove nicks, etc. and make the tool surface look factory-original.
Preservation of original tool manufacturer marks is desired, very tricky, and sometimes impossible
Sanding makes it shiny. I then use a buffing wheel to polish the tool b/c polished tools resist corrosion much better and are also more water resistant. Sometimes I skip buffing and use the following...
Other Step 2 depending on circumstances: Fiber wheel buffing/polishing.
An abrasive wheel attached to a motor like a buffing wheel. This thing is INCREDIBLE for making the surface look new. Its almost magic. I used to go through stages of buffing with various polishes and no longer need to do that (unless I want an extreme mirror finish for some reason). They now also have abrasive belts for the sander which I want to try. Knife makers have known about these wheels/belt for years.
Step 3: Finishing: Sealing and Paint (especially if the tool originally had paint)
I rub the tools with paste wax, or more typically depending on the tool, cover with shellac. Pliers would get paste wax because they get more abuse and wax is easier to re-apply than shellac which needs to be removed first for a new coat. A nail punch, not used near as much, would be dipped in shellac to preserve the knurling.
And I was asked to show some of the stuff I have done. Obviously I need to learn better photography skills with tools.
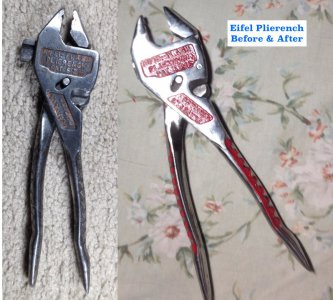
BTW - if you do not know what an Eifel Plierench is - you are missing out! This has been my go to tool for just about everything since I learned about it. Interchangeable jaws with one being a spreader, parallel holding of object using rack and pinion style of mechanism, no squeezing handles while using while having a claimed 1 ton grip (handles can be held together with a strong rubber band when in use), and it has a sort of ratcheting action while using it. I constantly find new uses and my wife gets tired or hearing me praise this tool for making jobs so much easier. Not made anymore (1916-2004), and I am guessing b/c most people didn't take the time to read the 5 second instructions as to how to use it properly, so they tried it as normal pliers and lost interest.
First credit where credit goes. I once stumbled onto a youtube channel where I found a lunatic guy calling himself Scoutcrafter was restoring old hand tools. I decided to watch to see why in the world anyone would want to waste their time making their old and used tools look nicer.
After about 2 videos I knew I was destined to become one of those lunatics. Preservation of the tools my dad and grandfathers handed down to me made a lot of sense and I have done it in their honor. Handling the tools makes me wish they could talk and tell me their stories.
Disclaimer: Some tool collectors cringe when they see a restored tool b/c they say the removing of what they call "patina" (a cool sounding name for that typical dark coating of embedded rust on your 30 year old pair of pliers that actually is nothing more than rust anyway) ruins the tool's history. So I won't polish away the patina on a rare and collectable tool, I will remove crusty and red looking surface rust to prevent further degradation though. The typical dark coating of dark "patina" rust is not polished off to a shiny finish.
Most tools I restore I also use.
Procedures:
1. Rust & dirt removal:
Rust (aka patina as well) is removed with a wire wheel and then Evaporust - incredible stuff. A white vinegar soak overnight is just as good (IMO), but the vinegar's usefulness is used up quickly compared to Evaporust lasting for a long time. So w/ vinegar @ $2.00 a gallon, the 20.00 Evaporust gallon which lasts for a long time was a no brainer after I got into this.
Step 2 - depending on circumstances: Sanding away gouges if needed.
Sanding away gouges/restoring original profile (like removing a mushroomed head on a punch). Harbor Freight 2 inch belt sander using varying grits from coarse to fine. The idea is to remove nicks, etc. and make the tool surface look factory-original.
Preservation of original tool manufacturer marks is desired, very tricky, and sometimes impossible
Sanding makes it shiny. I then use a buffing wheel to polish the tool b/c polished tools resist corrosion much better and are also more water resistant. Sometimes I skip buffing and use the following...
Other Step 2 depending on circumstances: Fiber wheel buffing/polishing.
An abrasive wheel attached to a motor like a buffing wheel. This thing is INCREDIBLE for making the surface look new. Its almost magic. I used to go through stages of buffing with various polishes and no longer need to do that (unless I want an extreme mirror finish for some reason). They now also have abrasive belts for the sander which I want to try. Knife makers have known about these wheels/belt for years.
Step 3: Finishing: Sealing and Paint (especially if the tool originally had paint)
I rub the tools with paste wax, or more typically depending on the tool, cover with shellac. Pliers would get paste wax because they get more abuse and wax is easier to re-apply than shellac which needs to be removed first for a new coat. A nail punch, not used near as much, would be dipped in shellac to preserve the knurling.
And I was asked to show some of the stuff I have done. Obviously I need to learn better photography skills with tools.
BTW - if you do not know what an Eifel Plierench is - you are missing out! This has been my go to tool for just about everything since I learned about it. Interchangeable jaws with one being a spreader, parallel holding of object using rack and pinion style of mechanism, no squeezing handles while using while having a claimed 1 ton grip (handles can be held together with a strong rubber band when in use), and it has a sort of ratcheting action while using it. I constantly find new uses and my wife gets tired or hearing me praise this tool for making jobs so much easier. Not made anymore (1916-2004), and I am guessing b/c most people didn't take the time to read the 5 second instructions as to how to use it properly, so they tried it as normal pliers and lost interest.
Attachments
-
 1-Eifel_Plierench.jpg122.9 KB · Views: 127
 -
 2-EC_STerns_C-Clamp_Restored.jpg158.7 KB · Views: 122
 -
 3-Klein_Restored.jpg69.1 KB · Views: 92
 -
 4_Suregrip_Nail_Puller.jpg90.6 KB · Views: 92
 -
 5_Pexto_10%22.jpg152.8 KB · Views: 90
 -
 6-Vise.jpg112.5 KB · Views: 92
 -
 7-Cleveland_Before&After.jpg129.6 KB · Views: 124

