
I need to make a small adjustment on my headstock. To me this procedure seems incorrect to me. Why would you not loosen the two hold down cap screws in the back of the HS. J in the manual are #54 bolt in the parts and the other I are #52. I also saw a video of Adam Booth where he said only loosen the two under the HS in front of the lathe. What am I not understanding here?

-
Welcome back Guest! Did you know you can mentor other members here at H-M? If not, please check out our Relaunch of Hobby Machinist Mentoring Program!
You are using an out of date browser. It may not display this or other websites correctly.
You should upgrade or use an alternative browser.
You should upgrade or use an alternative browser.
Headstock Question
- Thread starter ddickey
- Start date
- Joined
- Jul 2, 2014
- Messages
- 7,594
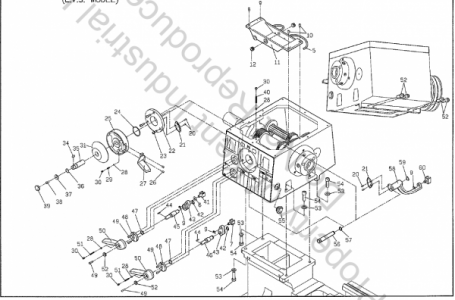
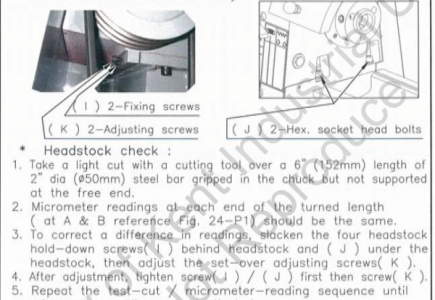
54 are the hold down bolts, 52 are the adjusting bolts. Loosen 54, adjust with 52, then tighten 54.
- Joined
- Feb 1, 2015
- Messages
- 9,598
Your second image says to loosen all four hold down screws. Loosening only the two front screws would cause a great deal of stress on the other two screws and on the adjustment screws.
Rather than tracking taper as suggested in the second image, I prefer to look at the ability to cut a flat face. I made the mistake of adjusting the headstock to correct a taper issue when I first had my G0602. As a result, I was cutting a face at an angle. Taper is also affected and usually corrected by shimming the tailstock to remove twist and adjusting the headstock is using two wrongs to make a right.
To check for a flat face, I mount the face plate with a boss mounted on it. The purpose of the boss is to provide a raised surface for sweeping a test indicator across. A carriage bolt works great for this. The face plate is rotated so the boss is forward and the center of the boss is in contact with the test indicator. I place a mark on the boss so I always contact it at the same place. I zero the indicator and lock the carriage. Then I rotate the face plate and advance the cross slide to hit the boss at the same point at the rear of the lathe. The indicator reading should be zero. If it isn't, you will be cutting either a dish or a dome, depending on which direction the indicator has moved.
I adjust my headstock to correct any issues as on my lathe, at least, there is no other way to make this correction. I then check for taper, either using the RDM method or the two collar method and correct any issue by shimming the tailstock.
- Joined
- Feb 1, 2015
- Messages
- 9,598
Since you can only push with the adjustment screws, I back them off and move the headstock to the rear as far as possible. Then, depending upon the direction of the correction needed. I would snug down one of the rear mounting bolts and tighten the other adjustment screw. If I were cutting a dome or turning a taper which was larger at the tailstock, the headstock would be rotated counterclockwise looking from above. I would snug the left rear mounting bolt and tighten the adjustment nearest the chuck to correct by rotating the headstock clockwise.
- Joined
- Jul 2, 2014
- Messages
- 7,594
For facing, lathes are commonly set up so that a facing cut creates a very slight cone inwards toward the head stock at the center of the work. Work that is slightly hollow in the center is usually desired over having a high point in the center. I am only talking about perhaps .001" over several inches of radius. Check the specs for your lathe.