Heat Treating Results...

Ray C

Registered
Registered
Joined
Nov 16, 2012
Messages
5,596
All,

Here are some planned test results on heat treating. The texts I'm learning from really stress proper procedure and I decided to verify if the authors are being overly cautious (with good intentions) or if it really makes a difference. Aside from passing along what I'm learning, there's a motvation in me to post this... Specifically, I occasionally hear folks here planning to heat treat a part -and sometimes the intended part is something criticical like a bucket pin or home-made parts for a hoist etc... Worse yet, sometimes the material is not precisely known.

Summary: Propoer procedure makes a difference -and a lot moreso than I imagined!

Three varying length slugs of 1045 were heat treated with an intended Rockwell of 32-C. The slugs were 1.5" diameter with lengths of 1/2", 1" and 1.5" and were fully normalized using proper technique.

Without getting into the details of the procedure, the piece shown should have had a uniform case hardening with about 0.050" depth. Since it's the smallest piece, it should have cooked the fastest and most uniformly. So... I decided to heat the piece at the low end of 1525 and started the clock as soon as the oven reached that temperature (about 1 hour) and cooked it for 30 minutes. In reality, it should have been allowed to stabilize for about 10 minutes before starting the clock and ideal temperature should have been 1550.

After the part was heat treated, the tempering process was done properly and according to the cook book.

Here's what it looks like. The piece was face turned in 0.010" increments and on the 2nd pass the soft chewy center was visible. It didn't even harden down to the desired depth. -And by the way, you've probably seen how cold-rolled steel shows this same pattern and it's proof positive that stresses are present in non-normalized material. The Rockwell tested-out at 27-C but, at the current time, the test apparatus is not verified. I'm using a rebound type and also evaluating some brinell testers. -But before making any serious investments, want to learn more about the merits of each technique.

I heat treated some of the othe parts in proper fashion and they pretty-much produced the desired results. BTW: by peeking at the color of red inside the oven, I sure has hell (pun intended) can't tell the difference in color between 1525 and 1550. Even following the cook-book, I did not achieve uniformity in the other pieces that were done properly. It was pretty close -but no cigar... Need to read/learn/experiment more... I think it's a quenching problems but at this time do not have enough knowledge to analyze the symptoms. I'm pretty sure I'll get a handle on this in the next week or so.

BTW:... somewhere along the line, I'll include some comments about the PID controller. Seems to have some glitches -not the end of the world but minor annoyances.

Ray
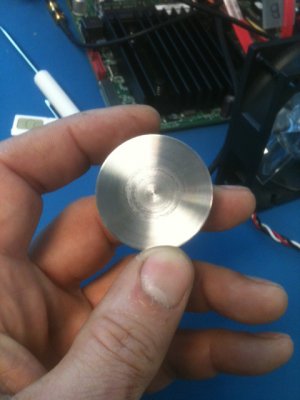

Treated Part 30..JPG

Treated Part 30..JPG
 
IMO, the penetration method is much more accurate than the bouncing ball. You can get an import machine for around a grand. It will cover several ranges and scales. There are procedures to hardness checking that must be followed also, and if you don't follow them, you won't get accurate results. For the record, the spec you see on off the shelf heat treated material is checked mid-radius on the face of the bar (round stock that is) and any decarb zone has been removed.


How did you accomplish your quench?
 
Brine water brought up to 200F before the dunk as not to let the part drop below 200 for the ensuing tempering. 1550 straight into the brine. Basket bottom container. Used enough quenchant volume to cool from 1550 to 250 in a matter of 15 seconds (approx). -Boiled like heck and I "think" that's the problem -superheated steam all around the part... -but not sure.


IMO, the penetration method is much more accurate than the bouncing ball. You can get an import machine for around a grand. It will cover several ranges and scales. There are procedures to hardness checking that must be followed also, and if you don't follow them, you won't get accurate results. For the record, the spec you see on off the shelf heat treated material is checked mid-radius on the face of the bar (round stock that is) and any decarb zone has been removed.


How did you accomplish your quench?
 
Might well be the steam. Can't let the steam stay on the part. Have to keep it agitated as much as possible. Also, the quench medium has to remain at the desire temperature, or within limits. If it heats up too much, you aren't quenching fast enough to ensure grain capture. It's a tricky sort of thing.
 
This takes practice for sure. That's why I decided to experiment with some "bad practices" to convince myself that short-cuts are bad news.

Agitation: I sure as heck could not stop that steam if I wanted to. I think maybe will be limited to certain levels of qualty with brine. Maybe I'll try oil in the future. This is going to have some learning curve...

BTW: Gives me a new appreciation for hot things. Doesn't bother me to be face-to-face with a TIG torch or stick. The heat is small and focused. Large volumes of super-heated sapce---things glowing red and you can't even tell where all the red color is coming from. -Different can of worms than anything I've done before. Fun times... BTW: Oven box doing nicely!


Hardness Testers: Still evaluating needs while reading-up on the matter.

Ray


Might well be the steam. Can't let the steam stay on the part. Have to keep it agitated as much as possible. Also, the quench medium has to remain at the desire temperature, or within limits. If it heats up too much, you aren't quenching fast enough to ensure grain capture. It's a tricky sort of thing.
 
I have done a bit of HT, but never on anything that thick (the thickest I have worked with is 3/4"). Mostly I use W1 (it's a plain carbon steel, and should behave pretty similarly to 1045). I typically quench in plain water. From what I have read, plain carbon steels won't harden through in thick pieces, though getting a good soak will improve this. Temperature when hardening plain carbon steels is not that critical with the exception that you want to get it up past the austenizing temperature, and you don't want to get it too hot, too long, or you will de-carburize the surface, and it will be soft. Tempering temperature is more critical if you want to hit the desired hardness. Chromium steels are much more finicky when it comes to hardening, not just with temperature, but with time (heat them too long, and they become grainy, and lose toughness).

As far as the steam causing problems, yes, it does, that is the reason brine is preferred to water in some cases (it keeps the bubbles small, and they tend to cling to the surface less). I remember reading about other additives that people add to their quench to improve things even more, but can't seem to find the info when I look now.

You may get better through hardening with different steels (O1, 5160).
 
Just to set the record straight as the OP didn't specifically say he is case hardening...

W1 is all together different than 1045. W1 is a high carbon steel alloyed with other good stuff. It is inherently hardenable simply by heating and quenching.

1045 is a low carbon steel and will not harden the same way. Additional carbon must be added: charred bone meal, charred leather, charcoal, Kasenit, etc. In other words, case hardening.

I believe the OP is correct. That said, it's relatively easy to get W1 (or O1) how you want it - especially if you know ahead of time how it will react (generally it grows slightly). Case hardening is another matter. I have had mixed results trying to do case hardening myself. The process can be picky and getting a consistent hardening depth is an art form in my opinion.

Even the pros don't always get it right. At work, we have our case hardening and nitriding done outside. A few pieces from every lot are hardness tested and plated/microsectioned for analysis. The results often vary widely.

John

- - - Updated - - -

All,

Here are some planned test results on heat treating. The texts I'm learning from really stress proper procedure and I decided to verify if the authors are being overly cautious (with good intentions) or if it really makes a difference. Aside from passing along what I'm learning, there's a motvation in me to post this... Specifically, I occasionally hear folks here planning to heat treat a part -and sometimes the intended part is something criticical like a bucket pin or home-made parts for a hoist etc... Worse yet, sometimes the material is not precisely known.

Summary: Propoer procedure makes a difference -and a lot moreso than I imagined!

Three varying length slugs of 1045 were heat treated with an intended Rockwell of 32-C. The slugs were 1.5" diameter with lengths of 1/2", 1" and 1.5" and were fully normalized using proper technique.

Without getting into the details of the procedure, the piece shown should have had a uniform case hardening with about 0.050" depth. Since it's the smallest piece, it should have cooked the fastest and most uniformly. So... I decided to heat the piece at the low end of 1525 and started the clock as soon as the oven reached that temperature (about 1 hour) and cooked it for 30 minutes. In reality, it should have been allowed to stabilize for about 10 minutes before starting the clock and ideal temperature should have been 1550.

After the part was heat treated, the tempering process was done properly and according to the cook book.

Here's what it looks like. The piece was face turned in 0.010" increments and on the 2nd pass the soft chewy center was visible. It didn't even harden down to the desired depth. -And by the way, you've probably seen how cold-rolled steel shows this same pattern and it's proof positive that stresses are present in non-normalized material. The Rockwell tested-out at 27-C but, at the current time, the test apparatus is not verified. I'm using a rebound type and also evaluating some brinell testers. -But before making any serious investments, want to learn more about the merits of each technique.

I heat treated some of the othe parts in proper fashion and they pretty-much produced the desired results. BTW: by peeking at the color of red inside the oven, I sure has hell (pun intended) can't tell the difference in color between 1525 and 1550. Even following the cook-book, I did not achieve uniformity in the other pieces that were done properly. It was pretty close -but no cigar... Need to read/learn/experiment more... I think it's a quenching problems but at this time do not have enough knowledge to analyze the symptoms. I'm pretty sure I'll get a handle on this in the next week or so.

BTW:... somewhere along the line, I'll include some comments about the PID controller. Seems to have some glitches -not the end of the world but minor annoyances.

Ray


View attachment 53417

Ray, what are you using for a source of the additional carbon? Kasenit? CO2? Just curious.

John
 
1045 is classified as a "medium carbon" steel. It's hardenable (carbon content above the minimum of 0.4%), but just barely. Looking at the specs for W1, you are right, not a great comparison between it and 1045 (it's closer to 1095).

Ray, given that this was your "slapdash" attempt, to see how bad things can go, I am pretty interested to see how your textbook attempt goes.

I found that quench recipe

http://www.anvilfire.com/FAQs/quenchants.htm
 
Yes indeed... 1045 has just enough carbon to do surface hardening but, the real goal was twofold. By properly normalizing (high heat with gradual cool-down) it makes the internal structure uniform and of a structure amenable to strength. In the vernacular, surface hardening seems to imply using the metal's existing carbon whereas case hardening seems to imply using an exterior carbon source to "impregnate" the surface. FWIW: These definitions are by inference of my reading and it's not specifically stated that way...

Thanks for the quench info. I did notice in that writing a reference to someone whose punch shattered upon use. It's not due to the quenchant at all. The books absolutely warn people never to use hardened steel that has not been properly tempered. Even lowly 1045 will have a 100-range RC immediately after hardening. The tempering brings it back down to a usable state. I tried to test my pieces immediately after hardening but, A) they were too hot too handle and B) the time required would have pushed the 1 hour envelope by which the tempering process must begin. It's clearly stated in all the references that tempering of all carbon steel must begin within 1 hour of heat treating and when the part is on the down-slope cooling phase between 150 and 125 degrees (no more, no less). There are ways around this -such as keeping the metal at 450 until the tempering can be done at a convenient time etc... Electron micrographs are shown of what happens when uniform samples violate those rules and the images do not even appear to be the same metal.

BTW: The textbook piece came-out pretty well. It's pretty much destroyed now and looks a lot like the one shown; however, the hardening had a depth of about 30 thou and not (approx) 15 thou like the other. I ripped it on the sides with an endmill with pretty-much the same findings (best I could tell).

Using the rebound hardness tester, I checked some known tooling at 50 and 60 RC and got very close results. Still don't quite know why my piece came out about 6 points lower than expected but, I'm not going to sweat this for now.

One thing I've learned is that solid textbooks on the matter are worth it! I tried for months to read various Internet sources and it's all over the place -somewhere between witchcraft and alchemy. I could not find the same story in two places... This is quite a science actually and now I know why my uncle turned from chemist to metallurgist -and that was back in the 50's when this was groundbreaking stuff.

Ray


1045 is classified as a "medium carbon" steel. It's hardenable (carbon content above the minimum of 0.4%), but just barely. Looking at the specs for W1, you are right, not a great comparison between it and 1045 (it's closer to 1095).

Ray, given that this was your "slapdash" attempt, to see how bad things can go, I am pretty interested to see how your textbook attempt goes.

I found that quench recipe

http://www.anvilfire.com/FAQs/quenchants.htm
 
A piece that has the cross section like your samples will have a hardness gradient through the diameter. It's unavoidable. When you quench, the outside cools quickest, but naturally, the heat from the core must transfer outward to the quench media, so quenches slower, yielding softer steel. That's why the mid radius method is really a standard method. The actual measured hardness is greater the closer you get to the OD of the par, and at dead center, it is softer. That's just the way it is. Some people who buy trepanned cores often are misled into thinking that the material is exactly like the bar that is is cored from, but it is invariably softer than the nominal hardness called out for the parent bar. Same chemistry, but different mechanicals. You will see deep grinds (1/4" deep at times) on larger rounds, such as 8" and up, and a portable Brinell tester is chained to the bar or part, and an indention is made under controlled pressure with a known spherical penetrator. The diameter of the impression is measured and a chart guides the hardness comparison.

A bench type Rockwell machine is more suited for the smaller parts hobbyists and small shops are likely to see, and for your size furnace, would be preferred over portable Brinell machine.
 
Back
Top