[How-To] Help Please. How would you repair this Cracked Cast Iron Lathe Apron (Off a Smithy Granite). Braze or Weld?

I have taken the next step of modeling the box and gears, and based on input from you guys, have further developed a repair strategy. I am now working on the fixtures necessary to ensure alignment for the brazing process.

Here is the damaged box - front and rear (click to enlarge):

4 - Damaged Case Front.JPG 5 - Damaged Case Rear.JPG

Here is the modeled box and affected gears. First a rendering of the entire model then a look from the back without the gears. You can (barely) see -- in the image on the right -- the cut-out lines for the replacement part in the upper left hand corner (click to enlarge).

6 - Case Model with Gears.png 9 - Rear View.jpg


And a blow-up of the replacement part that will fit in the cut-out of the upper right hand corner of the box, rear and front. I am thinking the replacement part will be a plate of 1018 with a couple of 1018 blocks MIG welded to it, then milled to shape prior to brazing (click to enlarge).

10 - Smithy Apron Replacement Part.jpg 11 - Smithy Apron Replacement Part.jpg


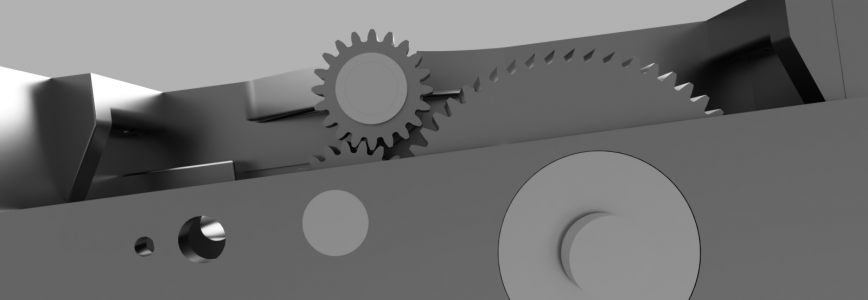
And finally a close-up of the model gear mesh. Looks like the model is pretty accurate.

8 - Smithy Apron Gear Mesh.PNG


Thanks again for all of the input. I would appreciate any additional thoughts!!
 

Attachments

  • 8 - Smithy Apron Gear Mesh.PNG
    8 - Smithy Apron Gear Mesh.PNG
    192.5 KB · Views: 11
Last edited:
In your cut out you have square corners, Square corners are stress risers that can be the start of a new crack. Radius corners are a lot easier to make also since you will likely have a round tool in your mill. on the right hand edge of the cutout, instead of going straight up I would angle it so that you stay way from the hole you are leaving and the cutout includes all of the bracing for the internal boss.

What was your plan for the 2 internal boss areas? Start with a plate and add material to build up the bosses? Start with a thick piece of material and make a LOT of chips? There are pros and cons to each approach.

Are you planning to make this replacement part out of steel or cast iron?
 
What was your plan for the 2 internal boss areas? Start with a plate and add material to build up the bosses? Start with a thick piece of material and make a LOT of chips? There are pros and cons to each approach.

Are you planning to make this replacement part out of steel or cast iron?
Thanks much for your input. I will alter the repair plan accordingly.

My plan is to start with a plate of mild steel -- the same thickness as the casting walls -- then to weld a couple of mild steel blocks to the plate and mill the assembly to final shape. I happen to have all the stock on hand.
 
Start with a plate a little thicker than the finished wall thickness.
Where you add the material for the bosses, do this before any other machining so that you can make very deep chamfers to get very deep penetration and weld the blocks on, you should need to make several passes to build it up to a nice fillet.
This much welding will warp the heck out of everything, that is why you do this first before anything else.
Then you can mill the face flat and do the rough machining to fit the cutout in the casting.
At this point you can braze it in place with the plate flush to the INSIDE of the casting.
Now you can machine the outside flat again and start adding the bores.
Thanks for the advice, Jeff. I really appreciate that.
 
I have made some changes to the design of the case replacement part, based on Jeff's (Flyinfool's) input.


Here is the front of the apron case showing the outline of the replacement part.
Smithy Apron Case Only v13.png

Here are the three milled CRS pieces that make up the part.
Parts and Pieces.jpg

And here is the part (rear view) - ready to be beveled, chamfered and welded together.
Then I'll cut the case to fit the part, braze the two together and line bore the holes
on the mill, starting from the rear wall of the case, through the new part on the front wall.

Ready To Prep for Welding.jpg.
 
Do you have any experience brazing steel to cast iron/ductile iron/semi-steel? I've been welding/brazing for close to ten years now as a hobby, so I'm not a professional, but a serious enthusiast (owned 50+ welders if that says anything). I do most of my cast repairs with TIG, although not usually TIG brazing....I often use Inconel which has a lot of nickel so it acts a lot like high nickel rod when stick welding and often works better than TIG brazing (not always). I actually started welding mostly to fix old bench vises that were either cast iron or some form of semi-steel or ductile iron...so I've done a fair bit of it. I would still really hesitate to try the repair you're describing without first practicing on similar scrap pieces.

In fact, I wouldn't even think about cutting out that section and trying to graft in a replacement without trying it beforehand. You can pretty simply fix what's there now by grinding out the cracks and brazing them then machining everything square, but once you cut it out you might wind up down a rabbit hole with no end.

There have been times I've been fixing mystery cast products and gone through multiple processes and then multiple filler materials until I finally got something to work and that's almost always been when I was trying to graft in a piece of mild steel. Trying to fix the cracks first would actually let you experiment a bit as well....you'll know almost immediately if it's going to work or not. Just a thought...
 
I would still really hesitate to try the repair you're describing without first practicing on similar scrap pieces.
Thanks a lot for your response. Much appreciated!

To answer your question, no I don't have any experience with this brazing approach to repair.

My photos don't show well, but most of the cracks extend through the wall and into the bosses inside the casting. I had first thought about drilling the ends then grinding those cracks, but it seemed like an impossible task, given the difficulty of access. Thus the grafting approach.

As far as testing the feasibility of the repair: Yes I plan to do so. I have this worn out drill press head that's roughly the same size as this casting, so will be using it for a test.

DSC_0056.JPG
 
Back
Top