-
Welcome back Guest! Did you know you can mentor other members here at H-M? If not, please check out our Relaunch of Hobby Machinist Mentoring Program!
You are using an out of date browser. It may not display this or other websites correctly.
You should upgrade or use an alternative browser.
You should upgrade or use an alternative browser.
Hendey Lathe Refurbish
- Thread starter 682bear
- Start date
- Joined
- Nov 28, 2016
- Messages
- 2,332
- Joined
- Nov 28, 2016
- Messages
- 2,332
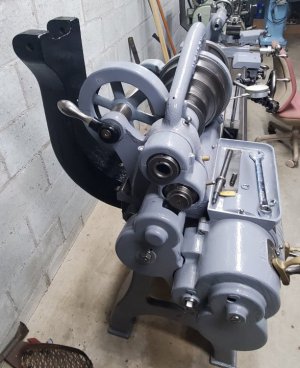
I haven't worked on this lathe in a while... and I don't like not having it running...
I've started working on the Turner Uni-Drive gearbox, I plan to 'rebuild' it with new bearings and seals. Of course, I'll have to disassemble it and clean the gunk out of it also.
So I began the disassembly... and quickly found a problem with the gearbox. One of the shift forks is broken...
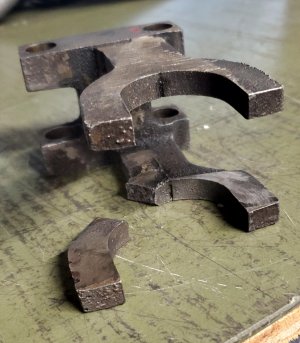
The chances of finding a replacement is zero... I'll have to repair this one. It is cast iron... I'm not confident in my ability to successfully weld it back together. I can braze it, but I'm not convinced brazing would really be strong enough.
I have about .300" clearance between this shift fork and the next one... I'm considering brazing this piece back together, blending the brazing flush, then machining a piece from 1/4" steel and 'plating' the outside of the shift fork to reinforce it. That (I think) would be strong enough... it would just be a lot of work.
Otherwise, the gearbox is in excellent condition inside... I haven't found any damage on the gears or shafts, it's just nasty inside (and outside).
-Bear
I've started working on the Turner Uni-Drive gearbox, I plan to 'rebuild' it with new bearings and seals. Of course, I'll have to disassemble it and clean the gunk out of it also.
So I began the disassembly... and quickly found a problem with the gearbox. One of the shift forks is broken...

The chances of finding a replacement is zero... I'll have to repair this one. It is cast iron... I'm not confident in my ability to successfully weld it back together. I can braze it, but I'm not convinced brazing would really be strong enough.
I have about .300" clearance between this shift fork and the next one... I'm considering brazing this piece back together, blending the brazing flush, then machining a piece from 1/4" steel and 'plating' the outside of the shift fork to reinforce it. That (I think) would be strong enough... it would just be a lot of work.
Otherwise, the gearbox is in excellent condition inside... I haven't found any damage on the gears or shafts, it's just nasty inside (and outside).
-Bear
- Joined
- Jan 26, 2021
- Messages
- 22
If not billet then maybe fabrication from mild steel would be more secure than a repair to cast iron?I see a billet shift fork in your future
- Joined
- Nov 28, 2016
- Messages
- 2,332
I see a billet shift fork in your future
If not billet then maybe fabrication from mild steel would be more secure than a repair to cast iron?
It may come to doing something like that... but I would rather try repairing this first.
So I sandblasted the broken ends to clean them, then ground angles on all the edges. The span between the two forks was 1.250"... I have a piece of aluminum that is a snug fit between the forks, so I wedged it in and clamped the broken end to the aluminum.
I then brazed the outside and both edges, then removed the aluminum block and brazed the inside.
Luckily, my hands were steady enough this morning to do a halfway decent job TIG brazing this...
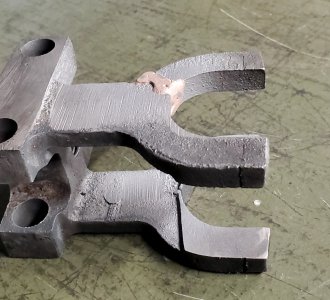
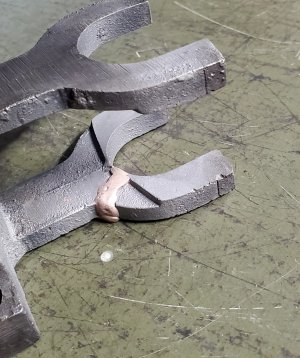
It turned out ok, I think. I'm tempted to just install it like this and see how long it lasts... it may be fine as-is...
-Bear
- Joined
- Jan 26, 2021
- Messages
- 22
Nice work! Could well be strong enough now, esp. since you know now not to be rough on it.
- Joined
- Nov 23, 2014
- Messages
- 2,606
My thought exactly. Some gorilla in a man suit must have really wrenched on it. I wouldn't think that part would take much load in "proper" use. Now that it's back together it wouldn't be too tough to drill a dowel pin hole from the side and pound a pin in (if you were worried about the brazed joint). Doctors do it all of the time on femurs, humorous, metacarpal, etc. I think @Aukai has a pinned-together ankle. He still a regular poster!My guess is that as long as you don't slam the shift levers around it'll be fine like that.
Bruce
- Joined
- Nov 28, 2016
- Messages
- 2,332
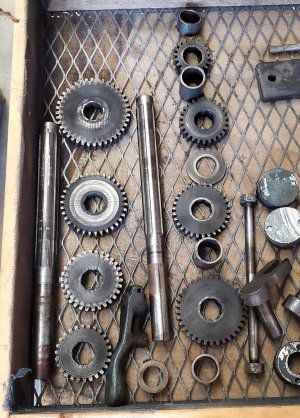
I have finished completely disassembling the gearbox and cleaned everything up...
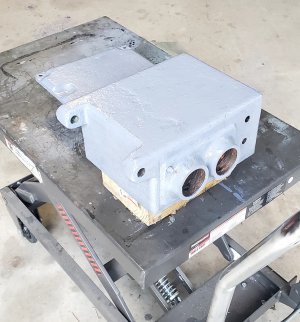
This morning, I put the first coat of paint on the housing...
I have new bearings and seals waiting for the reassembly.
One of the gear shafts has all of the gears seperated by spacers... the spacers keep the gears from sliding on the shaft. The other shaft has the sliding gears on it... it has some wear on it. I'm planning to swap the shafts and put the sliding gears on the unworn shaft... if the two shafts are identical. I think they are, but haven't verified that yet.
-Bear

This morning, I put the first coat of paint on the housing...

I have new bearings and seals waiting for the reassembly.
One of the gear shafts has all of the gears seperated by spacers... the spacers keep the gears from sliding on the shaft. The other shaft has the sliding gears on it... it has some wear on it. I'm planning to swap the shafts and put the sliding gears on the unworn shaft... if the two shafts are identical. I think they are, but haven't verified that yet.
-Bear


