

-
Welcome back Guest! Did you know you can mentor other members here at H-M? If not, please check out our Relaunch of Hobby Machinist Mentoring Program!
You are using an out of date browser. It may not display this or other websites correctly.
You should upgrade or use an alternative browser.
You should upgrade or use an alternative browser.
VN High Speed Sub Head
- Thread starter BROCKWOOD
- Start date
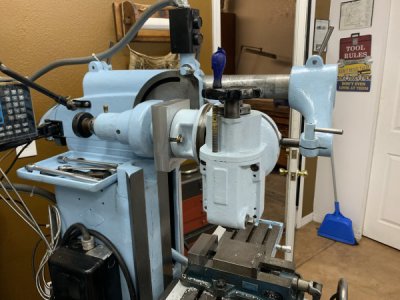
This week has been all about restoring the High Speed Universal Subhead.
Got my tool to remove the adjustment nuts made & had to modify a spanner to fit 5/16" pin holes. The spanner now fits the collet retainer. This was needed to provide resistance while removing the adjustment nuts from both the mount section & the elbow section inputs.

The mount section is simple with only a bevel gear with internally splined shaft.

It is mounted on large roller bearings. Gear mesh is adjusted with babbit coated brass shims.

So, the 1st section was restored quickly. Gear mesh was dialed in & this part was set aside (along with VN 24 sump housings).

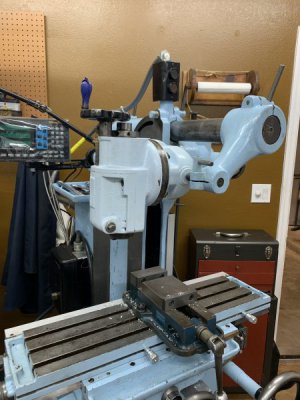
The elbow was really more of the same as it too is really just a couple of bevel gears on a shaft with large roller bearings etc. I didn't like how this nut area in the forefront looked. So, I'm using my head porting skills to smooth it out.

Still onward & upward. Here is the main head getting ready for rebuild.


More to come.
Got my tool to remove the adjustment nuts made & had to modify a spanner to fit 5/16" pin holes. The spanner now fits the collet retainer. This was needed to provide resistance while removing the adjustment nuts from both the mount section & the elbow section inputs.
The mount section is simple with only a bevel gear with internally splined shaft.
It is mounted on large roller bearings. Gear mesh is adjusted with babbit coated brass shims.
So, the 1st section was restored quickly. Gear mesh was dialed in & this part was set aside (along with VN 24 sump housings).
The elbow was really more of the same as it too is really just a couple of bevel gears on a shaft with large roller bearings etc. I didn't like how this nut area in the forefront looked. So, I'm using my head porting skills to smooth it out.
Still onward & upward. Here is the main head getting ready for rebuild.
More to come.
This is the main housing cover, as seen on the left side of the last pic above. I wanted to highlight the casting number, but it is too crude. It reads
V.N.M.T. CO.
12 - 718

This casting, by modern standards did some unexpected shrinking - or else they would've chosen a different way to mark it. As far as machining it to size: It's good! Somehow, this ID was simply part of the mold. By the 50s auto manufacturers (in America) were doing the opposite impression of such ID's. I can't help but wonder if Van Norman slowly slipped behind the times. American Politics had to suck for them as evidenced by all manufacturing of this type having long since been moved overseas with very few exceptions.
It's the same part for all sizes: Up to you to have the correct mount to fit it to your mill.
V.N.M.T. CO.
12 - 718
This casting, by modern standards did some unexpected shrinking - or else they would've chosen a different way to mark it. As far as machining it to size: It's good! Somehow, this ID was simply part of the mold. By the 50s auto manufacturers (in America) were doing the opposite impression of such ID's. I can't help but wonder if Van Norman slowly slipped behind the times. American Politics had to suck for them as evidenced by all manufacturing of this type having long since been moved overseas with very few exceptions.
It's the same part for all sizes: Up to you to have the correct mount to fit it to your mill.
Progress! 2 portions completed, ready & joined together. 360 degree rotation is smooth. Gear mesh is spot on & bearings are good.

The handle came to me Orange. Since all period pics are B&W, I cannot say if this is stock. So, I went with HEMI Orange!

Now it's on to the complicated portion. Looks like the housing will be a good place to start.


The handle came to me Orange. Since all period pics are B&W, I cannot say if this is stock. So, I went with HEMI Orange!
Now it's on to the complicated portion. Looks like the housing will be a good place to start.
Last edited:
Another Garlock Klozure seal on the lower end of the ram. I emailed my local Garlock rep for replacements & no word. The top seal was bad. I replaced it with a seal like the ones used on the crank snout of an engine. This lower seal is intact, so we'll see if it performs as expected soon enough.

Not gonna watch paint dry on the housing.

Cleaning up internals instead. The spindle has a brass looking coating where it rides in the bearings. Any idea of what that is? I'd like to use it again on reassembly.

Another pic of the outer portion of the ram.

There aren't any seals provided for this. No need to polish it then.
Not gonna watch paint dry on the housing.
Cleaning up internals instead. The spindle has a brass looking coating where it rides in the bearings. Any idea of what that is? I'd like to use it again on reassembly.
Another pic of the outer portion of the ram.
There aren't any seals provided for this. No need to polish it then.
Last edited:
The ram drive is installed. Here the preload on the bearings is set using a home made spanner & a center punch. Not sure if the 2 opposing holes serve any other purpose.

Rotary motion is applied to this section of the drive & transfers that motion via the splined inside portion on to the ram section that includes the linear up & down adjustment. In other words this portion only spins.
The ram is going back together here. The collet retainer has been soaking in Metal Rescue. Same as Evaporust chemically speaking. It's not that the retainer was rusty at all. It's just that leaving parts in the soak for a week blackens them!

Taking some pics with only 2 hands limits my ability to accurately express what is happening. The modified, to fit 5/16 holes, spanner is used to set the preload on the spindle while the pry bar keeps the nut stationary. As I thought more about the brass surface that rides inside the bearings on this portion, I wondered if this was similar to a Speedi Sleeve. Since run out is around a thou, I'll tackle that once it becomes an issue.
Now seeing how it all fits together & operates, there shouldn't be any reason to break the whole thing down again. The ram simply adjusts down until it drops out. The limit screw & handle prevents this, unless the limit nuts & handle are removed.
Rotary motion is applied to this section of the drive & transfers that motion via the splined inside portion on to the ram section that includes the linear up & down adjustment. In other words this portion only spins.
The ram is going back together here. The collet retainer has been soaking in Metal Rescue. Same as Evaporust chemically speaking. It's not that the retainer was rusty at all. It's just that leaving parts in the soak for a week blackens them!
Taking some pics with only 2 hands limits my ability to accurately express what is happening. The modified, to fit 5/16 holes, spanner is used to set the preload on the spindle while the pry bar keeps the nut stationary. As I thought more about the brass surface that rides inside the bearings on this portion, I wondered if this was similar to a Speedi Sleeve. Since run out is around a thou, I'll tackle that once it becomes an issue.
Now seeing how it all fits together & operates, there shouldn't be any reason to break the whole thing down again. The ram simply adjusts down until it drops out. The limit screw & handle prevents this, unless the limit nuts & handle are removed.
Last edited:
So, I checked my questionable National oil seal on the shaft & it was good. Now for the housing portion or outside fitment, it was either a version that practically jumped into the bore / recess or this 1. Put it in the freezer for 2 hrs before trying it. Very disappointed as 1 side mushroomed out. So, I grabbed a square punch & played body man to suck the side back in & rammed it home. Wear from this seal will be expanded over a wider area than the typical groove. Better? Time will tell.

Still have a few parts to clean up - but getting there! Oh, in other news, since the Garlock rep has ignored me? I applied for his job!
Still have a few parts to clean up - but getting there! Oh, in other news, since the Garlock rep has ignored me? I applied for his job!

- Joined
- Feb 7, 2016
- Messages
- 172
Can I join the party?
I bought the sub-head off eBay in the spring time for $1250 shipped. Over the past few months I went through a similar process as Brockwood.
Still working on the adapter to work with my VN no10.
I bought the sub-head off eBay in the spring time for $1250 shipped. Over the past few months I went through a similar process as Brockwood.
Still working on the adapter to work with my VN no10.
Attachments
Looking good Manderioli! What size tool holders fit your mill spindle? I'm glad for the type of spline drive I have since it fits a standard size tool holders. I just have to cut the shoulder down on the holder for a good fit.