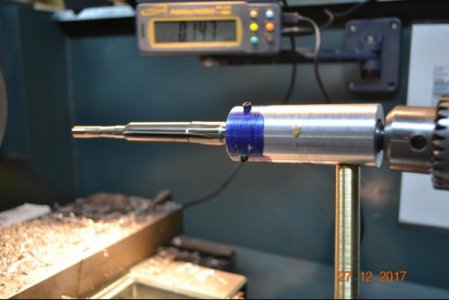
Home made floating reamer holder.

HRgx

Registered
Registered
Joined
Aug 5, 2017
Messages
46
Howdy friends. I'll start by saying that I hope that you've all enjoyed a Merry Christmas with family and friends and that Santa was good to you. Then, I'll follow by wishing all good health, prosperity and happiness in the new year. We've been hit with a major cold spell here in the great white north. Heck, on December 11th, we had no snow here in God's country (southern Alberta), temps in the high teens (celcius that is). Then BANG, a major snow storm, temps down to -20C on average and one morning down to -32C. It's starting to get back up to Tee shirt weather here in Canada (-15C)...LOL. Anyhow, this weather has kept me in the shop. So, perfect opportunity to widdle out a "floating reamer holder". I cannot take credit for the design, I got it from "firearmdesigner.com".DSC_0664.jpg
 
Looking good! Now if I may ask a stupid question, what is it used for? ( newbie in me coming out :cower: )
 
The reamer betrays it as a tool for reaming cartridge chambers in the end of a rifle barrel. The reamer is piloted so it cuts concentric with the bore. The reamer holder only has to push on the reamer without any kind of sideways pressure hence the name floating.
 
After boring the hole you use a reamer to final size. If your tailstock is not within .0002" of your lathe axis the hole can be oversized, barreled, oval and/or scarred. The floating reamer holder is supposed to hold the reamer and can ream a perfect hole from a tailstock barrel offset by up to 0.015" and angularly mis-aligned by up to 5°.
I made one ordering the prints from Hemingway kits. The above info is from their site.
 
Looking good! Now if I may ask a stupid question, what is it used for? ( newbie in me coming out :cower: )

Not a stupid question at all. I hope that the other fellows have clarified it for you. :)
 
I’m not too sure I need one? Have not noticed a miss-alignment problem. I have noticed that changing cutting speeds, type of cutting fluid, condition of reamer and type of material to name a few can affect the finished size of the reamed hole. I’m talking tenths. And what I mike the reamer at does not mean the hole will be that size either. Also, when I start to ream, I position the reamer so that it is touching the front of the hole. Then I turn on the spindle and begin to ream. In this way I minimize the risk of cutter/chatter marks at the front of the hole, good luck…Dave.
 
Ah ha now it makes perfect sense to me! Thanks for the enlightening guys!
 
Back
Top